
How to Ensure Complex Hand-Painted Nail Art Lasts Over Three Weeks?
After over 15 years immersed in the intricate world of beauty fashion, particularly nail art, I've observed a recurring heartbreak among clients and fellow artists: the premature demise of a truly magnificent, hand-painted nail design. It’s an investment of time, skill, and passion, only to see it chip, dull, or lift long before its time. This isn't just frustrating; it undermines the very artistry we cherish.
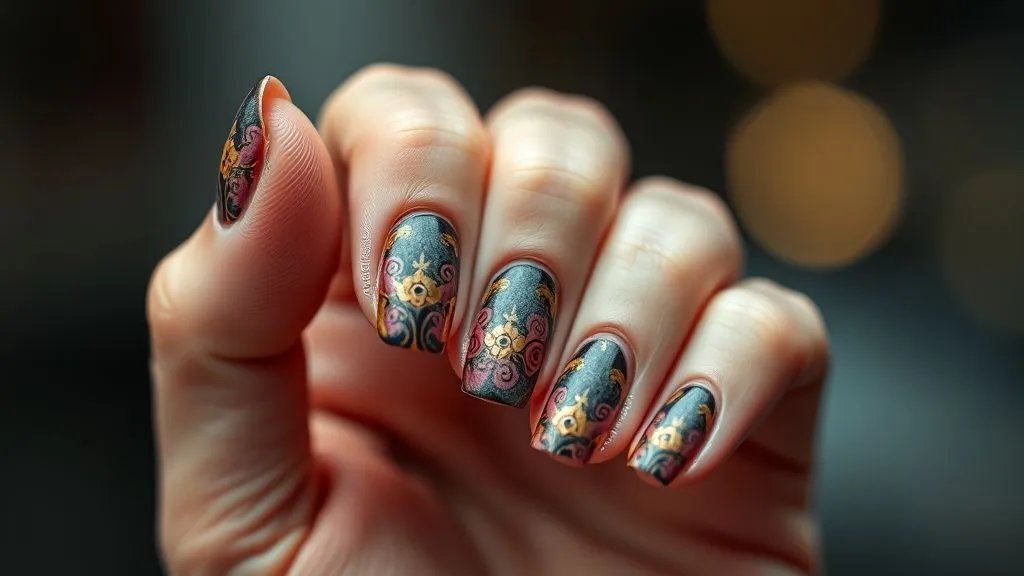
That dazzling, hand-painted design, a true miniature masterpiece, often begins to show wear and tear within days, not weeks. The delicate lines blur, the vibrant colors lose their luster, and the entire effect diminishes, leaving both the artist and the wearer feeling disappointed. This common struggle often stems from a lack of understanding about the synergistic factors that contribute to true nail art longevity.
I'm here to share my accumulated wisdom, the precise techniques, and the often-overlooked secrets that will empower you to create and maintain hand-painted nail art that genuinely lasts over three weeks. This isn't about quick fixes; it's about a holistic approach, from the initial nail prep to daily aftercare, ensuring your intricate designs stand the test of time.
The Foundation: Impeccable Nail Preparation
Think of your nail as a canvas. Would a master artist paint on a dirty, uneven, or unstable surface? Absolutely not. The longevity of any nail art, especially complex hand-painted designs, hinges almost entirely on the quality of your initial nail preparation. This is where countless manicures fail before they even begin.
Nail Health Check: Assessing Your Canvas
Before applying anything, take a moment to assess the natural nail plate. Is it healthy, free from damage, or signs of infection? Strong, healthy nails provide a better foundation for adhesion. If nails are brittle or damaged, a strengthening treatment might be necessary before proceeding with elaborate art.
Proper Cleansing and Dehydration: The Essential First Step
Residual oils, lotions, or even natural moisture on the nail plate are adhesion killers. They create a barrier that prevents your base coat and subsequent layers from bonding effectively. Dehydration is not about drying out the nail; it's about removing surface contaminants.
- Wash Hands Thoroughly: Start with soap and water to remove visible dirt and oils.
- Push Back Cuticles: Gently push back cuticles using a cuticle pusher. Never cut live tissue; only trim hangnails if necessary.
- Gently Buff the Nail Plate: Using a fine-grit buffer (240 grit or higher), lightly buff the entire nail surface. This creates microscopic etches for better adhesion without thinning the nail.
- Cleanse with Isopropyl Alcohol: Saturate a lint-free wipe with 99% isopropyl alcohol or a specialized nail dehydrator. Wipe each nail thoroughly, ensuring no dust or debris remains.
- Avoid Touching Nails: Once cleansed, refrain from touching the nail surface with your fingers as this can transfer oils.

Shaping and Buffing for Optimal Adhesion
The shape of the nail can influence its durability. Square or squoval shapes with slightly rounded corners tend to be more resilient against chipping than sharp, pointed styles. A very light buffing of the nail plate, as mentioned, creates the ideal surface texture for product adherence.
When I say 'buffing,' I'm not advocating for aggressive sanding. It's about creating a 'tooth' – a very fine, slightly textured surface that your base coat can grip onto, much like preparing a wall for paint. This subtle roughening is crucial, especially for gel systems, to prevent lifting.
Mastering the Canvas: Base Coat Selection and Application
The base coat is the unsung hero of a long-lasting manicure. It acts as a protective barrier for your natural nail and, more importantly, provides the adhesive layer for all subsequent products. Skimping on this step or using an incompatible product is a direct route to premature chipping.
Choosing the Right Base Coat: Gel vs. Regular
For hand-painted nail art that needs to last over three weeks, a high-quality gel base coat is almost non-negotiable. Gel base coats offer superior adhesion and flexibility compared to traditional lacquer base coats, creating a more durable foundation for intricate designs. Look for 'rubber base' options, which are known for their flexibility and strength, ideal for slightly weaker or bendy nails.
Flawless Application: Thin, Even, and Capped
The application of your base coat is just as critical as its selection. A common mistake is applying too thick a layer, which can lead to bubbling, uneven curing (for gel), and ultimately, lifting.
- Thin Layer: Apply an extremely thin, even layer of base coat from the cuticle to the free edge. Think of it as 'scrubbing' the product into the nail plate.
- Cap the Free Edge: This is paramount. Drag the brush horizontally across the very tip of the nail, encapsulating the free edge. This seals the layers and prevents water or air from seeping under the product, which is a primary cause of chipping.
- Cure Properly (Gel): If using a gel base coat, cure according to the manufacturer's instructions in a UV/LED lamp. Under-curing leads to weak adhesion; over-curing can make the product brittle.
"A perfectly applied base coat should be almost imperceptible, a mere whisper of product. Its power lies in its uniform thinness and complete coverage, not its bulk." - Industry Veteran Insight
| Base Coat Type | Pros | Cons | Ideal Use |
|---|---|---|---|
| Traditional Lacquer | Easy removal, no UV/LED lamp needed | Lower durability, prone to chipping earlier | Short-term wear, simple designs |
| Standard Gel | Excellent adhesion, high durability | Requires UV/LED lamp, harder to remove | Extended wear, complex art |
| Rubber Base Gel | Superior flexibility, strengthens natural nail, fills ridges, high durability | Requires UV/LED lamp, slightly thicker application | Weak/flexible nails, maximum longevity, intricate <b>hand-painted nail art</b> |
The Artistry: Techniques for Durable Hand-Painted Designs
Now, let's delve into the heart of the matter: the hand-painted art itself. While creativity knows no bounds, certain technical considerations during the design phase can significantly impact how long your masterpiece endures.
Product Compatibility: A Non-Negotiable Rule
When working with gel systems, it's crucial that all your products – base coat, color gels, art gels, and top coat – are chemically compatible. Mixing brands indiscriminately can lead to adhesion issues, cracking, or dulling. Stick to professional-grade products within the same system or brands known for cross-compatibility. For intricate details, specialized art gels or highly pigmented gel polishes are superior to traditional lacquer paints.
Thin Layers are Key: Building Complexity Gradually
This cannot be stressed enough: every single layer, including your hand-painted details, must be as thin as possible. Thick layers, especially in gel, can lead to:
- Uneven curing, leaving parts soft and prone to dents.
- Increased bulk, making the nail feel heavy and more susceptible to impact.
- Lifting and chipping due to internal stress.
Build your design in multiple thin layers, curing each one thoroughly if using gel. This might mean painting one color, curing, then adding another detail, curing again. This meticulous process ensures each element is fully hardened and bonded.
Curing Discipline (for Gel): The Science of Longevity
If your hand-painted nail art involves gel products, proper curing is paramount. Under-curing leaves the gel soft, sticky, and prone to damage, while over-curing can make it brittle and susceptible to cracking. Always follow the manufacturer's recommended cure times and ensure your UV/LED lamp is powerful enough and its bulbs are not expired. A good lamp is an investment in your art's longevity.

Detail Work: Applying Intricate Designs Without Overloading
For fine lines and intricate patterns, use highly pigmented art gels or acrylic paints specifically formulated for nails. Apply them sparingly. If a design requires multiple colors overlapping, ensure each color layer is thin and cured (if gel) before applying the next. This prevents a thick, bulky design that is more likely to chip.
The Shield: Top Coat Application for Extreme Longevity
The top coat is the final protective layer, the shield that guards your intricate hand-painted nail art against the rigors of daily life. Its proper selection and application are arguably the most critical steps in ensuring your manicure lasts over three weeks.
Selecting the Ultimate Top Coat
For maximum durability, a non-wipe gel top coat is generally recommended. These offer superior scratch resistance, high shine, and a hard, protective shell. They are also less prone to dulling over time compared to traditional top coats. If you prefer a matte finish, ensure it's a high-quality gel matte top coat. Avoid using a traditional lacquer top coat over gel art if you're aiming for extreme longevity, as it won't provide the same level of protection or flexibility.
The Double-Layer Strategy: An Expert Technique
For exceptionally complex or textured hand-painted designs, I often employ a double-layer top coat strategy. The first thin layer is applied and cured to encapsulate the art, then a second, slightly thicker (but still even) layer is applied and cured. This creates an extra buffer against impact and wear, significantly boosting the durability of the design.
Capping the Free Edge: Absolutely Essential
Just like with the base coat, capping the free edge with the top coat is non-negotiable. This seals all layers together and creates a protective barrier against water and impact from the most vulnerable part of the nail. Without capping, the free edge becomes a weak point, inviting chips and lifting. It’s like sealing an envelope; without it, the contents are exposed.
- Apply First Top Coat Layer: Ensure it's even and covers all the art.
- Cap the Free Edge: Gently drag the brush across the tip of the nail, ensuring the top coat fully wraps around.
- Cure Thoroughly: Follow manufacturer's instructions for your specific gel top coat.
- Apply Second Top Coat (Optional but Recommended for Complex Art): Repeat steps 1-3 for an extra layer of protection.
According to the Professional Beauty Association, proper sealing and curing techniques are among the most cited factors for professional nail service longevity and client satisfaction.
Curing Precision (for Gel): The Final Hardening
Ensure your gel top coat is fully cured. A tacky layer often indicates under-curing or that it's a 'wipe' top coat requiring a cleanser. Most modern non-wipe top coats should come out of the lamp completely dry and smooth. If it's still tacky, cure for a longer duration or check your lamp's wattage and bulb life.
Post-Application Care: Protecting Your Masterpiece
Once your exquisite hand-painted nail art is complete and perfectly cured, the responsibility shifts to aftercare. Even the most meticulously applied manicure can be ruined by improper post-application habits. Educating clients on these practices is as important as the application itself.
Moisturize, Moisturize, Moisturize: The Cuticle Oil Ritual
Dry nails and cuticles are more prone to chipping and lifting. Regularly applying high-quality cuticle oil is paramount. It keeps the nail plate flexible, preventing brittleness, and nourishes the surrounding skin, which supports overall nail health. Make it a daily ritual, especially before bed.

Avoiding Harsh Chemicals: Gloves Are Your Best Friend
Exposure to harsh cleaning chemicals, strong detergents, or even prolonged immersion in water can weaken the bond of your nail products and degrade the top coat. Always wear gloves when:
- Doing dishes
- Cleaning with household chemicals
- Gardening
- Engaging in activities that involve prolonged water exposure.
This simple habit can extend the life of your manicure by weeks.
Gentle Handling: Nails Are Jewels, Not Tools
Resist the urge to use your nails as tools to open cans, scrape labels, or pry things open. This puts immense stress on the free edge and can cause immediate chipping or lifting. Encourage clients to be mindful of their nails and treat them with the care they deserve.
The "Mini-Refresh" Strategy: A Mid-Manicure Boost
For extremely long-lasting hand-painted nail art, consider a 'mini-refresh' after two weeks. This involves lightly buffing the top surface of the existing top coat (if it's a gel top coat) and applying another thin layer of gel top coat, ensuring to cap the free edge. This revitalizes the shine, adds an extra layer of protection, and can push the wear time well past the three-week mark.
Case Study: How Eleanor's Art Lasted an Extra Two Weeks
Eleanor, a graphic designer with a penchant for elaborate floral nail art, always struggled with her intricate designs chipping within 10 days. She invested heavily in professional services but felt disheartened by the short lifespan. After a detailed consultation where I emphasized the importance of aftercare, she committed to wearing gloves for all household chores, religiously applying cuticle oil twice daily, and implementing the 'mini-refresh' top coat strategy at the two-week mark. Her next set of hand-painted floral nails lasted a remarkable 4 weeks and 3 days, with only minimal tip wear. This demonstrated the profound impact of consistent post-application care on how to ensure complex hand-painted nail art lasts over three weeks.
Lifestyle Adjustments for Extended Wear
Beyond the immediate aftercare, certain lifestyle habits can significantly contribute to the longevity of your hand-painted nail art. It's about integrating nail-friendly practices into your daily routine.
Protective Gear: Beyond Cleaning
While gloves for cleaning are essential, consider them for other activities too. If you're an avid gardener, wear sturdy gardening gloves. If you're engaging in sports or activities that might involve impact to your hands, be mindful. Any direct trauma to the nail can compromise the integrity of the art and lead to chipping or cracking.
Mindful Activities: Avoiding Excessive Nail Stress
Activities that cause repetitive stress or friction on your nails can accelerate wear. This includes things like aggressive keyboard typing (if you're hitting your nails on the keys), constant drumming of fingers, or even certain hobbies. Being aware of how you use your hands can help you modify habits to protect your manicure.
Hydration and Diet: The Internal Foundation
Healthy nails start from within. Adequate hydration and a balanced diet rich in vitamins and minerals (especially biotin, zinc, and iron) contribute to stronger, more flexible nails. Stronger natural nails provide a more stable foundation, reducing the likelihood of breakage or bending that can compromise your art. For more on nail health, refer to resources like the American Academy of Dermatology.
Troubleshooting Common Longevity Issues
Even with the best practices, issues can arise. Knowing how to diagnose and address them is part of becoming an expert in nail art longevity.
Premature Chipping: Diagnosing the Cause
If chipping occurs within the first week, it's almost always due to:
- Inadequate Nail Prep: Oils or debris on the nail plate prevent proper adhesion.
- Insufficient Base Coat: Too thin or uneven, or not capped properly.
- Thick Layers: Especially in the art or color layers, leading to flexibility issues.
- Improper Curing: Gel products not fully hardened.
- Lack of Free Edge Capping: The most common culprit.
Review your process step-by-step to identify the weak link.
Lifting at the Edges: A Sign of Adhesion Failure
Lifting, particularly around the cuticle or sidewalls, points directly to an adhesion problem. This is typically caused by:
- Product on Cuticles: If gel or polish touches the skin, it will lift as the nail grows.
- Poor Dehydration: Residual moisture or oils.
- Incompatible Products: Chemical reactions leading to separation.
- Over-filing the Natural Nail: Making it too thin or weak at the edges.
Always ensure a clean, tiny margin around the cuticle area, never letting product flood the skin.
Dullness or Scratches: Top Coat Quality and Protection
If your art loses its shine or develops scratches prematurely, it's usually a top coat issue:
- Low-Quality Top Coat: Not resistant enough to daily wear.
- Improper Curing: Leading to a soft surface.
- Lack of Protection: Exposure to harsh chemicals or abrasive activities.
- Using Nails as Tools: Direct physical damage.
Consider upgrading your top coat or implementing the double-layer strategy for enhanced protection.
"Mastering longevity in nail art is a journey of continuous refinement. Each chip or lift is a lesson, guiding you towards perfecting your technique and understanding the unique needs of each client." - Expert Reflection
Professional Insights and Advanced Tips
To truly elevate your hand-painted nail art and extend its life beyond conventional expectations, consider these advanced professional insights.
The Power of a Quality Lamp: An Unseen Hero
For gel systems, your UV/LED lamp is not just a tool; it's a critical piece of equipment. Invest in a professional-grade lamp with adequate wattage and consistent light distribution. Cheaper lamps often have 'dead spots' or insufficient power, leading to under-cured products and compromised longevity. Regularly replace UV bulbs as their efficacy diminishes over time, even if they still light up.
Adhesion Promoters: When and How to Use
For clients with particularly oily nail plates or those who struggle with lifting despite meticulous prep, an acid-free primer or 'bonder' can be a game-changer. These products create an even stronger adhesive bond between the natural nail and the base coat. Apply them sparingly and only after thorough dehydration, ensuring no contact with the skin.
Client Consultation: Setting Realistic Expectations
As an expert, it's crucial to have open conversations with your clients. Discuss their lifestyle, occupation, and how they use their hands. This helps you tailor recommendations for aftercare and set realistic expectations for wear time. A construction worker, for example, will likely have different longevity expectations and needs than an office worker.
Continuous Learning: Staying Ahead of the Curve
The beauty industry, especially nail technology, is constantly evolving. New products, techniques, and formulations emerge regularly. Stay updated by attending workshops, following reputable industry educators, and reading scientific articles related to nail chemistry and health. Resources like The Cosmetic, Toiletry, and Fragrance Association (CTFA) or similar regulatory bodies often provide insights into product safety and efficacy.

Frequently Asked Questions (FAQ)
Q: Can I use regular polish over a gel base/top coat for my hand-painted nail art? A: While technically possible, for maximum longevity and to ensure complex hand-painted nail art lasts over three weeks, I strongly advise against it. Regular polish, even with a gel base and top coat, is less durable, more prone to chipping, and can dull the finish of your gel system. Stick to gel polishes or specialized art gels for your designs for optimal results.
Q: What if my natural nails are naturally weak or brittle? Will this method still work? A: Yes, but with extra consideration. For weak or brittle nails, I recommend using a 'rubber base' gel as your base coat. These are designed to add flexibility and strength, acting as a protective layer for your natural nail. Additionally, consistent use of cuticle oil and internal supplements for nail health will be even more crucial. The goal is to strengthen the canvas beneath the art.
Q: How often should I reapply cuticle oil to ensure my nail art lasts? A: For optimal results, I recommend applying cuticle oil at least twice a day – once in the morning and once before bed. However, if your hands are frequently exposed to water or dry conditions, more frequent application (e.g., every time you wash your hands) can be highly beneficial. Consistency is key here.
Q: Is it okay to file my nails after the hand-painted art is done and sealed? A: Generally, no. Filing after the top coat has been applied and cured breaks the seal on the free edge, which is a major cause of chipping and lifting. If minor shaping is absolutely necessary, do it very gently and then immediately re-cap the free edge with another thin layer of top coat, curing thoroughly. It's always best to complete all shaping before the base coat.
Q: What's the single biggest mistake people make that prevents their complex hand-painted nail art from lasting? A: In my experience, the single biggest mistake is neglecting the proper preparation and sealing of the free edge. Whether it's the base coat or the top coat, failing to 'cap' the free edge effectively allows water and air to seep in, compromising the adhesion and leading to premature chipping. This tiny step holds immense power over your manicure's longevity.
Key Takeaways and Final Thoughts
Achieving hand-painted nail art that genuinely lasts over three weeks isn't a stroke of luck; it's the culmination of meticulous technique, informed product choices, and diligent aftercare. It's a holistic process where every step, from the initial nail preparation to your daily habits, plays a vital role.
- Impeccable Prep is Non-Negotiable: Clean, dehydrated, and lightly buffed nails are your foundation.
- Quality Products Matter: Invest in professional-grade gel systems and compatible art products.
- Thin Layers, Thorough Curing: Build your art gradually and ensure every gel layer is fully hardened.
- Master the Top Coat: Double-layering and precise free-edge capping are your ultimate shields.
- Commit to Aftercare: Daily cuticle oil, protective gloves, and gentle handling are your art's best friends.
Embrace these expert strategies, and you'll transform the lifespan of your intricate nail designs. You're not just applying polish; you're crafting wearable art that deserves to be admired for weeks, not days. Trust in the process, refine your technique, and watch your hand-painted masterpieces endure beautifully.
Recommended Reading
- From Freebies to Fees: 7 Steps to Paid Fashion Collabs
- 5 Steps to Ethically Source Sustainable Fabrics for Streetwear Drops
- 7 Proactive Steps: Prevent Unsafe Kids Accessory Product Recalls
- How Do Luxury Streetwear Retailers Verify Authenticity? 7 Expert Methods Revealed
- 7 Crucial Steps: How to Verify Ethical Labor in Slow Fashion Supply Chains


Your email address will not be published. Required fields are marked *