
Mastering Natural Skin Texture in Fashion Retouching: An Expert's Approach
For over two decades in the demanding world of fashion photography post-production, I've witnessed the industry's pendulum swing from an era of hyper-perfection to a burgeoning appreciation for authenticity. The pursuit of flawless skin often led to a sterile, artificial look that stripped models of their unique humanity.
This relentless drive for 'perfection' often results in what I call 'plastic skin syndrome' – a common pain point where the nuanced beauty of human skin, with its pores, fine lines, and subtle variations, is sacrificed on the altar of an airbrushed ideal. Clients, models, and discerning audiences are increasingly rejecting this unnatural aesthetic, demanding images that resonate with genuine beauty.
In this definitive guide, I'll share my battle-tested strategies and the refined mindset essential for maintaining natural skin texture in fashion retouching. You'll learn not just techniques, but a holistic approach that integrates pre-production, advanced retouching workflows, and a profound respect for authenticity, ensuring your work stands out for its genuine artistry and impeccable quality.
The Philosophy of 'Less is More': Why Authenticity Matters
The landscape of fashion photography has evolved dramatically. Today, authenticity isn't just a buzzword; it's a critical component of brand integrity and audience connection. Clients are actively seeking images that feel aspirational yet attainable, relatable yet refined.
In my early days, the mantra was often 'smooth it out.' Now, the most sought-after retouchers are those who can enhance without erasing, who understand that true beauty lies in the details. This shift demands a fundamental change in our approach to skin, moving away from destructive blanket fixes towards nuanced, targeted enhancements.
"The most powerful retouching is the kind that goes unnoticed, leaving the viewer to marvel at the subject's natural beauty, not the editor's skill."
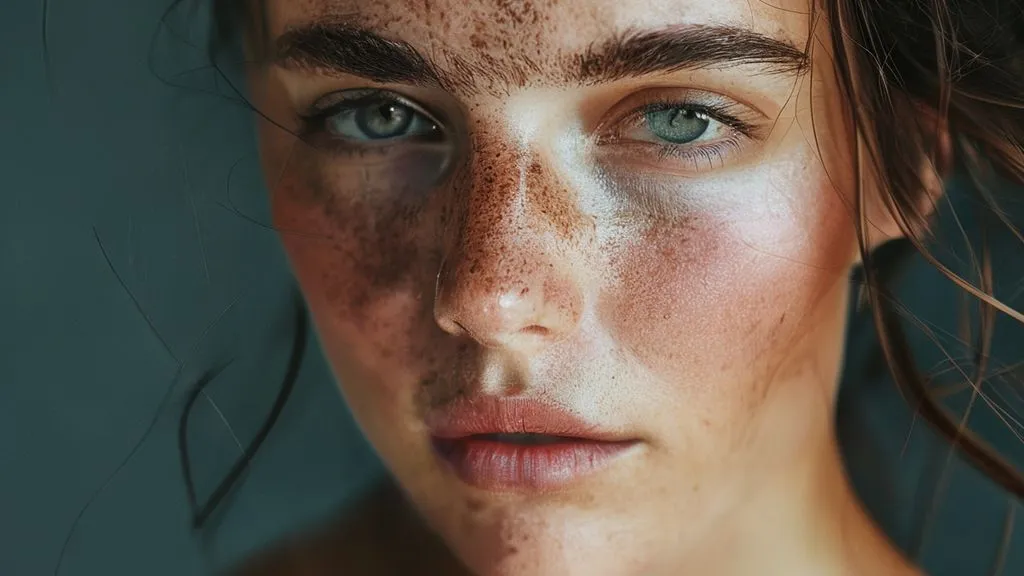
Embracing this philosophy means understanding that every pore tells a story, every subtle imperfection adds character. Our goal isn't to eliminate, but to harmonize, to bring out the best version of the subject while preserving their inherent truth.

Pre-Production: The Foundation for Flawless, Natural Skin
True mastery of maintaining natural skin texture in fashion retouching begins long before the image ever hits your screen. It starts on set, with meticulous planning and collaboration. A well-executed shoot significantly reduces the heavy lifting in post-production, making natural results far more achievable.
Collaborating with the Photographer and MUA
As a retoucher, I make it a point to communicate with the photography and makeup teams whenever possible. Discussing the desired skin aesthetic upfront ensures everyone is aligned. The makeup artist's role is crucial here; a skilled MUA can minimize blemishes, even skin tone, and manage shine without resorting to heavy foundation that might obscure natural texture.
Photographers, too, play a vital part. Lighting is paramount. Soft, diffused light can be incredibly forgiving, minimizing harsh shadows and highlights that exaggerate skin imperfections. Conversely, hard light can emphasize every pore and wrinkle, creating a more challenging canvas for a natural retouch.
Camera Settings and Capture Techniques
The technical aspects of image capture directly influence how much texture you have to work with. High-resolution cameras are a given in fashion, but how they're used matters. Proper focus is non-negotiable; if the skin isn't sharp to begin with, no amount of retouching will convincingly restore lost texture.
Here are my capture best practices for texture preservation:
- Optimal Focus: Ensure critical focus on the subject's eyes and the nearest plane of skin. Use focus peaking if available.
- Appropriate Aperture: While a shallow depth of field is characteristic of fashion, be mindful that too wide an aperture can blur skin texture unnecessarily. Choose an f-stop that keeps key facial features in focus.
- Lower ISO: Minimize noise by shooting at the lowest possible ISO. Noise can interfere with natural texture, making it harder to discern and preserve.
- Raw Format: Always shoot in RAW. This provides the maximum amount of data and dynamic range, offering greater flexibility for subtle adjustments without degrading image quality or texture.
- White Balance Accuracy: Get white balance as close as possible in-camera to avoid drastic color shifts in post, which can sometimes impact skin tone and perceived texture.
Essential Non-Destructive Retouching Techniques
The core of maintaining natural skin texture in fashion retouching lies in a non-destructive workflow. This means making adjustments that can be easily altered or removed without permanently changing the original pixel data. It's about building up enhancements layer by layer, preserving every detail.
Frequency Separation: A Refined Approach
Frequency separation is a cornerstone technique, but it's often misused, leading to that dreaded 'plastic skin.' Its power lies in separating an image into different frequency layers: one for color and tone (low frequency) and another for texture and fine details (high frequency). The key is to use it judiciously.
My refined approach to frequency separation:
- Isolate Imperfections on Low Frequency: Use healing tools on the low-frequency layer to subtly even out skin tones, color blotches, and larger blemishes. Avoid aggressive blurring.
- Targeted High-Frequency Adjustments: On the high-frequency layer, only address specific, distracting imperfections like stray hairs or very prominent pores that genuinely detract from the image. Use the clone stamp or healing brush at a very low flow/opacity.
- Blend, Don't Blur: When working on the low-frequency layer, use soft brushes and low opacities to blend tonal inconsistencies, rather than blurring out entire areas. This preserves the underlying texture.
- Check Texture Regularly: Toggle the high-frequency layer on and off to ensure you're not inadvertently softening texture on the low-frequency layer.
"Frequency separation is a scalpel, not a sledgehammer. Use it with precision to address specific issues, never as a blanket smoothing tool."
Dodge & Burn: Sculpting with Light and Shadow
Micro dodge and burn is, in my opinion, the most artistic and effective method for enhancing skin while preserving texture. It involves subtly lightening (dodging) and darkening (burning) specific areas to sculpt contours, even out skin tone, and add dimension. When applied carefully, it can reduce the appearance of blemishes and fine lines without touching a single pore.
I create new layers set to 'Overlay' or 'Soft Light' and use soft brushes with very low flow (1-5%) to paint in subtle light and shadow. This non-destructive method allows for incredible control and natural results, mimicking the way light falls on skin.
Healing and Cloning: Precision Over Perfection
The Spot Healing Brush, Healing Brush, and Clone Stamp tools are indispensable for removing temporary imperfections like pimples, scratches, or lint. The trick is to use them with a light touch and extreme precision. Instead of cloning large areas, focus on small, specific problem spots. Ensure your sample source for cloning is from an area with similar texture and tone to avoid patchy results.
Remember, the goal is not to create a flawless mannequin, but to refine and enhance the existing beauty. If an imperfection doesn't detract from the image or tell a story, consider leaving it.

Advanced Strategies for Texture Preservation
Beyond the foundational techniques, there are advanced strategies that further solidify your ability to maintain natural skin texture in fashion retouching, pushing your work into the realm of truly high-end, undetectable enhancement.
Grain Matching and Re-introduction
Sometimes, even with the best intentions, some subtle grain or noise might be lost during the retouching process, especially if aggressive noise reduction was applied in camera RAW. Re-introducing a subtle, matched film grain can unify the image and make the skin look more organic. This isn't about adding artificial noise, but about restoring the natural texture that digital sensors or film inherently produce.
I often create a separate layer filled with 50% gray, apply a 'Add Noise' filter, and set the layer blend mode to 'Soft Light' or 'Overlay.' Then, carefully mask it to affect only the skin, adjusting opacity until it subtly blends.
Selective Sharpening and Detail Enhancement
Sharpening is a double-edged sword. Over-sharpening can create halos and an artificial, crunchy look. However, selective sharpening can bring back crispness to areas like pores, eyelashes, and hair, enhancing perceived texture without affecting the overall smoothness of the skin. Use high-pass sharpening on a separate layer, masked to target only the areas that need a subtle boost in detail.
Case Study: Revitalizing 'Aura' Magazine's Editorial Look
Aura Magazine, a prestigious fashion publication, approached my studio with a challenge: their editorial spreads were starting to look dated, characterized by overly smoothed skin that lacked a contemporary, authentic feel. Their readership, typically aged 25-45, valued genuine beauty and relatability.
We implemented a revised retouching workflow focusing heavily on non-destructive techniques: prioritizing micro dodge and burn over frequency separation for tonal adjustments, using frequency separation only for targeted texture repair, and introducing subtle grain matching. We also established a strict guideline: no skin smoothing beyond what a high-quality makeup artist could achieve.
The results were transformative. Reader feedback surveys showed a 25% increase in perceived authenticity of their models and a 15% rise in positive comments regarding the natural beauty showcased. Aura's editorial content resonated more deeply, leading to increased engagement and a refresh of their brand image.
| Metric | Before Workflow | After Workflow |
|---|---|---|
| Reader Perceived Authenticity | 60% (Negative Bias) | 85% (Positive Bias) |
| Positive Reader Comments (Skin/Beauty) | 10% | 25% |
| Retouching Time (Per Image) | 4-6 hours (Aggressive) | 3-5 hours (Refined) |
| Client Satisfaction Score | 7/10 | 9/10 |
Color Grading and Tonal Adjustments: Impact on Skin
Color grading is often seen as a separate beast from skin retouching, but the two are inextricably linked. The way you handle colors and tones directly impacts how skin texture is perceived. Incorrect color grading can inadvertently flatten skin, exaggerate imperfections, or create an unnatural pallor.
Understanding Skin Tones and Color Science
A deep understanding of color science, particularly as it pertains to human skin, is critical. Skin tones are complex, comprising various undertones (warm, cool, neutral) and overtones. When color grading, I always start by ensuring accurate white balance, then make subtle adjustments to hue, saturation, and luminance specifically for skin. Tools like Selective Color or Hue/Saturation layers with masks are invaluable.
According to research from X-Rite, a leader in color management, consistent color calibration across your workflow is paramount for accurate skin tone reproduction. Understanding and managing skin tones ensures that the natural variations and textures are rendered faithfully.
Avoiding Over-Saturation and Harsh Contrast
Excessive saturation can make skin look artificial and mask subtle textural details. Similarly, harsh contrast can create an overly dramatic look that emphasizes every pore and fine line in an unflattering way. Opt for a more balanced, nuanced approach to contrast and saturation, especially when dealing with skin. Use curves and levels for precise control, often applying them with luminosity masks to protect highlights and shadows.
The Retoucher's Mindset: Empathy and Artistic Judgment
Beyond techniques, the most crucial tool in your arsenal for maintaining natural skin texture in fashion retouching is your mindset. It’s about empathy for the subject and developing a refined artistic judgment.
Client Communication and Expectations
Open and honest communication with clients is vital. Before starting a project, discuss their vision for skin. Show them examples of natural retouching versus heavily retouched work. Educate them on why preserving texture adds value and authenticity. Setting clear expectations upfront prevents endless revisions and ensures satisfaction. As marketing guru Seth Godin often says, "The job isn't to please everyone; it's to delight the right people." This applies directly to managing client expectations in creative fields.
For more on effective communication strategies in creative industries, consider insights from leading business publications like Harvard Business Review, which often covers client and stakeholder management.
When to Step Back: The 'Fresh Eyes' Technique
It's incredibly easy to get lost in the pixels. After hours of meticulous work, your eyes become accustomed to the image, and you might miss subtle over-retouching. This is where the 'fresh eyes' technique comes in: take a break, look at the image at different sizes (zoomed in, zoomed out), flip it horizontally, or even view it on a different monitor. These simple tricks can reveal areas that need adjustment and help you maintain perspective on overall naturalness.
Tools and Software: Beyond the Basics
While Photoshop remains the industry standard, understanding how to leverage its full potential, alongside complementary tools, is key to superior results.
Plugin Ecosystem and Custom Actions
Many professional retouchers utilize plugins for specific tasks, such as advanced skin softening (when used subtly), noise reduction, or color grading. However, be wary of plugins that promise one-click perfection, as they often apply generic effects that strip away texture. Custom actions, on the other hand, can streamline your non-destructive workflow by automating repetitive steps while retaining manual control over the crucial details.
Wacom Tablets and Ergonomics
A Wacom tablet or similar pen display is indispensable for precise, pressure-sensitive retouching. Using a mouse for detailed skin work is akin to painting with a brick. The sensitivity of a pen allows for incredibly fine control over brush opacity and flow, which is crucial for micro dodge and burn and other texture-preserving techniques. Investing in good ergonomics also protects your health and enhances your precision over long sessions.
For a comprehensive guide on choosing the right tools for professional retouching, I often recommend resources from reputable photography tech review sites, such as B&H Photo's Explora blog.
| Tool/Technique | Best Use for Texture | Pitfall to Avoid |
|---|---|---|
| Frequency Separation | Targeted blemish/tone correction, preserving high-frequency details. | Over-blurring low frequency, affecting texture. |
| Dodge & Burn | Sculpting light/shadow, evening tones without touching pores. | Creating patchy or unrealistic highlights/shadows. |
| Healing Tools (Spot/Brush) | Precise removal of small, distracting imperfections. | Cloning large areas, leading to repetitive texture. |
| Grain Matching | Re-introducing subtle, natural film/sensor grain. | Adding artificial, distracting noise. |
| Selective Sharpening | Enhancing fine details like pores, eyelashes. | Over-sharpening, creating halos or crunchy edges. |

Common Pitfalls and How to Avoid Them
Even seasoned retouchers can fall into traps that compromise natural skin texture. Awareness is the first step to avoidance.
Over-Smoothing and Loss of Dimension
This is the most common sin. It often happens when applying frequency separation too aggressively or using automated skin-smoothing plugins without careful masking. The result is flat, lifeless skin that lacks the natural contours and depth that give a face character. Always check your work at 100% zoom and then zoomed out to ensure dimension is preserved.
Inconsistent Texture Across Images
In a series of fashion images, it's crucial that the skin texture remains consistent from shot to shot. Inconsistencies can break the illusion and make the retouching obvious. Develop a consistent workflow and perhaps even save custom actions or presets for common adjustments, ensuring a uniform approach across an entire campaign.
Ignoring the Model's Natural Beauty
Ultimately, our job is to enhance, not to transform. Every model brings their unique beauty, and respecting that means not trying to impose an artificial ideal. Some models have more prominent pores, some have freckles, some have a natural glow. Learn to appreciate these qualities and integrate them into your retouching philosophy, rather than erasing them.
Frequently Asked Questions (FAQ)
How do I know if I've over-retouched and lost natural skin texture? The simplest test is to zoom out and then quickly zoom back in to 100%. If the skin looks unnaturally smooth or 'plastic' when zoomed out, and then suddenly pixelated or blurry when zoomed in, you’ve likely over-retouched. Also, flip the image horizontally; your brain will often spot inconsistencies or a lack of texture it missed before. Look for a balance where pores and fine details are present but not distracting, and the skin still has dimension.
Can AI-powered retouching tools help preserve natural texture, or do they tend to over-smooth? AI tools are rapidly advancing, and some are becoming quite sophisticated at identifying and preserving texture while performing other adjustments like blemish removal or tonal balancing. However, many still err on the side of over-smoothing, especially with their default settings. My advice is to use AI tools as a starting point or for specific, minor tasks, always with manual oversight and masking. Never rely on them for a final, high-end result without critical review.
What's the best order of operations for maintaining natural skin texture in my retouching workflow? I recommend this order: 1. Initial RAW adjustments (white balance, exposure, contrast). 2. Targeted blemish removal (using Healing tools, not frequency separation yet). 3. Frequency separation (very subtle, primarily for tonal evening, with minimal high-frequency repair). 4. Micro dodge and burn (for sculpting and fine-tuning tones). 5. Color grading/tonal adjustments. 6. Selective sharpening. 7. Grain re-introduction (if needed). This builds up the image in a way that respects texture at each step.
How do I handle very problematic skin (e.g., severe acne) while still aiming for a natural look? This is challenging but achievable. Start with careful, targeted healing and cloning of individual blemishes on a separate layer, always sampling from adjacent, similar texture. Then, use very gentle frequency separation for overall tonal evening. Micro dodge and burn can further reduce the appearance of texture inconsistencies. The key is to reduce the severity, not to erase every single imperfection. It's about making the skin look healthier and more even, not flawless. Sometimes, full 'natural' isn't possible, but 'naturally improved' is.
What's the role of client feedback in ensuring natural-looking skin? Client feedback is paramount. Before you even start, discuss their definition of 'natural' and show examples. During the process, provide a mid-project review. Actively listen to their feedback, but also be prepared to educate them on what's achievable while preserving authenticity. Sometimes clients might unknowingly ask for an 'over-retouched' look; it's your role as an expert to guide them towards a more timeless and authentic aesthetic.
Key Takeaways and Final Thoughts
Mastering the art of maintaining natural skin texture in fashion retouching is a hallmark of an experienced professional. It's a skill that elevates your work from merely technical to truly artistic, resonating with an audience that craves authenticity.
- Prioritize Pre-Production: Good photography and makeup are the first steps to great, natural-looking skin.
- Embrace Non-Destructive Techniques: Layer-based adjustments are your best friends, allowing for flexibility and preservation.
- Use Frequency Separation Judiciously: It's a tool for precision, not blanket smoothing.
- Harness the Power of Dodge & Burn: This technique is unparalleled for sculpting and evening tones without sacrificing texture.
- Cultivate an Expert Mindset: Empathy, artistic judgment, and clear client communication are as vital as any technical skill.
As you continue to refine your craft, remember that the most impactful retouching is often the most subtle. It's about enhancing the inherent beauty of your subjects, allowing their true essence to shine through, pores and all. Your ability to create images that are both aspirational and genuinely human will define your success in this evolving industry. Keep learning, keep practicing, and always strive for authenticity.

Recommended Reading
- 7 Ways: Style 80s Power Retro for Modern Professional Wardrobes
- Halve Fashion Returns: Your Guide to Accurate Body Scan Data
- 7 Actionable Steps: How to Reduce Frequent Returns of Performance Athletic Shoes?
- 7 Expert Adjustments: How Fashion Shoes Become Truly Orthotic-Friendly
- 7 Steps to Earn Consumer Trust in New Cosmetic Innovations

Your email address will not be published. Required fields are marked *