
How to Eliminate Harsh Shadows on Models' Faces in Midday Sun?
For over 15 years in the cutthroat world of fashion photography, I've seen countless shoots derailed by a seemingly insurmountable foe: the unforgiving midday sun. I vividly recall one early assignment, a high-stakes editorial for a luxury brand, where I naively believed I could 'power through' the noon light. The resulting images were a disaster – blown-out highlights, cavernous shadows under the eyes, and models squinting uncomfortably. It was a harsh, humbling lesson in the raw power of direct sunlight and my own lack of preparedness.
This isn't just my story; it's a common nightmare for photographers at all levels. The problem with midday sun is its direct, overhead angle, creating deep, unflattering shadows beneath brows, noses, and chins. It drains color, flattens dimensionality, and often leaves your subject looking uncomfortable or even angry. For fashion photography, where every detail of a model's expression and the garment is paramount, these harsh shadows are nothing short of a creative catastrophe, undermining the very essence of beauty and elegance you aim to capture.
But here's the good news: you don't have to surrender to the sun's tyranny. Through years of trial, error, and collaboration with some of the industry's best lighting technicians, I've developed a robust toolkit of strategies. This article isn't just about theory; it's a practical, experience-backed guide designed to equip you with the actionable frameworks, real-world case studies, and expert insights needed to not just mitigate, but master, the challenges of midday light. You'll learn precisely how to eliminate harsh shadows on models' faces in midday sun, transforming a photographic pitfall into an opportunity for stunning, high-contrast artistry.
Understanding the Enemy: The Physics of Midday Light
Before we can conquer midday sun, we must understand its nature. Unlike the soft, directional light of golden hour, noon sun is notoriously difficult because of its position and intensity. It's not inherently 'bad' light, but rather 'challenging' light that demands a specific approach.
The Problem with Direct Overhead Light
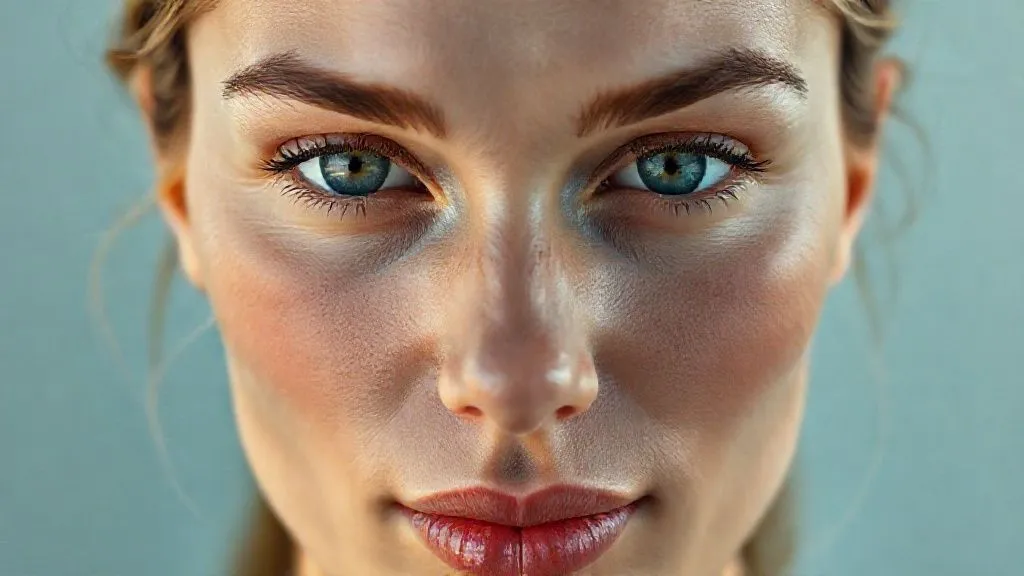
When the sun is directly overhead, typically between 11 AM and 2 PM, it creates an extremely small light source relative to your subject. This results in very hard, defined shadows with sharp edges. Imagine holding a flashlight directly above a sphere – the shadow directly beneath it is tiny and intense. On a model's face, this translates to dark rings under the eyes, pronounced shadows under the nose, and a strong shadow beneath the chin, completely obscuring jawlines and creating an unflattering, almost ghoulish effect.
Color Temperature and Intensity
Midday sun also tends to be cooler in color temperature, often appearing bluer than the warmer tones of morning or late afternoon light. Its intensity is also at its peak, leading to a much higher dynamic range – the difference between the brightest highlights and the deepest shadows. This extreme contrast is what makes exposure so tricky; exposing for the highlights often plunges the shadows into impenetrable black, while exposing for the shadows blows out the highlights, losing all detail in bright areas like skin or white clothing.
"Understanding the direction, quality, and color of light is the foundational language of photography. Without it, you're merely pointing a camera; with it, you're painting with photons." - My mentor, a seasoned editorial photographer.
The First Line of Defense: Seeking Open Shade
My go-to strategy, especially when time and equipment are limited, is always to seek out open shade. This isn't just about hiding from the sun; it's about leveraging ambient light in a controlled environment.
Open shade occurs when your subject is shielded from direct sunlight, but still receives ample ambient light from the open sky or reflected light from surrounding surfaces. Think of it as a giant, natural softbox. The light is diffused by the atmosphere, leading to softer shadows and a more even exposure across the face. The background, however, might still be in direct sun, creating a beautiful separation and often a brighter, more vibrant backdrop.
How to Find and Utilize Open Shade Effectively
- Look for Large Structures: Buildings, overhangs, or even the side of a large truck can provide excellent open shade. Position your model just inside the shadow line, facing outwards towards the open sky.
- Dense Foliage: A thick canopy of trees can offer dappled shade, which can be beautiful, but for truly even light, look for areas where the light is completely blocked from above, but still open to the sides.
- Consider the Background: While your model is in open shade, ensure the background isn't too distracting or blown out by the direct sun. Sometimes, a slightly overexposed background can work as a bright, ethereal backdrop.
- Watch for Color Casts: Be mindful of colored walls or surfaces nearby that might reflect an unwanted color cast onto your model's skin.
I've often found myself scouting locations specifically for open shade pockets, even if the primary location is bright. It's a fundamental technique that can save a shoot. PetaPixel has an excellent breakdown of open shade principles that I often recommend to my students.

Mastering Diffusion: Your Best Friend Against Harshness
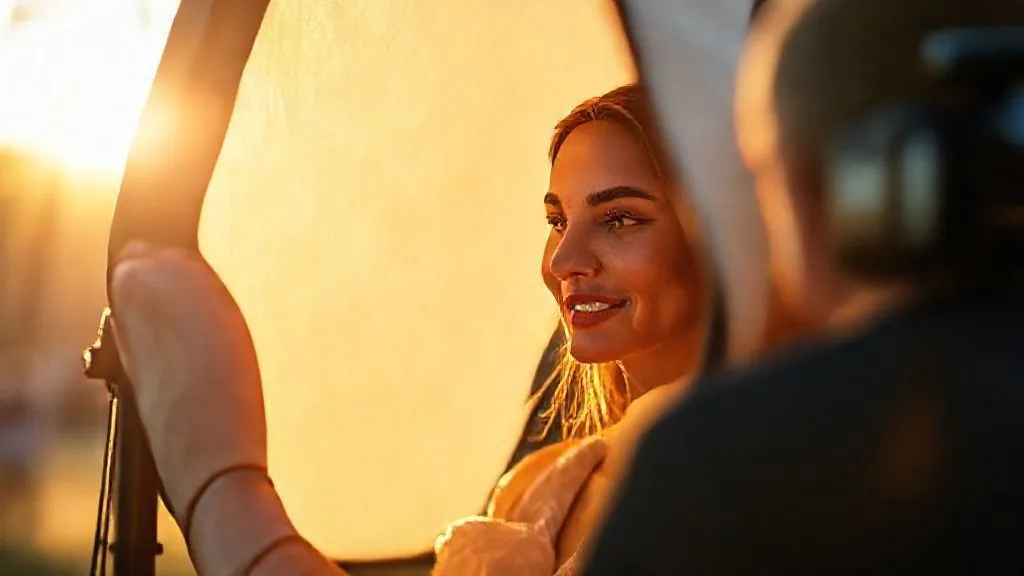
When open shade isn't an option, or you need more control, diffusion is your next powerful weapon. Diffusion panels or scrims are essentially large translucent screens placed between the sun and your subject, scattering the direct light into a much softer, broader source.
Large Diffusion Panels and Scrims
Think of diffusion as creating your own portable cloud. A large diffusion panel (I often use 6x6ft or even 8x8ft scrims for full-body shots) will transform that hard, direct midday sun into a beautiful, flattering soft light. The larger the diffuser relative to your subject, the softer the light will be. This technique effectively mimics the effect of an overcast sky, but with the added benefit of still having the sun's intensity to work with.
Effective Positioning for Optimal Diffusion
- Position Directly Overhead: For midday sun, the ideal placement is often directly above and slightly in front of your model, blocking the primary overhead light source.
- Distance is Key: The closer the diffuser is to your model, the softer and larger the light source will appear. However, ensure it doesn't enter your frame.
- Angle for Coverage: Adjust the angle of the panel to ensure it covers the model's entire face and upper body, eliminating any stray direct sunlight. An assistant is almost always essential for holding these large panels steady.
- Watch for Spill: Ensure no direct sun is 'spilling' around the edges of your diffuser onto the model's face, creating unwanted hot spots.

The Power of Reflectors: Filling Shadows and Adding Sparkle
While diffusion softens the main light, reflectors are crucial for filling in those remaining harsh shadows and adding a beautiful catchlight to the eyes. They don't change the quality of the light, but rather redirect existing light back into the shadowed areas.
Types of Reflectors and Their Uses
Reflectors come in various surfaces, each with a distinct effect:
| Reflector Type | Effect | Best Use |
|---|---|---|
| Silver | Brightest, coolest light, high contrast, adds sparkle | Adding punch, strong fill, creating catchlights |
| Gold | Warmest light, adds a golden glow, good for skin tones | Simulating golden hour, warming up cool light |
| White | Soft, neutral light, subtle fill | Gentle shadow fill, natural look |
| Translucent (Diffuser) | Softens direct light, reduces intensity | As a small scrim, when a large diffuser isn't practical |
| Black (Flag) | Absorbs light, deepens shadows, creates negative fill | Controlling light spill, increasing contrast |
Strategic Placement for Optimal Fill
- Angle is Everything: Position the reflector so it bounces light directly into the shadows on the model's face. Often, this means placing it below the model, angled upwards, or to the side.
- Distance Matters: The closer the reflector, the more intense the fill light. Experiment to find the right balance – you want to fill shadows, not flatten the face.
- Aim for the Eyes: Always check for catchlights in the model's eyes. A well-placed reflector will create beautiful, natural-looking catchlights, bringing life to the portrait.
- Work with an Assistant: Holding a reflector steady and aiming it precisely is a two-person job. A dedicated assistant can make all the difference.
I've seen reflectors transform a flat, high-contrast image into a vibrant, three-dimensional portrait. They are invaluable for adding that professional polish.
Strategic Off-Camera Flash (OCF) for Fill Light
When natural light modification isn't enough, or you desire even more control and creative freedom, off-camera flash (OCF) becomes an indispensable tool. This is where you truly take command of the light, even against the most challenging midday sun.
Balancing Ambient and Flash
The key to using OCF in bright sun is to balance it with the ambient light. You're not trying to overpower the sun, but rather to use the flash as a precise fill light to lift shadows and control contrast. The technique often involves 'dragging the shutter' – setting your camera's shutter speed to expose for the ambient background (often a faster shutter speed to darken the background slightly), and then using your flash to properly expose your subject in the foreground. High-speed sync (HSS) is often necessary here to allow your flash to sync with shutter speeds faster than your camera's native sync speed (e.g., 1/250s).
Using Modifiers with OCF
Just as with natural light, the quality of your flash light is crucial. A bare flash is too harsh. Always use a modifier:
- Softboxes: Create a beautiful, soft, directional light, excellent for portraits.
- Beauty Dishes: Offer a slightly harder, more contrasty light than softboxes, with a distinct highlight fall-off, popular in fashion.
- Umbrellas: Portable and easy to use, they provide a broad, soft light.
Case Study: How Luna Photography Mastered Midday Sun for 'Urban Bloom'
Luna Photography, a boutique fashion studio, was commissioned for an editorial titled 'Urban Bloom' requiring vibrant outdoor shots in downtown Los Angeles. The client insisted on specific locations only available during midday. Facing intense overhead sun, lead photographer Elena chose a multi-pronged approach. She first positioned her model in partial open shade where possible. For direct sun scenarios, she deployed a large 8x8ft scrim overhead to diffuse the main light. Critically, to eliminate any remaining harsh shadows on the model's face and add a pop to the eyes, she used a Profoto B1X off-camera flash, wirelessly triggered, with a 2-foot octabox as a fill light. The flash was set to HSS mode, balancing perfectly with the ambient exposure. This combination allowed her to maintain the vibrant, sun-drenched feel of the city while ensuring the model's skin tones were flawless and shadows were subtly lifted, resulting in a critically acclaimed series that defied the challenges of midday light.
For more on balancing flash with ambient light, I often refer to the excellent resources provided by Adorama Learning Center's guides on flash photography.
 with a softbox modifier on a light stand, positioned to provide fill light for a model standing in bright midday sun, the model's face already showing improved lighting, photorealistic, professional photography, 8K, cinematic lighting, sharp focus on the OCF setup, depth of field, shot on a high-end DSLR.")
Creative Posing and Model Direction
Sometimes, the solution isn't just about gear; it's about intelligent interaction with your model and the environment. Posing and direction can significantly mitigate the effects of harsh midday light.
Utilizing Natural Shadows Creatively
Instead of fighting every shadow, consider how you can integrate them creatively. A model's face can be angled so that a shadow falls flatteringly across one side, creating drama and contour. Or, if there are architectural elements, allow their shadows to fall across the scene in an interesting way, adding depth and composition. The goal isn't always to eliminate shadows entirely, but to control and shape them.
Angle and Facial Expression Guidance
- Chin Down, Head Up: To reduce shadows under the eyes and chin, often a slight chin-down, head-up pose works wonders. This brings the forehead forward, shading the eyes naturally, and extends the neck, reducing chin shadows.
- Turn from the Sun: Have your model turn their back slightly to the sun, or face away from the harshest direct light. This can put their face in a softer, more even light, especially if there's a reflective surface in front of them.
- Avoid Squinting: Direct sun often causes models to squint. Provide sunglasses as props, or position them in partial shade. Constant communication and breaks are crucial for keeping their expressions relaxed and natural.
- Eyes to the Light: Even if the face is in shadow, try to get the eyes facing towards the brightest part of the open sky or a reflector to ensure good catchlights.
"A model's comfort and confidence are directly proportional to the authenticity of their expression. Ensure their physical comfort, and their emotional honesty will shine through." - A key principle I've always lived by.
Post-Processing Techniques: The Final Polish
Even with the best on-location techniques, post-processing is the final, crucial step to perfect your images and ensure those harsh shadows are completely eliminated or subtly softened. It's not a substitute for good lighting, but a powerful enhancement.
Shadow/Highlight Recovery and Global Adjustments
Modern editing software like Adobe Lightroom or Capture One offers powerful tools for recovering detail in both shadows and highlights. I often start with these global adjustments:
- Shadows Slider: Increase this to lift the darkest areas, revealing detail in the face.
- Highlights Slider: Decrease this to recover detail in overexposed areas, like foreheads or shoulders.
- Exposure/Contrast: Make subtle adjustments to overall exposure and contrast to bring the image into a balanced state.
- Whites/Blacks: Fine-tune the pure white and black points to ensure good dynamic range without clipping.
Dodging and Burning for Precision
For more precise control, dodging (lightening) and burning (darkening) are invaluable. These techniques allow you to selectively lighten specific shadowed areas on the face (under the eyes, nose, chin) and subtly darken any overly bright spots, creating a more sculpted and natural look. This is done with local adjustment brushes or layers in Photoshop, allowing for feathered, non-destructive edits.
| Adjustment Type | Purpose | Common Effect |
|---|---|---|
| Shadows Slider | Lift detail in dark areas | Reduces harshness under eyes, nose, chin |
| Highlights Slider | Recover detail in bright areas | Reduces blown-out spots on forehead, shoulders |
| Dodging (Local) | Selectively lighten specific areas | Brightens under-eye circles, softens nose shadows |
| Burning (Local) | Selectively darken specific areas | Adds subtle contour, reduces overbright areas |
| Clarity/Texture | Enhance or soften mid-tone contrast | Refines skin texture, adds subtle pop without harshness |
Remember, post-processing should always enhance, not overhaul. The goal is to refine the excellent work you did on location, not to fix fundamental lighting errors. For advanced techniques, I recommend exploring tutorials from Fstoppers for their comprehensive post-production guides.
Gear Essentials for Midday Mastery
Having the right tools is half the battle. While creativity and technique are paramount, certain pieces of gear make tackling midday sun significantly easier:
- Large Diffusion Panel (Scrim): Essential for softening direct sun. I recommend at least a 6x6ft, but 8x8ft or even 12x12ft for full-body fashion shots are ideal.
- 5-in-1 Reflector Kit: Versatile and portable, offering silver, gold, white, and translucent surfaces, plus a black flag.
- Sturdy Light Stands: For holding diffusion panels and OCF, especially in windy conditions. C-stands are a solid investment.
- Off-Camera Flash (OCF) System: Powerful strobes or speedlights with high-speed sync (HSS) capabilities. Brands like Profoto, Godox, or Elinchrom are excellent.
- Flash Modifiers: Softboxes (octagonal are great for portraits), beauty dishes, or umbrellas to shape your OCF.
- Wireless Flash Trigger: For reliable communication between your camera and OCF.
- Sandbags: Crucial for weighting down light stands and preventing gear from toppling over.
You can find a wide array of professional lighting equipment and accessories at trusted retailers like B&H Photo Video, where I've sourced much of my own kit over the years.
Frequently Asked Questions (FAQ)
Q: Is midday sun ever usable without modification? A: While highly challenging, midday sun can be used creatively without modification if you're aiming for a very specific, high-contrast, dramatic look. This often involves embracing the harsh shadows as a stylistic element, or shooting silhouettes. However, for flattering portraiture and fashion, some form of modification is almost always necessary to avoid unflattering shadows and blown-out highlights.
Q: What's the biggest mistake photographers make in midday sun? A: The most common mistake is directly facing the model into the sun without any diffusion or fill, leading to squinting, harsh shadows, and flat, overexposed skin. Another significant error is not understanding the dynamic range challenge and failing to expose properly for both highlights and shadows.
Q: Can I use natural elements as diffusers? A: Absolutely! While not as controlled as a dedicated scrim, natural elements like thin white curtains, sheer fabric, or even a large, light-colored wall can act as impromptu diffusers or reflectors. Be mindful of color casts and ensure the material is large enough to adequately diffuse the light source for your subject.
Q: How do I balance flash with bright sun if I don't have HSS? A: If your flash or camera doesn't support High-Speed Sync (HSS), you'll be limited to your camera's native flash sync speed (often 1/200th or 1/250th of a second). To balance the exposure, you'll need to reduce the ambient light by stopping down your aperture (which will also affect depth of field) or using an ND filter on your lens. This can make the background darker, allowing your flash to properly expose the foreground subject.
Q: What if I don't have an assistant for reflectors/diffusers? A: This is a common challenge. For smaller reflectors, you can use a light stand with a reflector clamp. For larger diffusers, it's significantly harder. Consider using natural open shade more extensively, or using smaller, more portable diffusion solutions like a shoot-through umbrella attached to your OCF. Alternatively, strategically position your model near a large, light-colored wall to act as a natural reflector.
Key Takeaways and Final Thoughts
Mastering midday sun in fashion photography isn't about avoiding it; it's about understanding its unique characteristics and deploying a strategic blend of techniques to control and sculpt it. It's a skill that elevates your work from amateur to professional, ensuring your models always look their absolute best, regardless of the time of day.
- Embrace Open Shade: Your simplest and most effective natural diffuser.
- Utilize Diffusion Panels: Create your own soft, flattering light source.
- Leverage Reflectors: Fill shadows, add sparkle, and shape light with precision.
- Employ Off-Camera Flash: Gain ultimate control over exposure and contrast.
- Direct Your Model: Posing and communication can solve many lighting woes.
- Refine in Post-Processing: The final touch to perfect your images.
I've seen the transformation in countless photographers who move from dreading midday shoots to confidently creating stunning images under the brightest conditions. It takes practice, patience, and the right toolkit, but the results are profoundly rewarding. Go out, experiment with these techniques, and turn that challenging midday sun into your most dynamic light source. Your portfolio, and your models, will thank you for it.
Recommended Reading
- Mastering Expressive Poses: 7 Techniques for High-End Fashion Models
- Reigniting Allure: 5 Steps When Heritage Luxury Brand Perceived Value Drops
- Menswear Style Tips for Short Men: Look Taller Instantly!
- Stop Sports Eyewear Slipping: 7 Pro Fixes for High-Sweat Events
- 7 Steps to Verify Cruelty-Free Fashion Supply Chains Ethically

Your email address will not be published. Required fields are marked *