
How to Retouch Beauty Skin Naturally, Avoiding the Plastic Look?
For over 15 years in the high-stakes world of fashion and beauty photography, I've witnessed a pervasive and often disheartening trend: the pursuit of 'perfection' at the cost of authenticity. I've seen countless images, destined for glossy magazines and major campaigns, fall flat because the skin retouching was so aggressive it rendered the subject almost alien – smooth, yes, but devoid of the very texture that makes us human.
The problem, as I see it, is a widespread misunderstanding of what 'retouching' truly means in beauty photography. Many photographers and retouchers, often under pressure or simply lacking nuanced technique, resort to heavy-handed smoothing, blurring, and cloning. This inevitably leads to what we colloquially call the 'plastic look' – skin that appears unnaturally uniform, devoid of pores, fine lines, or the subtle variations that give it life and character. It strips away the very essence of natural beauty, leaving behind a sterile, unconvincing facade.
In this comprehensive guide, I will share my expert insights and actionable frameworks to teach you how to retouch beauty skin naturally, avoiding the plastic look. We'll delve into pre-shoot preparation, non-destructive workflows, advanced techniques like gentle frequency separation and nuanced dodge and burn, and crucially, how to preserve and even enhance natural skin texture. My goal is to equip you with the knowledge to create stunning, believable beauty portraits that celebrate genuine skin, not erase it.
Understanding the 'Plastic Look' Phenomenon and Its Impact
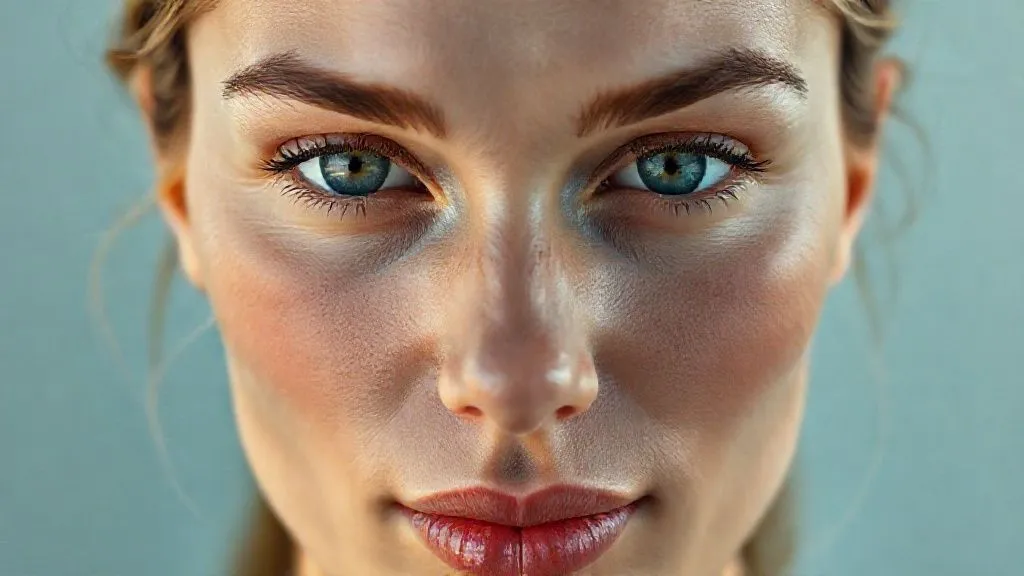
Before we dive into techniques, let's truly understand the 'plastic look' and why it's detrimental. It's not just an aesthetic flaw; it's a fundamental misstep that undermines the trust between viewer and image. When skin is over-retouched, it loses its dimensionality. Shadows and highlights become flat, pores vanish, and the subtle variations in tone and color that characterize healthy skin are obliterated. This creates an uncanny valley effect – something that looks almost human, but is just 'off' enough to be unsettling.
From a commercial perspective, this can be disastrous. Consumers today are savvier than ever; they crave authenticity and relatability. A Deloitte study on consumer trends highlighted a growing demand for transparency and genuine representation from brands. When a beauty image feels artificial, it creates a disconnect, eroding trust and making the product or message feel less credible. As a veteran in this field, I've seen brands pivot their entire visual strategy after realizing their 'perfect' imagery was perceived as fake.
The true art of beauty retouching isn't about making skin 'perfect'; it's about making it the best version of itself, while retaining its inherent human qualities. It's enhancement, not erasure.
The pitfalls extend beyond consumer perception. Over-retouching can also stifle creativity and skill development. If your default is to smooth everything away in post-production, you might neglect crucial aspects of pre-production like lighting and makeup, which are foundational to truly great beauty photography. Mastering how to retouch beauty skin naturally, avoiding the plastic look, starts with understanding its negative implications and committing to a more authentic approach.
The Foundation: Pre-Shoot Preparation and Lighting for Natural Skin
The secret to natural-looking skin in post-production actually begins long before you even open Photoshop. As I always tell my mentees, a great retouched image is built upon a great original capture. This means meticulous attention to pre-shoot preparation and mastering your lighting.
- Skin Care & Makeup: Work closely with your model and makeup artist. Encourage proper skin hydration and care leading up to the shoot. For makeup, opt for lightweight, natural foundations and concealers that even out skin tone without masking texture. Avoid heavy powders that can look cakey or flatten the skin under studio lights.
- Hydration & Rest: A well-rested and hydrated model will naturally have healthier-looking skin, reducing the amount of corrective work needed in post. This isn't just a courtesy; it's a professional strategy.
- Flattering Lighting: This is arguably the most critical element. Soft, diffuse lighting is your best friend for beauty photography. I predominantly use large softboxes, beauty dishes with diffusers, or even natural window light to wrap around the subject's face. This type of lighting minimizes harsh shadows, gently sculpts features, and softens minor imperfections without obliterating texture. Avoid harsh, direct light that accentuates every pore and blemish, forcing you into heavy retouching later.
- Camera Settings: Shoot at the lowest ISO possible to minimize noise, which can complicate skin smoothing. Use a wide enough aperture (e.g., f/5.6 to f/11 for beauty) to ensure critical areas like eyes and nose are sharp, but not so wide that you lose detail across the face.
By investing time and effort in these foundational steps, you'll find yourself starting with a much cleaner canvas, drastically reducing the need for aggressive retouching. This is the first, often overlooked, step in learning how to retouch beauty skin naturally, avoiding the plastic look.

Essential Tools and a Non-Destructive Workflow
In my experience, the choice of tools is less important than *how* you use them, and crucially, adopting a non-destructive workflow. This philosophy is paramount for achieving natural results, as it allows for adjustments and reversions without permanently altering your original image data.
The Pillars of Non-Destructive Retouching:
- Work on Duplicates or Adjustment Layers: Never work directly on your background layer. Duplicate it (Cmd/Ctrl+J) or use adjustment layers for color and tone corrections.
- Smart Objects: Convert layers to Smart Objects when applying filters or transformations. This allows you to re-edit filter settings or scale layers without loss of quality.
- Masks: Use layer masks extensively. They allow you to selectively apply effects or adjustments to specific areas of an image, and you can always refine them later.
- Frequency Separation Layers: While often misused, frequency separation, when applied judiciously, is a powerful technique. It separates an image into two layers: a low-frequency layer (color and tone) and a high-frequency layer (texture and detail).
Frequency Separation: A Double-Edged Sword
Frequency separation is perhaps the most famous, and most often abused, technique in beauty retouching. It’s a fantastic tool for how to retouch beauty skin naturally, avoiding the plastic look, *if* used correctly. The common mistake is to over-blur the low-frequency layer, which instantly creates that plastic, textureless look. Instead, think of it as a tool for subtle evening out of tones, not for erasing texture.
Here's a simplified, non-destructive approach:
- Duplicate your background layer twice. Name the bottom duplicate 'Low Frequency' and the top 'High Frequency'.
- Blur the 'Low Frequency' layer: Apply a Gaussian Blur (Filter > Blur > Gaussian Blur). The key here is to choose a radius *just* enough to smooth out major skin blotches and color variations, but still retain some underlying form. This is where most people go wrong, choosing too high a radius.
- Extract Texture for 'High Frequency': Select the 'High Frequency' layer. Go to Image > Apply Image. For 'Layer', choose 'Low Frequency'. Set 'Blending' to 'Subtract', 'Scale' to 2, and 'Offset' to 128. Change the blending mode of the 'High Frequency' layer to 'Linear Light'. This isolates the texture.
- Work on Separate Layers: Now, create new blank layers above both the low and high-frequency layers, and set them to clipping masks. Use a soft brush on the low-frequency helper layer to gently smooth out color blotches (using a low flow/opacity brush, sampled colors). Use the healing brush or clone stamp on the high-frequency helper layer to remove blemishes and stray hairs, focusing only on texture.
This method ensures you're only targeting specific aspects of the skin without destroying crucial information. Remember, the goal is to enhance, not to erase.
Mastering Subtle Skin Enhancement Techniques
Once your non-destructive frequency separation layers are set up, it's time to refine the skin using techniques that prioritize naturalness. This is where your artistic eye truly comes into play.
Dodge & Burn: Sculpting Light Naturally
Dodge and Burn is, in my professional opinion, the most powerful technique for how to retouch beauty skin naturally, avoiding the plastic look. It allows you to subtly lighten (dodge) and darken (burn) areas of the skin, enhancing natural contours, evening out skin tone, and adding dimensionality without touching a single pore.
- Create Neutral Gray Layers: Create two new layers, fill them with 50% gray (Edit > Fill > 50% Gray), and set their blending mode to Overlay. Name one 'Dodge' and the other 'Burn'.
- Dodge for Highlights: On the 'Dodge' layer, use a soft white brush with very low flow/opacity (1-5%). Gently paint over areas you want to subtly brighten, like the tops of cheekbones, the bridge of the nose, or under the eyes. This brings out natural highlights.
- Burn for Shadows & Contours: On the 'Burn' layer, use a soft black brush, again with very low flow/opacity. Gently paint into areas that need subtle deepening, like the hollows of the cheeks, around the nose, or along the jawline. This adds definition and dimension.
- Focus on Micro Dodge & Burn: Zoom in and use tiny brush strokes to even out blotches of light and shadow on the skin itself, creating a smoother transition of tones without blurring texture. This is key for a natural finish.
Healing and Cloning with Precision
The Spot Healing Brush, Healing Brush, and Clone Stamp tools are essential, but their application requires surgical precision. Resist the urge to use them broadly. Instead, focus on:
- Temporary Imperfections: Address blemishes, pimples, stray hairs, or small redness that wouldn't normally be present.
- Source Carefully: When using the Healing Brush or Clone Stamp, always sample from an adjacent area with similar texture and tone. This prevents patchy, unnatural results.
- Small Strokes: Use small brush sizes and multiple clicks rather than long, sweeping strokes. This gives you more control and maintains texture integrity.

| Technique | Purpose | Tools | Caution |
|---|---|---|---|
| High Frequency (Texture) | Target blemishes, fine lines, pores | Healing Brush, Clone Stamp (on separate layer) | Avoid over-softening, use low flow/opacity |
| Low Frequency (Tone/Color) | Even out skin tones, subtle color correction | Mixer Brush, Gaussian Blur (on separate layer) | Preserve natural light/shadow, minimal blurring |
| Dodge & Burn | Enhance contours, even micro-tones, add dimension | Soft Brush on 50% Gray Overlay layers | Maintain realism, avoid harsh contrasts |
Preserving Texture: The Unsung Hero of Natural Retouching
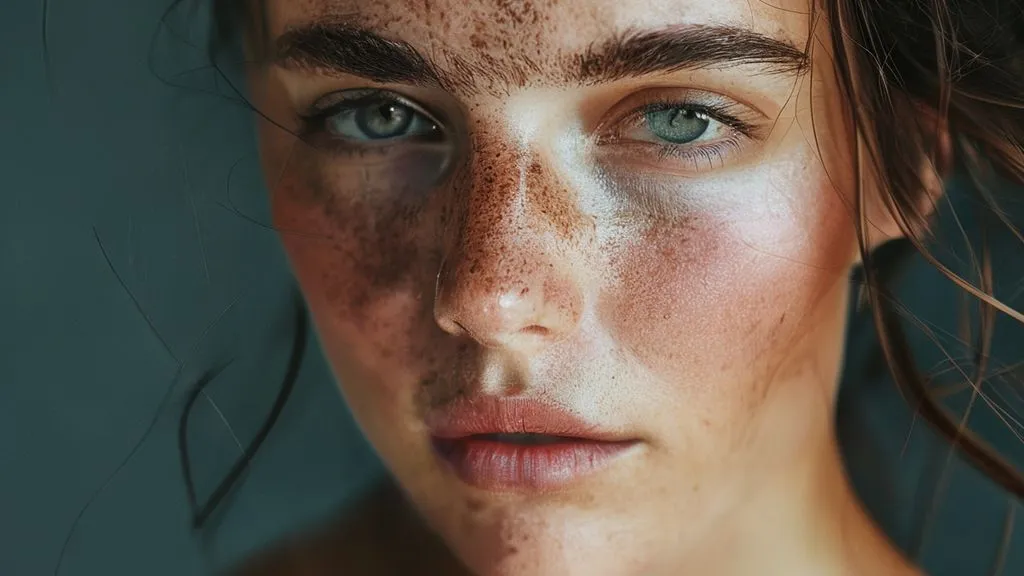
If there's one principle I want you to take away, it's this: texture is life. The biggest giveaway of the 'plastic look' is the absence of natural skin texture – pores, fine hairs, and subtle irregularities. To truly master how to retouch beauty skin naturally, avoiding the plastic look, you must become a guardian of texture.
Case Study: Elevating 'Ethereal Cosmetics' Campaign
Case Study: How 'Ethereal Cosmetics' Rediscovered Authenticity
Ethereal Cosmetics, a new luxury skincare brand, initially launched with a campaign featuring models whose skin was retouched to an almost porcelain-like smoothness. While technically 'flawless,' the feedback was lukewarm; consumers found the imagery unrelatable and almost sterile. Their conversion rates lagged. I was brought in to overhaul their visual strategy. By implementing a strict texture preservation protocol – focusing on subtle micro-dodge and burn, minimal frequency separation, and strategic sharpening to bring out natural pores – we transformed their campaign. The new images, while still aspirational, showcased models with visibly healthy, textured skin. This shift resonated deeply with their target audience, who perceived the brand as more honest and trustworthy. Within three months, their online engagement soared by 40%, and sales conversion improved by 18%, proving that authenticity truly sells.
Techniques for Texture Preservation:
- Minimal Blurring: As discussed with frequency separation, use the absolute minimum Gaussian blur on your low-frequency layer. The goal is to smooth tones, not obliterate texture.
- High-Pass Sharpening (Subtle): After all other retouching, consider a very subtle high-pass filter (Filter > Other > High Pass) on a duplicate layer, set to Overlay or Soft Light, with a very low radius. This can enhance existing micro-texture without creating halos.
- Noise/Grain Addition: In rare cases, if you've inadvertently smoothed too much, adding a touch of subtle photographic grain (Filter > Noise > Add Noise, set to Gaussian, Monochromatic, very low amount) can help restore a natural feel, especially for high-resolution prints.
- Targeted Masking: If you've applied any global smoothing, use masks to paint back texture in critical areas like the nose, forehead, and cheeks, where texture is most prominent.
Think of skin texture as the fingerprint of authenticity. Preserve it, enhance it, but never erase it.
For further reading on the importance of texture in photography, I highly recommend exploring resources that delve into the psychology of visual perception, such as articles from reputable photography education sites or even academic papers on image realism. For instance, PetaPixel often publishes insightful pieces on this very subject.
Color Grading and Tonal Adjustments for Authenticity
Beyond texture, the way you handle color and tone profoundly impacts the perceived naturalness of the skin. An overly saturated, desaturated, or incorrectly white-balanced image can make even perfectly textured skin look artificial. This is a crucial step in learning how to retouch beauty skin naturally, avoiding the plastic look.
- Accurate White Balance: Start with a precise white balance. Even subtle color casts can make skin look unhealthy or unnatural. Use a grey card during the shoot or meticulously adjust in post-production.
- Selective Color Correction: Use adjustment layers like Selective Color or Hue/Saturation to target specific color ranges in the skin. For example, if there's too much redness, you can selectively desaturate or shift the reds and yellows without affecting the overall image.
- Skin Tone Consistency: Ensure that skin tones are consistent across the face and body. Variations can be natural, but extreme differences often need gentle blending.
- Avoid Over-Saturation/Desaturation: Healthy skin has a natural vibrancy. Avoid pushing saturation too high, which can make skin look cartoonish, or too low, which can make it look sickly. Aim for a balanced, realistic palette.
- Grading for Mood, Not Masking: While color grading is essential for setting the mood of an image, ensure it complements the natural skin tones rather than overshadowing or distorting them. Use curves and color balance layers with masks to apply subtle, targeted adjustments.
Remember, the goal is to enhance the natural glow and health of the skin, not to repaint it with an artificial palette. A natural-looking beauty image often has a subtle, harmonious color scheme that lets the subject shine.

The Final Polish: Eyes, Lips, and Hair
While the focus has been on skin, the surrounding elements—eyes, lips, and hair—play a significant role in the overall perception of natural beauty. Neglecting these can undermine all your efforts to make the skin look authentic. This final polish is crucial for a cohesive, natural look.
- Eyes: Subtle enhancements are key. Gently sharpen the iris to bring out detail. Brighten the whites of the eyes *very* slightly, but avoid making them unnaturally stark. Remove any obvious redness in the corners or veins, but don't erase every tiny detail. A touch of dodge on the catchlights can add sparkle.
- Lips: Enhance natural lip color with a curves or hue/saturation adjustment layer, masked to the lips. Gently smooth any chapping or dry areas, but preserve the natural texture and lines of the lips. A subtle dodge on the cupid's bow can add dimension.
- Hair: Address flyaways carefully. Use the healing brush or clone stamp to remove distracting strands, but avoid making the hair look like a helmet. Enhance shine and volume with dodge and burn, following the natural flow of the hair.
Each of these elements should be treated with the same philosophy as the skin: enhance, don't erase. The cumulative effect of these subtle adjustments will contribute to an overall image that feels polished, yet undeniably real.

Developing Your Expert Eye: Practice and Critique
Learning how to retouch beauty skin naturally, avoiding the plastic look, is not a destination; it's a continuous journey of refinement. The techniques I've shared are powerful, but their true mastery comes from developing a keen eye and committing to consistent practice.
- Practice, Practice, Practice: The more you retouch, the more intuitive these techniques will become. Experiment with different brush opacities, blend modes, and radii for frequency separation.
- Self-Critique with Fresh Eyes: Step away from your image for a few hours, or even a day, before reviewing your work. What looks good after an hour of focused work might appear over-retouched with fresh eyes.
- Seek Constructive Feedback: Share your work with trusted peers or mentors. An outside perspective can highlight areas you've overlooked or overdone. Join online communities focused on natural retouching.
- Study Master Retouchers: Analyze the work of industry leaders known for their natural aesthetic. What makes their skin look so good? How do they handle texture and light?
- Understand Anatomy: A basic understanding of facial anatomy and how light interacts with it will significantly improve your dodge and burn skills, leading to more realistic results.
This dedication to continuous learning and critical self-assessment is what truly separates a good retoucher from a master. It allows you to develop that nuanced 'feel' for when enough is enough, and when a subtle touch makes all the difference.
Frequently Asked Questions (FAQ)
Question? Can I use AI-powered retouching tools for natural results, or do they always lead to a 'plastic look'?
Detailed answer: While AI tools are rapidly advancing, they often struggle with the nuanced preservation of individual skin texture. Many AI solutions are trained on datasets that prioritize smoothness, leading to a generic, 'plastic' finish. For truly natural results, manual techniques like frequency separation and dodge & burn, combined with a discerning eye, are still superior. AI can be a starting point for basic cleanup, but always review and refine manually to ensure authenticity and avoid losing unique skin characteristics.
Question? What's the biggest mistake beginners make when trying to retouch skin naturally?
Detailed answer: The biggest mistake is often over-blurring the low-frequency layer during frequency separation or using healing/cloning tools too broadly. This immediately erases natural texture. Another common error is neglecting pre-production (lighting, makeup), which forces heavy-handed retouching in post. Beginners also tend to overdo dodge and burn, creating harsh, unnatural contours instead of subtle enhancements. Less is always more when aiming for a natural look.
Question? How do I handle severe skin conditions (e.g., acne, scars) naturally without making them disappear completely?
Detailed answer: This is a delicate balance. For temporary conditions like acne, target individual blemishes with the healing brush, focusing on reducing redness and inflammation while preserving surrounding texture. For permanent features like scars, the goal is not to erase them, but to soften their appearance and ensure they don't distract from the overall image. Use dodge and burn to subtly even out light and shadow around the scar, and gentle frequency separation to reduce color variation, allowing the texture to remain. Transparency and ethical considerations are paramount here; discuss with your client or model. You can find excellent ethical guidelines from organizations like the American Psychological Association on body image representation.
Question? Is it ethical to retouch beauty photography at all, even naturally? Where do we draw the line?
Detailed answer: This is a crucial ethical discussion in the industry. My stance is that natural retouching, when done to enhance and present the best version of reality (e.g., removing temporary blemishes, evening skin tone, flattering light), is ethical. It's akin to professional makeup or good lighting. The line is crossed when retouching fundamentally alters a person's appearance, creates unrealistic ideals, or removes permanent features without consent. Transparency and intent are key. Always ask: 'Does this enhancement serve to celebrate the individual's natural beauty, or does it strive to create an impossible standard?'
Question? How do I know when to stop retouching? I often feel like I could keep going forever.
Detailed answer: This is a common challenge for many retouchers. The best indicator is when you can no longer discern *what* you've done. If the skin looks naturally healthy, glowing, and textured, but you can't pinpoint specific areas you've worked on, you've likely reached a good stopping point. A useful trick is to toggle your retouching layers on and off frequently, looking for subtle changes. If the 'before' and 'after' are dramatically different, you've probably gone too far. Also, step away from the image and view it at 100% and a zoomed-out view to check for overall balance. Sometimes, simply applying a very subtle Gaussian blur (radius 0.5-1.0) to your entire image at the end can help soften any harshness without losing texture, giving it a more filmic quality. You can also refer to Adobe's official guidelines for best practices in retouching.
Key Takeaways and Final Thoughts
Mastering how to retouch beauty skin naturally, avoiding the plastic look, is an art form that requires patience, a keen eye, and a commitment to authenticity. It's about enhancing, not erasing; celebrating, not fabricating. As an industry specialist, I've seen firsthand the power of genuine imagery to connect with audiences and elevate brands. The techniques we've discussed are your toolkit, but your artistic vision is the blueprint.
- Preparation is Paramount: Great retouching starts with great capture. Invest in lighting and pre-shoot care.
- Embrace Non-Destructive Workflows: Always work on separate layers and use masks to maintain flexibility.
- Frequency Separation with Finesse: Use it minimally to even tones, never to obliterate texture.
- Master Dodge & Burn: This is your most powerful tool for adding dimension and evening micro-tones naturally.
- Preserve Texture at All Costs: Skin texture is the hallmark of authenticity; guard it fiercely.
- Color with Care: Ensure natural skin tones and a harmonious color palette.
- Refine, Don't Rebuild: Apply subtle enhancements to eyes, lips, and hair for a cohesive natural look.
- Practice and Critique Relentlessly: Your eye is your most valuable asset; continually refine it.
Remember, the goal isn't to create an illusion of perfection, but to reveal and amplify the inherent beauty that's already there. By adhering to these principles, you'll not only produce stunning beauty images but also contribute to a more authentic and trustworthy visual landscape in the world of fashion photography. Go forth, create, and let natural beauty shine through your work.
Recommended Reading
- 7 Pro Strategies: Capture Unique Street Style in Crowded Fashion Events
- Unlock the Secret: Tips for Long-Lasting Professional Stage Makeup?
- 7 Steps: Design Kids' Clothes for Extreme Durability & Appeal
- 7 Proven Strategies: Luxury Scarf Dead Stock Reduction Without Devaluation
- 7 Pillars: Build Unshakeable Trust in Body Positive Fashion Campaigns


Your email address will not be published. Required fields are marked *