
How to restore delicate vintage lace wedding dresses safely?
For over fifteen years in the bridal fashion industry, I've witnessed the profound emotional weight a vintage wedding dress carries. It's not just a garment; it's a tangible link to family history, a whispered story from generations past. Yet, I've also seen the heartbreak when these delicate heirlooms, entrusted to well-meaning but inexperienced hands, suffer irreversible damage during attempted restoration.
The challenge of restoring a delicate vintage lace wedding dress is immense. These gowns, often decades or even a century old, are made from fibers that have weakened with time, dyes that have become unstable, and intricate lacework that can disintegrate with the slightest mishandling. The fear of causing further damage, of erasing a cherished legacy, is a very real and understandable concern for anyone considering this undertaking.
That's why I've distilled my extensive experience into this definitive guide. My goal is to equip you with the knowledge, the precise techniques, and the confidence to approach this sacred task safely. We will explore everything from meticulous assessment to gentle cleaning, expert repair, and long-term preservation, ensuring you understand exactly How to restore delicate vintage lace wedding dresses safely? and preserve their beauty for future generations.
Understanding the Unique Challenges of Vintage Lace
The Fragility of Time: What Makes Vintage Lace Vulnerable?
When we talk about vintage lace, we're discussing fabrics that have endured decades of environmental exposure, gravity, and often, improper storage. The fibers—whether silk, cotton, rayon, or early synthetics—undergo a natural degradation process. This means they lose elasticity, tensile strength, and can become brittle or powdery.
Beyond structural weakening, vintage lace often harbors hidden damage. This could be anything from unseen micro-tears, weakened seams, or areas where the fibers have been chemically altered by old stains or previous cleaning attempts. My experience tells me that what looks fine to the naked eye can often be incredibly fragile upon closer inspection.
Expert Insight: "Patience is not just a virtue in vintage restoration; it's your most critical tool. Rushing any step can lead to irreparable damage. Assume every fiber is on the brink of disintegration until proven otherwise."
Identifying Fabric Composition and Age
Before you even think about cleaning or repairing, you must understand the material. Is it a delicate silk tulle, a robust cotton guipure, or perhaps an early synthetic blend? Each fiber type reacts differently to moisture, heat, and chemicals. Silk, for instance, can yellow or become brittle with harsh soaps, while cotton might withstand more robust cleaning but is prone to shrinkage.
The age of the dress also significantly impacts your approach. A gown from the 1920s with delicate bobbin lace will require a far gentler touch than a 1970s polyester lace dress. Researching common fabrics and lacework styles from the dress's era can provide invaluable clues. If you're unsure, professional textile conservators can often perform fiber analysis without damaging the garment.
The Golden Rule: Assessment Before Action
Thorough Visual Inspection: Your First Line of Defense
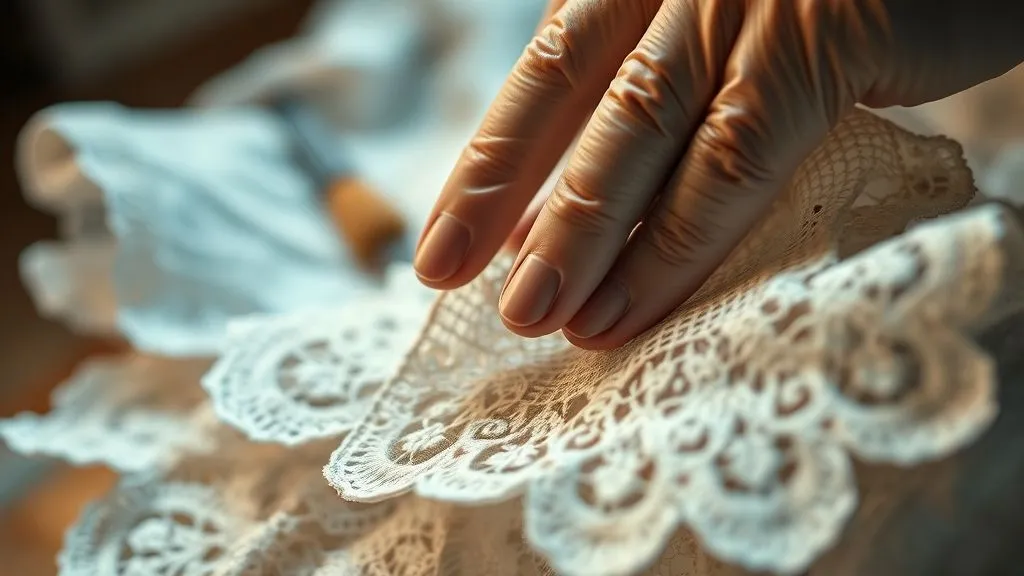
This is where your inner detective comes out. I always begin with a comprehensive, hands-on examination of the entire dress. This isn't a quick glance; it's a methodical process that can take hours. You need to understand the dress's current condition, identify all areas of concern, and document everything meticulously.
- Full Lighting Scan: Examine the dress under various lighting conditions – natural daylight, diffused light, and even a strong backlight. Backlighting can reveal hidden tears, thin spots, or areas of fiber loss that are otherwise invisible.
- Magnification is Key: Use a jeweler's loupe or a strong magnifying glass to inspect the lace patterns up close. Look for broken threads, weakened joins, and areas where the lace may be detaching from its base fabric.
- Document Everything: Take high-resolution photographs of every stain, tear, weakened seam, and embellishment. A detailed visual record serves as a baseline and helps track progress, or identify new issues.
- Gentle Touch Test: Very carefully, and only in a discreet, non-critical area, gently tug or prod the fabric to gauge its strength. If it feels brittle or shows any sign of tearing, proceed with extreme caution.

Patch Testing: Non-Negotiable for Safety
Never, ever apply any cleaning solution or treatment directly to a visible part of the dress without a patch test. This is an absolute non-negotiable step in my restoration process. Dyes can bleed, fibers can react unexpectedly, and you risk creating a larger, more obvious problem.
Find the most inconspicuous area possible – an inside seam allowance, an underarm gusset, or a hidden hem. Apply a tiny amount of your chosen cleaning agent with a cotton swab. Let it sit for the recommended time, then gently blot and observe. Check for color change, fiber degradation, or any adverse reaction. Repeat this for every new cleaning agent you introduce.
Step-by-Step Safe Cleaning Techniques
Pre-Cleaning Preparation: A Gentle Approach
Before any wet or dry cleaning, a crucial pre-cleaning phase is necessary to remove loose dirt and debris. This prevents these particles from becoming embedded or creating new stains during the main cleaning process. Think of it as preparing the canvas.
- Vacuuming: Using a small, handheld vacuum cleaner with a nylon stocking covering the nozzle (to prevent suction damage or accidental ingestion of lace), gently vacuum the entire dress. Hover the nozzle over the lace rather than pressing directly onto it.
- Dusting: For very fragile areas, a soft, natural-bristle brush (like a cosmetic brush) can be used to lightly dust away surface dirt, always brushing in the direction of the fibers.
- Protecting Embellishments: If the dress has delicate beads, pearls, or sequins, consider gently wrapping them in acid-free tissue paper or fine netting, secured with archival thread, to prevent snagging or damage during the main cleaning.
Choosing the Right Cleaning Method: Wet vs. Dry
The decision between wet and dry cleaning is perhaps the most critical one. It hinges entirely on the fabric, the type of stains, and the overall fragility of the dress. My rule of thumb: if in doubt, opt for the least invasive method or consult a professional.
| Method | Pros | Cons | Best For |
|---|---|---|---|
| Wet Cleaning (Hand Wash) | Effective for many stains, refreshing, can remove acidity | High risk for fragile fibers, color bleed, shrinkage | Sturdy cottons/linens, specific water-soluble stains, less fragile synthetics |
| Dry Cleaning (Professional) | Less water risk, handles complex fabrics, good for oil-based stains | Chemicals can damage old fibers, can set some stains, expensive | Silks, rayons, very delicate lace, unstable dyes, embellishments |
The Art of Hand Washing Delicate Lace (If Applicable)
For dresses that can withstand wet cleaning, hand washing is a meticulous process that requires extreme care. I always stress that this is not a 'wash and rinse' situation; it's a lengthy, gentle soak and persuasion.
- Prepare Your Bath: Fill a clean, non-reactive basin or bathtub with lukewarm (never hot!) distilled water. Add a tiny amount of pH-neutral, unperfumed detergent specifically designed for delicate fabrics (e.g., Orvus Paste or a specialized textile soap). Ensure it's thoroughly dissolved.
- Support the Dress: Lay a clean, white sheet or fine mesh laundry bag in the basin. Gently lower the dress onto this support. The sheet will allow you to lift and move the dress without directly handling the fragile lace, distributing the weight evenly.
- Gentle Soaking: Allow the dress to soak for an extended period, perhaps several hours or even overnight, depending on the level of soiling. Avoid any scrubbing or vigorous agitation. The water will slowly draw out dirt and acidity.
- Rinsing Protocol: Drain the dirty water. Refill the basin with fresh, lukewarm distilled water. Repeat the soaking process multiple times until the water remains completely clear, indicating all detergent residue has been removed. Each rinse should be as long and gentle as the wash.
- Pressing, Not Wringing: Never wring or twist the lace. Instead, gently press the excess water out by sandwiching the dress between clean, absorbent white towels.
Expert Insight: "Think of the water as a gentle current, not a washing machine. The goal is to coax dirt out, not to force it. This process demands immense patience and a light hand."
Addressing Stubborn Stains: Targeted Treatment
Stains on vintage lace require highly targeted, delicate treatment. General stain removers are often too harsh. My approach focuses on specific types of stains:
- Oxidation (Yellowing): For overall yellowing, the extended, gentle soaks described above can often help. For more stubborn yellowing, some conservators use very dilute solutions of hydrogen peroxide or oxygen-based brighteners, but this *must* be patch-tested extensively and used with extreme caution.
- Mold/Mildew: These require immediate attention. A very dilute solution of hydrogen peroxide or a specialized anti-microbial textile cleaner (again, patch-tested) can be applied. Ensure good ventilation. For severe cases, professional intervention is essential due to health risks and potential fabric damage.
- Oil-Based Stains: These are challenging. Dry cleaning solvents are often best, but for DIY, a tiny amount of talcum powder or cornstarch can be applied to absorb the oil, left for hours, then gently brushed off. Repeat as needed.
For more detailed insights into textile stain removal, I often refer to resources from institutions dedicated to preservation, such as the Metropolitan Museum of Art's Textile Conservation department, which offers invaluable guidance on handling historical fabrics.
Delicate Repair and Reinforcement Strategies
Mending Tears and Holes: Invisible Techniques
Repairing vintage lace is an art form. The goal is always to make the repair as invisible as possible while maintaining the structural integrity of the fabric. I've found that simple sewing techniques often fall short; true restoration requires more specialized methods.
- Netting/Tulle Backing: For small holes or tears, a piece of sheer, fine netting or tulle, dyed to match the dress, can be placed behind the damaged area. It's then meticulously stitched in place using tiny, almost invisible stitches that follow the existing lace pattern.
- Re-weaving/Darning: For more extensive damage, threads can be carefully re-woven into the existing lace structure. This is highly specialized and often best left to expert conservators.
- Appliqué from Spare Lace: If you have a matching piece of lace (perhaps from an unseen hem or an alteration remnant), it can be carefully cut and appliquéd over a damaged area, blending seamlessly into the original pattern.
Expert Insight: "When repairing lace, always use the finest needle and thread possible – ideally silk or fine cotton, matched perfectly in color. The goal is to support, not to overshadow, the original artistry."
Securing Loose Embellishments and Beading
Vintage dresses often feature intricate beading, pearls, or sequins that have become loose or detached over time. Reattaching these requires a steady hand and the right materials.
- Matching Thread: Always use a strong, fine thread that matches the original thread color and material (e.g., silk thread for silk beads).
- Specific Stitches: For beads, use a small backstitch or a bead-specific stitch that secures each bead individually, rather than stringing them all together. This prevents a cascade effect if one thread breaks.
- Reinforcement: If an area of lace is weak where embellishments are attached, consider adding a tiny, discreet patch of matching sheer fabric underneath for reinforcement before reattaching the beads.
Case Study: Eleanor's Grandmother's Gown
Case Study: How Eleanor Restored a Century-Old Silk Lace Gown
Eleanor approached me with her grandmother's 1920s silk lace wedding gown, a true family heirloom. It was a beautiful piece, but it suffered from extensive yellowing, several small tears in the delicate Chantilly lace, and a few missing seed pearls. The silk had become incredibly brittle, making any restoration attempt daunting.
Following my 'assessment before action' principle, we spent hours documenting every flaw. Patch tests confirmed the silk's extreme fragility and a slight dye instability. We opted for a multi-day, gentle hand-washing process using only distilled water and a minute amount of Orvus Paste, with the dress fully supported on a mesh screen. This slow process significantly reduced the overall yellowing without stressing the fibers.
For the tears, I advised Eleanor to use a very fine, sheer silk organza, dyed to match the gown's now-creamy hue, as a backing. With my guidance, she painstakingly stitched the organza behind the tears using a single strand of archival silk thread and a tiny curved needle, meticulously following the original lace pattern to make the repairs nearly invisible. The missing pearls were replaced with new, period-appropriate glass seed pearls, individually stitched on. The result was breathtaking: a gown that retained its century-old charm but was structurally sound and visually radiant, ready for her own wedding day. This success story underscores the power of patience, precision, and the right techniques when you restore delicate vintage lace wedding dresses safely.

Drying, Pressing, and Long-Term Preservation
The Critical Drying Process: Shape and Support
Drying is just as crucial as washing. Improper drying can cause shrinkage, distortion, or new damage. My cardinal rule: never hang a wet vintage dress. The weight of the water will stretch and distort the delicate fibers, especially the lace.
Expert Insight: "Gravity is the enemy of wet vintage lace. Always dry flat, distributing the weight evenly to maintain the dress's original silhouette and prevent stretching."
Lay the dress flat on a clean, dry, absorbent surface, such as several layers of clean white towels or a padded drying rack covered with a sheet. Gently smooth out any wrinkles, ensuring the lace patterns lie flat. Air dry in a clean, dust-free room with good air circulation. Avoid direct sunlight or heat sources, which can cause yellowing or damage fibers. Turn the dress periodically to ensure even drying.
Gentle Pressing for a Pristine Finish
Once completely dry, the dress may need a light pressing to remove lingering wrinkles and restore its smooth finish. Again, this must be done with extreme care.
- Low Heat Setting: Always use the lowest heat setting on your iron, or a 'silk' setting.
- Pressing Cloth: Place a clean, white pressing cloth (e.g., a thin cotton sheet) between the iron and the lace. Never let the iron touch the lace directly.
- Gentle Steam: A very light mist of steam, held a few inches above the fabric, can also help relax wrinkles without direct contact.
- Avoid Ironing Directly: For highly textured or raised lace, avoid direct ironing altogether. A garment steamer, held at a safe distance, is a better option.
Archival Storage: Protecting Your Heirloom for Generations
After all that meticulous work, proper storage is paramount to ensure your restored dress remains pristine. This is not just about keeping it clean; it's about creating an archival environment that minimizes degradation over time.
- Acid-Free Materials: Store the dress in an acid-free, lignin-free archival wedding dress box. These boxes are designed to protect textiles from environmental pollutants and acidity, which can cause yellowing and fiber deterioration.
- Acid-Free Tissue: Pad the dress with acid-free tissue paper, stuffing it into sleeves, bodices, and folds to prevent permanent creases and support the garment's shape.
- Climate Control: Store the box in a cool, dark, dry, and stable environment. Avoid attics, basements, or garages where temperature and humidity fluctuate wildly. A climate-controlled closet inside your home is ideal.
- Periodic Inspection: Inspect the dress every few years. Gently refold it to prevent permanent creasing along old fold lines, and check for any signs of pest activity or new stains.
For further reading on long-term preservation, I recommend consulting guides from reputable institutions like the Smithsonian Museum's conservation articles, which provide excellent insights into protecting historical garments.
When to Call in the Professionals: Knowing Your Limits
Recognizing Beyond DIY: Complex Damage and Rare Fabrics
While I've provided a comprehensive guide on how to restore delicate vintage lace wedding dresses safely, there are undoubtedly situations where professional intervention isn't just recommended, but absolutely necessary. Knowing your limits is a sign of true respect for the heirloom.
If the dress has extensive, complex damage—large areas of disintegrated lace, severe mold infestations, or stains from unknown origins—a DIY approach can quickly turn disastrous. Similarly, if the fabric is exceptionally rare, historically significant, or if you're simply not confident in your skills, seeking a professional is the wisest course of action.
| Damage Type | DIY Feasibility | Professional Recommended? |
|---|---|---|
| Minor Yellowing/Dust | High (with caution) | No, if confident |
| Significant Stains (mold, rust, blood) | Low to Moderate | Strongly advised, high risk |
| Large Tears/Missing Lace (extensive) | Very Low | Absolutely essential |
| Unknown Fabric/Extreme Fragility | None | Immediately for assessment |
Finding a Reputable Vintage Textile Conservator
When you decide to go professional, choosing the right conservator is paramount. Not all dry cleaners are equipped to handle delicate vintage textiles. Look for specialists with specific experience in antique garment restoration and textile conservation.
- Specialized Expertise: Seek out conservators who specialize in historical textiles, not just general dry cleaning. They should understand fiber chemistry, historical construction, and ethical conservation practices.
- Portfolio and References: Ask for a portfolio of their previous work and references from satisfied clients. A reputable conservator will be transparent about their processes.
- Detailed Assessment and Quote: They should provide a thorough assessment of the dress's condition, a detailed plan for restoration, and a clear, itemized quote before any work begins.
- Archival Materials: Ensure they use archival-safe cleaning agents, threads, and storage materials.
Professional organizations like the American Institute for Conservation of Historic and Artistic Works (AIC) often provide directories of qualified conservators, which is an excellent starting point for your search.

Frequently Asked Questions (FAQ)
Q: Can I use commercial stain removers on vintage lace? A: No, absolutely not. Commercial stain removers are formulated for modern fabrics and can contain harsh chemicals, bleaches, or enzymes that will severely damage or discolor delicate vintage fibers, especially silk and rayon. Always opt for pH-neutral, specialized textile soaps or targeted, gentle solutions after extensive patch testing.
Q: How do I remove yellowing from an old lace dress? A: General yellowing, often caused by oxidation and acidity, can sometimes be reduced through a series of long, gentle soaks in lukewarm distilled water with a tiny amount of pH-neutral textile soap. For more stubborn yellowing, some conservators use very dilute oxygen-based brighteners, but this is a high-risk process requiring expert knowledge and extensive patch testing. Never use chlorine bleach.
Q: Is it ever safe to machine wash a vintage lace dress? A: In almost all cases, no. Machine washing, even on a delicate cycle, subjects the fabric to too much agitation, twisting, and stress. This can cause irreparable tears, stretching, and distortion of delicate lace and weakened seams. Hand washing, with the dress fully supported, is the only recommended wet-cleaning method for vintage lace.
Q: What's the best way to store a restored vintage wedding dress? A: The best method is to store it flat in an acid-free, lignin-free archival wedding dress box, padded generously with acid-free tissue paper to prevent creasing and support the shape. Store the box in a cool, dark, dry, and stable environment, away from direct light, heat, and humidity fluctuations. Avoid plastic bags or regular cardboard boxes, which can trap moisture or emit damaging acids.
Q: How much does professional restoration typically cost? A: The cost of professional vintage wedding dress restoration varies widely based on the dress's condition, fabric type, extent of damage, and the conservator's expertise and location. Minor cleaning might be a few hundred dollars, while extensive repairs, stain removal, and re-weaving can range from several hundred to several thousand dollars. Always get a detailed quote after a thorough assessment.
Key Takeaways and Final Thoughts
Restoring a delicate vintage lace wedding dress is a journey of patience, precision, and profound respect for history. It's a task that, when done correctly, can breathe new life into a cherished heirloom, allowing its story to continue for generations. Always remember these core principles:
- Assess Meticulously: Never skip the detailed inspection and patch testing. Understanding the dress's condition is your first and most critical step.
- Prioritize Gentleness: Every action, from dusting to washing to pressing, must be executed with the lightest possible touch.
- Use Archival Materials: From cleaning agents to storage boxes, ensure everything is pH-neutral and acid-free to prevent future damage.
- Know Your Limits: Don't hesitate to seek professional help for complex issues. A skilled conservator can save a dress that's beyond DIY repair.
- Document Everything: Keep a detailed record of the dress's condition before, during, and after restoration.
The beauty of a vintage wedding dress lies not just in its intricate lace and timeless silhouette, but in the memories it holds and the love it represents. By following these expert-backed strategies, you're not just cleaning a garment; you're preserving a legacy. Approach this task with the care and reverence it deserves, and you'll be rewarded with a truly priceless heirloom, ready to tell its story anew.
Recommended Reading
- Mastering Shoe Release Demand: 5 Steps for Retailers to Forecast Accurately
- 7 Smart Strategies: Stop Overstocking Fleeting Jewelry Trends in Your Boutique
- Lab-Grown Diamonds Soaring? 7 Strategies for Natural Stone Sales
- Clean Beauty's Credibility: 7 Proven Ways to Banish Greenwashing Skepticism
- Unlocking Transparency: The Ultimate Guide to Tracking Ethical Sourcing in Fashion


Your email address will not be published. Required fields are marked *