
How to fix flat lighting ruining 'cinematic noir' fashion aesthetic shots?
For over 15 years in the dynamic world of fashion photography, I've witnessed firsthand the profound impact of light on an image. Often, aspiring photographers, and even some seasoned pros, stumble when trying to evoke a specific mood, particularly the rich, enigmatic allure of cinematic noir. The most common culprit? Flat lighting.
Flat lighting is the nemesis of drama, dimension, and mystery. It strips your subjects of character, flattens textures, and extinguishes the very soul of the cinematic noir aesthetic. It leaves your shots feeling uninspired, failing to communicate the powerful narratives that noir demands.
But fear not. In this definitive guide, I will share the expert frameworks, actionable techniques, and invaluable insights I've honed over years. You'll learn not just to avoid flat lighting, but to master the art of sculpting light and shadow, transforming your 'cinematic noir' fashion shots into captivating masterpieces.
Understanding the Essence of Cinematic Noir in Fashion Photography
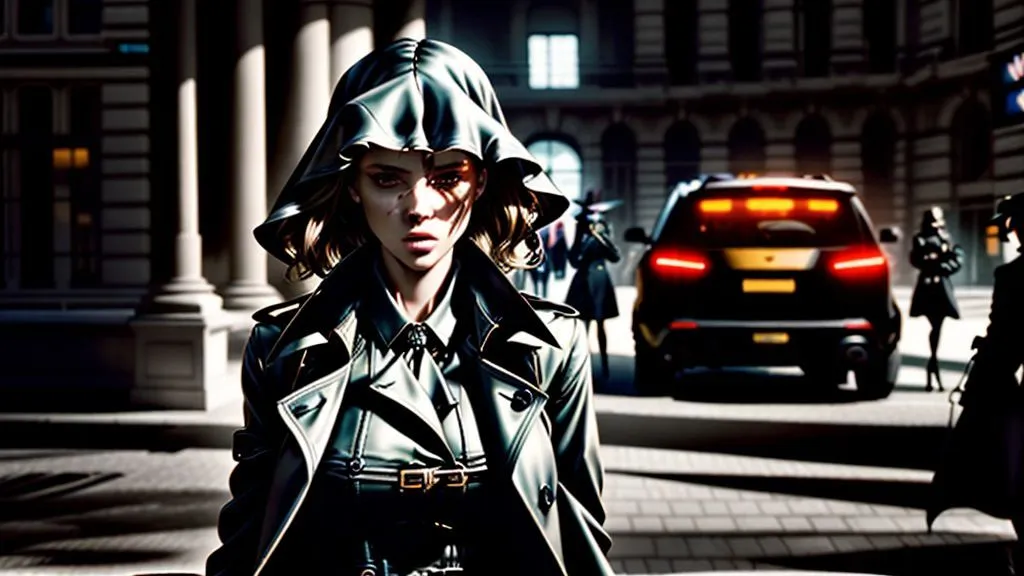
Before we can fix flat lighting, we must first deeply understand what cinematic noir truly is. It's more than just a lighting style; it's an aesthetic born from a post-war era of moral ambiguity, psychological tension, and stark realism, often characterized by crime dramas and femme fatales.
In fashion photography, this translates to images that are moody, dramatic, high-contrast, and often monochromatic or desaturated. The goal is to evoke a sense of mystery, intrigue, and sophisticated danger. Every shadow is intentional, every highlight a revelation.
The Pervasive Problem of Flat Lighting
Flat lighting, by definition, is light that is even and lacks direction. It wraps around your subject without creating distinct shadows or highlights, effectively erasing contours and depth. Imagine a cloudy day or a camera-mounted flash pointed directly at your subject – that's flat light in action.
For cinematic noir, this is catastrophic. Noir thrives on contrast, on the interplay between light and profound shadow. Flat lighting eliminates this interplay, rendering your fashion model and their environment as a two-dimensional cutout, devoid of the very tension and depth that defines the genre.
“Light is not merely illumination; it is a brush. Shadows are not absences; they are canvas. Together, they paint the narrative of your image.”
My experience has taught me that embracing shadow is paramount. Shadows are not flaws to be eliminated; they are powerful tools for shaping your subject, revealing character, and building an atmosphere of suspense. Without them, your noir shots will forever remain just 'dark,' not 'dramatic.'

The Fundamental Pillars of Noir Lighting: Contrast, Direction, and Quality
To truly master cinematic noir, we must build our lighting strategy on three foundational pillars: contrast, direction, and quality of light. These are the levers you pull to sculpt your scene.
1. Contrast: The Heartbeat of Noir
High contrast is non-negotiable for noir. This means a significant difference between the brightest and darkest areas of your image. We're not just talking about overall exposure, but the specific ratio of light to shadow on your subject's face and body.
- Identify your key light: This will be your primary light source, dictating the brightest areas.
- Determine your fill light strategy: For noir, fill light should be minimal or absent. We want deep, undiluted shadows. If used, it should be very subtle, perhaps a large reflector far away, or a very low-power secondary light.
- Measure the light ratio: Use a light meter (or your camera's histogram) to ensure your highlights are bright and your shadows are truly dark, without losing all detail in the darkest areas (unless that's an intentional artistic choice).
2. Direction: Sculpting with Light
Directional light is what gives your subject dimension. Unlike flat light, which comes from everywhere, directional light originates from a specific point, creating defined shadows that sculpt features.
- Side Lighting: Often the go-to for noir. Placing your key light to the side of your subject creates dramatic shadows that wrap around the face, emphasizing bone structure and creating mystery.
- Top Lighting: Can create harsh, dramatic shadows under the eyes and nose, reminiscent of classic horror or interrogation scenes. Use with caution, as it can be unflattering if not expertly controlled.
- Backlighting/Rim Lighting: While not a primary key light for noir, a subtle backlight can create a beautiful rim of light around your subject, separating them from the background and adding depth without filling in front shadows.
3. Quality: Hard vs. Soft Light
The quality of light refers to how sharp or soft the shadows are. This is determined by the size of your light source relative to your subject.
- Hard Light: Small light sources (bare bulb, snoot, grid, direct flash) create hard, well-defined shadows with sharp edges. This is the cornerstone of classic noir. It adds drama, texture, and intensity.
- Soft Light: Large light sources (softbox, umbrella, large window) create soft, diffused shadows with gradual transitions. While useful in other fashion contexts, too much soft light will instantly kill your noir aesthetic by flattening shadows.
Mastering Single-Light Setups for Maximum Drama
One of the most powerful lessons I've learned is that you don't need a complex array of lights to achieve stunning noir. Often, a single, expertly placed light source is all it takes to create profound drama and mood.
Techniques with a Single Key Light:
- Split Lighting: Position your key light directly to the side of your subject, at about a 90-degree angle. One half of the face will be brightly lit, the other in deep shadow. This creates a powerful, often unsettling, sense of duality.
- Rembrandt Lighting: Move your key light slightly forward from the 90-degree position, typically at a 45-degree angle to your subject, and slightly above eye level. Adjust until a small triangle of light appears on the shadowed cheek. This adds a touch more detail to the shadowed side while maintaining high drama.
- Butterfly Lighting (Paramount Lighting): Place your key light directly in front of your subject, above eye level, angled downwards. This creates a shadow under the nose resembling a butterfly. While traditionally more glamorous, it can be adapted for noir by making the light harder and increasing the contrast, emphasizing the cheekbones and jawline.
Using Flags and Gobos to Sculpt and Subtract
Beyond positioning your light, you can actively sculpt it. Flags (black fabric panels or foam core) are essential for blocking light and deepening shadows. Gobos (go-betweens) are stencils placed in front of a light to project patterns onto your subject or background, adding texture and narrative elements like window blinds or tree shadows – a hallmark of classic noir.
Case Study: How 'Shadow & Silk' Studio Transformed a Flat Shoot
A few years ago, 'Shadow & Silk' Studio approached me. They were struggling to achieve a truly impactful noir aesthetic for a new menswear collection. Their initial shots, despite having a dark background, felt flat and lacked the desired tension. We analyzed their previous attempts and found they were using a large softbox positioned too broadly, resulting in insufficient shadow definition.
Our solution was deceptively simple: we switched to a single, gridded beauty dish as the key light, positioned at a 45-degree angle and slightly above the model's eye level. We introduced a large black V-flat opposite the key light to actively absorb stray light and deepen shadows, rather than using a reflector. For specific shots, we used a barn-doored strobe to create a narrow, intense beam of light, mimicking a streetlamp. The result was a dramatic transformation. The garments gained texture, the models' expressions became more intense, and the overall mood shifted from merely 'dark' to profoundly 'cinematic noir,' leading to a highly successful campaign that resonated deeply with their target audience.
| Light Modifier | Shadow Quality | Best Use for Noir |
|---|---|---|
| Bare Strobe | Hardest, Sharpest | Extreme drama, small areas, gobos |
| Gridded Beauty Dish | Hard with defined edges | Rembrandt, split lighting, sculpting faces |
| Snoot | Very Hard, focused spot | Highlighting specific details, creating hotspots |
| Barn Doors | Adjustable hard edges | Controlling spill, creating narrow beams |
| Large Softbox (with grid) | Softer, but controllable with grid | Subtle fill, or key if gridded heavily |
Beyond the Main Light: Enhancing Noir with Kicker, Rim, and Practical Lights
While a single key light can do wonders, the strategic addition of secondary light sources can elevate your noir aesthetic, adding depth, separation, and narrative elements without compromising the dramatic shadows.
Kicker and Rim Lights for Depth and Separation
A kicker light is typically a small, hard light placed low and behind your subject, aimed to graze the side of their face or body. It creates a subtle highlight that separates the subject from the background, adding a three-dimensional quality without illuminating the front. A rim light is similar but usually positioned directly behind the subject, creating a bright outline around their silhouette.
For cinematic noir, these lights should be subtle. Their purpose is to define, not to fill. A gridded strobe or a continuous LED panel with barn doors works exceptionally well for this, allowing precise control over the beam of light.
Integrating Practical Lights for Authenticity
Practical lights are light sources that are visible within the frame of your photograph – lamps, neon signs, streetlights, car headlights. These are invaluable for grounding your scene in reality and adding narrative layers. They provide a natural source for your artificial lights to mimic.
- Table Lamps: Can cast pools of warm, localized light, perfect for intimate, introspective noir scenes.
- Neon Signs: Introduce splashes of vibrant, often unsettling, color that contrasts beautifully with the monochrome aesthetic.
- Streetlights: Can be simulated with a hard, top-down light source, casting long, dramatic shadows.
When using practicals, consider their color temperature and intensity. You might use gels on your strobes to match them, or deliberately play with contrasting colors for a more stylized, neo-noir feel.

Post-Production: The Final Polish for a True Noir Aesthetic
While excellent lighting is built in-camera, post-production is where you refine, enhance, and truly cement the cinematic noir aesthetic. It's not about fixing mistakes, but about perfecting your vision.
Dodging and Burning: Sculpting Light and Shadow Digitally
Dodging (lightening) and burning (darkening) are techniques inherited from the darkroom, and they are immensely powerful in digital post-processing. They allow you to selectively adjust the exposure of specific areas of your image, much like a painter adds highlights and shadows to a canvas.
- Identify Key Areas: Determine which parts of your subject or scene need more emphasis (dodging) or more depth (burning). For noir, this often means burning the edges of the frame to create a vignette, deepening shadows under the jawline, or dodging highlights on cheekbones.
- Use Adjustment Layers: In software like Adobe Photoshop or Lightroom, use curves, levels, or exposure adjustment layers with masks. This non-destructive approach allows for precise control and easy adjustments.
- Build Gradually: Apply dodging and burning in subtle layers. Overdoing it can make the image look artificial. The goal is to enhance, not to invent.
Color Grading for Mood and Atmosphere
Traditional film noir is often black and white, but modern interpretations (neo-noir) embrace color, albeit usually desaturated or with specific color palettes. Even in black and white, color grading (or tonal grading) plays a crucial role.
- Desaturation: Reduce the saturation of colors, often globally or selectively, to create a muted, somber mood.
- Split Toning: Add different color tints to the highlights and shadows (e.g., warm highlights, cool shadows) to create a sophisticated, filmic look.
- Contrast Boost: Enhance the overall contrast to make blacks deeper and whites brighter, reinforcing the dramatic lighting.
- Adding Grain: Simulate the texture of film by adding a subtle amount of photographic grain. This can instantly make a digital image feel more analog and authentic to the noir aesthetic.
For more in-depth techniques on digital darkroom manipulation, I often refer my students to authoritative resources like this detailed guide on Adobe's Creative Cloud blog about Dodging and Burning, which offers excellent foundational knowledge.
Gear Essentials for Cinematic Noir Fashion Shoots
While I always advocate for skill over gear, having the right tools can certainly streamline your process and expand your creative possibilities when crafting cinematic noir aesthetics. You don't need the most expensive equipment, but understanding what each piece does is crucial.
Lighting Equipment: The Sculptor's Tools
- Strobe Lights (Monolights or Pack-and-Head Systems): Offer powerful, consistent bursts of light, essential for freezing action and creating hard, dramatic shadows. Look for strobes with fast recycle times and good power control.
- Continuous LED Lights: Excellent for seeing your light fall-off in real-time, making them great for learning and for video-integrated shoots. Many modern LEDs offer impressive power and color accuracy.
- Light Stands & C-Stands: Robust stands are critical for securely positioning your lights, often at awkward angles.
Light Modifiers: Shaping the Drama
- Grids: Attach to softboxes or reflectors to narrow the beam of light, increasing contrast and preventing light spill. Indispensable for creating focused light.
- Snoots: Create a very narrow, concentrated beam of light, perfect for highlighting small details or creating dramatic hotspots.
- Barn Doors: Adjustable flaps that attach to light heads, allowing you to control the shape and direction of the light beam.
- Flags & V-flats: Essential for blocking light, deepening shadows, and preventing unwanted reflections. Black foam core or large black fabric panels work wonders.
- Gobos: Metal or glass stencils used to project patterns (like window blinds or tree shadows) onto your background or subject.
Camera and Lens Considerations
- Camera Body: A camera with good low-light performance (high ISO capabilities with minimal noise) and a wide dynamic range is beneficial. However, even entry-level DSLRs/mirrorless cameras can produce excellent results with proper lighting.
- Lenses: Fast prime lenses (f/1.4 - f/2.8) are excellent for low-light shooting and creating shallow depth of field, which can isolate your subject. Medium telephoto lenses (50mm, 85mm, 105mm) are often preferred for fashion portraits due to their flattering compression.
Investing in quality lighting modifiers can often yield more significant improvements than a new camera body. For a comprehensive look at essential lighting tools, I recommend exploring resources like B&H Photo's guide to studio lighting gear.
Developing Your Eye: Learning from the Masters of Film Noir
Technical mastery is crucial, but true artistry in cinematic noir fashion photography comes from developing a keen eye. This means understanding the aesthetic deeply, recognizing its nuances, and being able to translate that vision into your own work. It's about learning to 'see' light and shadow.
Study the Classics
Immerse yourself in the original sources. Watch classic film noir movies. Pay attention to how cinematographers like John Alton (cinematographer for 'T-Men', 'He Walked by Night') used light and shadow to create tension, reveal character, and build atmosphere. Analyze how they lit faces, created silhouettes, and used practical lights.
- Key Films to Watch: Double Indemnity, The Maltese Falcon, Sunset Boulevard, Touch of Evil, Chinatown (neo-noir).
- Key Photographers to Study: Look at the work of photographers who excelled in dramatic lighting, even outside of direct 'noir.' Think of Yousuf Karsh for his dramatic portraits, or Gordon Parks for his powerful photojournalism that often utilized stark contrast.
Practice, Experiment, and Analyze
The only way to truly master this aesthetic is through consistent practice. Don't be afraid to experiment. Set up a single light, grab a friend or a mannequin, and just play with angles, distances, and modifiers. Take notes on what works and what doesn't.
- Recreate a Scene: Choose a still from a film noir movie and try to replicate its lighting in your studio or home.
- The 'One Light' Challenge: Dedicate a week to only using a single light source for all your portrait or fashion practice. Explore its full potential.
- Self-Critique: After each shoot, review your images critically. Ask yourself: Is the mood right? Are the shadows deep enough? Is there enough contrast? Does it tell a story?
Developing your eye is an ongoing journey. It's about building a visual library in your mind and training yourself to spot the elements that make an image powerful. It's how you move from merely technically competent to truly visionary.
| Pre-Shoot Step | Action Item |
|---|---|
| Concept Development | Define narrative, mood board, character archetype |
| Location Scouting | Identify dramatic angles, potential practical lights |
| Wardrobe & Styling | Choose high-contrast fabrics, period-appropriate attire |
| Lighting Diagram | Sketch key, fill, rim light positions, flag placements |
| Test Shots | Check light ratios, shadow depth, model posing |

Frequently Asked Questions (FAQ)
Can I achieve cinematic noir with natural light? While challenging, it's certainly possible. Look for dramatic natural light sources like a single window on an overcast day, or the harsh, directional light of a setting sun filtering through blinds. You'll need to use flags and reflectors to create contrast and deepen shadows, effectively 'shaping' the natural light as if it were an artificial source. It requires immense control and patience but can yield stunning, organic results.
What's the biggest mistake photographers make when attempting noir? The most significant error is often being afraid of shadows. Many photographers instinctively try to 'fill in' all shadows, fearing lost detail. However, in noir, shadows are your primary storytelling device. Embrace them, let them be deep and expansive. The second mistake is using overly soft light, which diffuses all the dramatic edge that noir demands.
How do I balance shadows and detail without losing information? This is the art of balancing your light ratio. While shadows should be deep, they don't always have to be pure black. Use a subtle fill light, or strategically place a black V-flat to absorb light rather than reflect it, allowing for a hint of detail in the darkest areas. In post-production, selectively lifting shadows (without flattening them) in specific areas can also help, but always with a light touch.
Are specific camera settings crucial for this aesthetic? Yes. For hard light, you'll generally use a higher f-stop (e.g., f/8 to f/16) to ensure sharp focus and capture the texture of fabrics and skin. Shutter speed will be dictated by your strobes' sync speed (typically 1/125 to 1/250 sec). Keep your ISO as low as possible (100-400) to maintain image quality, especially in dark areas where noise is more apparent. Shooting in RAW is essential for maximum flexibility in post-production.
How can I practice noir lighting without expensive gear? Start with what you have! A single desk lamp or a bare bulb can serve as a hard key light. Use black cardboard or towels as flags. Experiment with natural window light and block out unwanted light with curtains or blankets. Even a smartphone flashlight can be used for dramatic, small-scale experiments. The principles of light direction, contrast, and quality remain the same, regardless of your equipment.
Key Takeaways and Final Thoughts
Mastering the cinematic noir aesthetic in fashion photography is a journey of understanding, practice, and a willingness to embrace the dramatic power of shadow. It's about moving beyond mere illumination to actively sculpt and shape light to tell a compelling story. Here are the critical takeaways:
- Embrace Contrast: High contrast between light and shadow is the bedrock of noir.
- Direction is Key: Use directional light (side, top) to create depth and sculpt features.
- Hard Light for Drama: Utilize small, hard light sources for sharp, defined shadows.
- Subtract Light: Use flags and V-flats to deepen shadows and control spill.
- Refine in Post: Leverage dodging, burning, and subtle color grading to enhance the mood.
- Study the Masters: Learn from classic film noir cinematographers and photographers.
- Practice Relentlessly: Experiment with single-light setups and analyze your results.
Remember, the goal isn't just to make your images dark, but to make them dramatic, intriguing, and deeply atmospheric. By consciously manipulating light and shadow, you transform your fashion photography from flat and mundane into something truly cinematic and unforgettable. Go forth, sculpt with light, and let your shadows tell the story.
Recommended Reading
- 7 Secrets: Why Your Smart Casual Outfits Look Sloppy & How to Fix It
- Unlock the Secret: Tips for Long-Lasting Professional Stage Makeup?
- The Secret Playbook: How to Get Early Access to New Shoe Launches
- Mastering Minimalist Fashion Photography: 7 Steps to a Distinctive Aesthetic
- The Ultimate Guide: What to Know Before Buying a Vintage Wedding Dress?


Your email address will not be published. Required fields are marked *