
Urgent costume breakdown: how to age denim realistically fast?
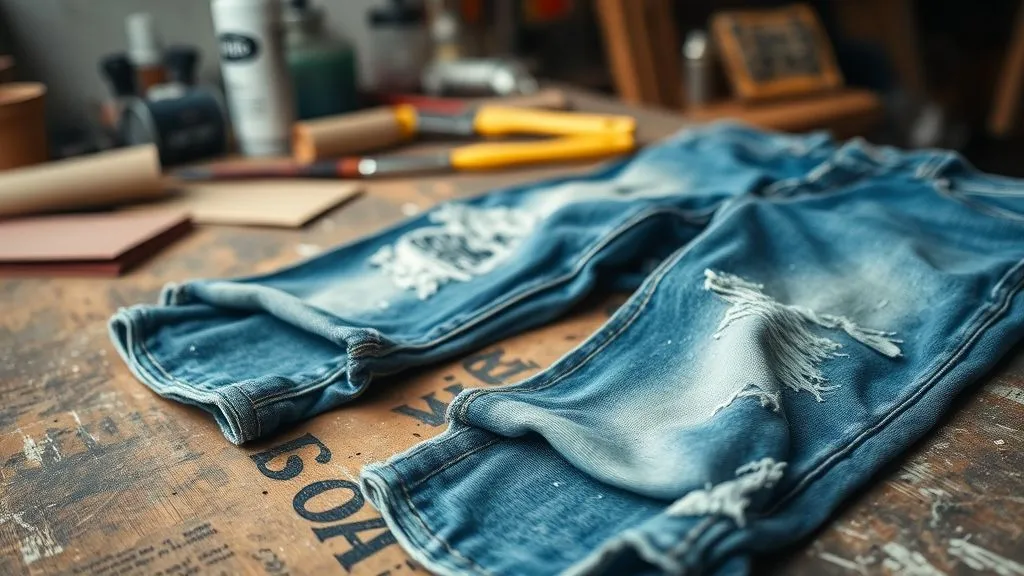
For over 15 years in costume design, I've faced countless 'urgent' calls – the kind where a director suddenly realizes their character's pristine denim needs to look like it's survived a decade in the apocalypse, and they need it yesterday. I once had 12 hours to take a brand-new pair of jeans from factory fresh to 'post-apocalyptic scavenger' for a pivotal scene. The pressure is immense, and the stakes for authenticity are incredibly high.
The core problem isn't just speed; it's achieving realistic aging under duress. Rushed work often looks fake, like a costume rather than a second skin. You've got to avoid that 'costume shop' look and aim for genuine wear, fading, and distress that tells a story, even when time is your biggest enemy.
In this definitive guide, I'll share the battle-tested techniques and expert insights I've honed over years in the trenches. You'll learn not just *what* to do, but *how* to do it safely and effectively, transforming new denim into a character-rich garment with speed and precision. We'll cover everything from abrasive methods to chemical treatments, ensuring your next urgent costume breakdown is met with confidence and skill.
Understanding the Anatomy of Denim Aging: Natural vs. Accelerated
Before we dive into the 'how,' it's crucial to understand the 'why' behind denim's natural aging process. Denim, a sturdy cotton twill fabric, fades and distresses in predictable ways based on wear patterns, environmental exposure, and washing cycles. Natural aging involves:
- Abrasions: Fading at friction points like thighs, knees, pockets, and hems.
- Creases: Defined lines (whiskering) around the crotch and behind the knees.
- Tears & Holes: Often starting at stress points or areas of heavy wear.
- Color Loss: Overall softening of the indigo dye, especially in high-wear areas.
- Texture Change: Softening of the fabric, sometimes thinning.
Our goal in accelerated aging is to mimic these natural processes as closely as possible. It's not about randomly destroying fabric; it's about targeted, intelligent distressing that tells the character's story. Think about what your character does, where they've been, and how they would naturally wear their clothes. This character-driven approach is what separates true costume artistry from haphazard destruction.
According to textile scientists, the indigo dye used in denim is surface-level, meaning it's designed to fade and show wear over time as the cotton fibers beneath are exposed. Understanding this chemical property is key to manipulating the fabric effectively. The history of denim itself is intertwined with its durability and capacity for wear, making it a perfect canvas for costume breakdown.
Method 1: The Abrasive Arsenal – Sandpaper, Files, and Pumice
This is often my first line of attack for creating realistic wear patterns. Abrasives are excellent for mimicking friction-induced fading and thinning. The key is to work strategically and gradually.
Tools You'll Need:
- Various grits of sandpaper (80-grit for heavy work, 220-grit for finer fading)
- Wire brush or a stiff bristled brush
- Pumice stone or a rotary tool with sanding attachments
- Cheese grater (yes, really!)
- Cutting mat or a thick piece of cardboard to protect your work surface
- Mannequin or a form to work on, if possible, to simulate body shape
Step-by-Step Abrasive Aging:
- Identify Wear Points: Lay the denim flat or put it on a form. Mark areas that would naturally fade: knees, thighs, seat, pocket edges, cuffs, and seams.
- Start with Lighter Grits: Begin with 220-grit sandpaper or a pumice stone. Gently rub in circular or linear motions, following the natural grain of the fabric. The goal is to slowly abrade the indigo dye from the surface fibers.
- Increase Aggression for Deeper Fades: For more pronounced fading, switch to 80-grit sandpaper or a wire brush. Apply more pressure, but always check your progress. You want to thin the fabric, not immediately create a hole unless that's the intention.
- Create Whiskering: For natural crease lines around the crotch (whiskers) and behind the knees, gently fold and press the denim along these lines. Then, lightly sand along the raised folds. A cheese grater can be surprisingly effective here for sharp, defined lines.
- Fray Edges: Use a wire brush or even a seam ripper to gently pull out threads along pocket edges, hems, or areas where you want a frayed look.
- Add Subtle Tears: Once the fabric is thinned, you can use a small pair of scissors or a utility knife to make tiny nicks, then fray them further with a wire brush or tweezers. Always place a cutting mat underneath!
Expert Insight: "The trick with abrasives is patience. Don't try to achieve maximum distress in one go. Build up the wear in layers, stepping back frequently to assess the overall effect. Think of it like a sculptor removing clay, not a wrecking ball."
Method 2: Chemical Catalysts – Bleach, Dyes, and Tea Stains
Chemicals can dramatically accelerate fading and staining, but they require careful handling and precise application to avoid irreversible damage or an unnatural look. Always work in a well-ventilated area and wear appropriate personal protective equipment (gloves, eye protection).
Tools You'll Need:
- Household bleach (diluted)
- Spray bottles, sponges, paintbrushes
- Fabric dyes (e.g., RIT dye in browns, grays, or even a lighter blue)
- Strong black tea or coffee
- Large buckets or tubs
- Protective tarp or plastic sheeting
- Neutralizing agent (e.g., hydrogen peroxide solution or a dedicated bleach neutralizer)
Step-by-Step Chemical Aging:
- Bleach for Fading: Dilute bleach significantly (e.g., 1 part bleach to 5-10 parts water) for controlled fading. Apply with a spray bottle for a fine mist, a sponge for larger areas, or a paintbrush for targeted spots. Immediately rinse thoroughly once the desired fade is achieved to stop the chemical reaction. For a more subtle, overall fade, you can do a quick dip in a very diluted bleach bath, but this is less controllable.
- Targeted Bleach Spots: For specific 'sun-bleached' or 'splashed' effects, apply a stronger, but still diluted, bleach solution to small areas. Again, rinse quickly.
- Dye for Grime & Dirt: Mix brown, gray, or even a very light green fabric dye with water. Apply this diluted solution to areas where dirt would naturally accumulate: hems, inner cuffs, around the knees, and the seat. You can also do an overall light dip-dye for a dingy effect.
- Tea or Coffee Stains: Brew strong black tea or coffee. Apply it with a sponge or spray bottle for natural-looking stains. These are great for adding a subtle, organic layer of grime or general 'used' appearance. Let it sit, then rinse lightly or allow to air dry for a more permanent stain.
- Neutralize & Wash: After any bleach application, it's crucial to neutralize the fabric. A quick soak in a solution of water and a few capfuls of hydrogen peroxide will stop the bleach from continuing to eat away at the fibers. Always follow up with a thorough wash cycle to remove all chemical residue.
Safety Note: Always read the labels on your chemicals. Never mix bleach with other cleaners, especially ammonia, as it can create dangerous fumes. Work in a well-ventilated area and protect your skin and eyes.
Method 3: Mechanical Mayhem – Washing, Drying, and Beating
Sometimes, the simplest methods are the most effective. The repeated stress of washing, drying, and physical manipulation can work wonders, especially when combined with other techniques.
Tools You'll Need:
- Washing machine and dryer
- Stones, pebbles, or golf balls (for agitation)
- Heavy-duty canvas bag or pillowcase
- A sturdy surface (like concrete or a brick wall)
- Mallet or hammer
Step-by-Step Mechanical Aging:
- Aggressive Washing Cycle: Place the denim in a washing machine on the hottest, most aggressive cycle available. For added abrasion, you can place a few clean stones, golf balls, or tennis balls (inside a sturdy canvas bag or pillowcase to protect your machine) in with the denim. The constant tumbling and friction will help break down fibers and fade the dye.
- High Heat Drying: Follow with a high-heat dryer cycle. The heat and tumbling will further shrink and distress the fibers. Repeat washing and drying cycles as needed to achieve the desired level of fade and softness.
- Targeted Beating/Scraping: For areas that would experience heavy impact or scraping, take the damp denim and rub it against a rough surface like concrete or a brick wall. Be careful not to overdo it, as this can create very quick, but sometimes unnatural, wear.
- Mallet for Softening: For a generally softer, more 'broken-in' feel, you can gently beat the denim with a mallet or hammer, particularly on seams and thicker areas. This helps to relax the fibers and give it a less stiff appearance.
- Twisting and Scrunching: For a lived-in, wrinkled look, twist the damp denim tightly and allow it to air dry in that twisted state. This can set natural-looking creases and folds.
This method is excellent for an overall 'softening' and fading effect, creating a base layer of wear that can then be enhanced with more targeted abrasive or chemical treatments.

Method 4: The Artistic Touch – Paint, Dirt, and Grime Application
Authentic aging isn't just about wear; it's about the accumulation of a character's life. This is where paints and real dirt come into play, adding layers of realism that tell a story.
Tools You'll Need:
- Acrylic paints (earth tones: browns, grays, black, muted greens)
- Fabric medium (to mix with acrylics for flexibility)
- Spray bottles, sponges, stippling brushes, old toothbrushes
- Real dirt, dust, coffee grounds, finely ground charcoal
- Hair spray or fabric sealant (optional, for setting dry applications)
Step-by-Step Artistic Grime Application:
- Diluted Paint Washes: Mix acrylic paints with fabric medium and water to create thin, transparent washes. Apply these with a large sponge or spray bottle to mimic general grime or water stains. Focus on lower hems, cuffs, and areas that would naturally pick up dirt.
- Stippling for Texture: Use a stippling brush or an old toothbrush to flick tiny dots of darker paint onto the denim, creating the appearance of mud splatters or fine dust. Build up layers for depth.
- Dry Pigment Application: For a very realistic dusty or muddy effect, take actual dirt, coffee grounds, or finely ground charcoal. Dampen the denim slightly, then rub the dry material into the fabric. Pay attention to creases, seams, and pockets where dirt would settle.
- Oil/Grease Stains: For specific grease stains, a small amount of dark brown or black paint, applied sparingly with a sponge and then dabbed with a paper towel, can mimic oil. Consider the source of the stain – a mechanic character would have different stains than a farmer.
- Setting the Grime: For dry applications like real dirt, a light mist of hair spray (from a distance) or a fabric sealant can help prevent it from shaking off too easily. Test in an inconspicuous area first.
As Seth Godin often says about marketing, "People don't buy what you do; they buy why you do it." The same applies to costume. The 'why' behind every stain and tear makes the aging believable. Each mark should contribute to the character's narrative.

Method 5: Combining Forces – A Multi-Layered Approach for Ultimate Realism
For truly convincing and rapid aging, rarely will one method suffice. The most effective approach is a combination of these techniques, applied in a logical sequence.
The Layering Principle:
- Start with Overall Fading & Softening: Begin with mechanical methods (aggressive washing/drying) and perhaps a very light, diluted bleach bath or spray for a general base fade and softened hand. This sets the foundation.
- Introduce Primary Wear Patterns: Move to abrasives (sandpaper, pumice) to create the main friction points, whiskering, and initial thinning on knees, thighs, and edges.
- Add Targeted Distress: If holes or significant tears are needed, apply them now, using the thinned areas as a starting point. Fray the edges for realism.
- Apply Stains & Grime: Layer in chemical stains (tea/coffee) and artistic applications (paint, dirt) to build up the character's history. Think about the character's journey – did they fall in mud, work in a dusty environment, spill something?
- Final Touches & Assessment: Step back and examine the garment from all angles. Does it look authentic? Does it tell the story? Are there any 'costume-y' elements that need softening or refinement? Sometimes, another light wash can help integrate all the layers.
Case Study: 'Dust Bowl Drifter' Denim
For a recent period film, I faced an urgent request to age denim for a character portraying a Dust Bowl drifter. We had new, dark indigo overalls. My team and I used a multi-layered approach:
- First, we did three aggressive hot washes with golf balls to soften the fabric and initiate overall fading.
- Next, we used 80-grit sandpaper and a wire brush on the knees, seat, and shoulder straps to create significant friction wear and some small holes.
- We then applied a very diluted bleach spray to specific 'sun-bleached' areas on the shoulders and upper thighs, rinsing quickly.
- Finally, we created a slurry of real Oklahoma red dirt, coffee grounds, and a touch of brown fabric paint, which we rubbed deeply into the seams, cuffs, and lower legs, then set with a light mist of fabric sealant.
The result was a pair of overalls that looked authentically weathered, dust-caked, and lived-in, perfectly conveying the character's harsh journey. This multi-pronged attack shaved days off what would normally be a weeks-long natural aging process.
Crucial Considerations: Fabric Type, Character Arc, and Safety Protocols
While the techniques are universal, their application must be tailored. Not all denim is created equal, and not all characters experience the same wear.
Fabric Type Matters:
- Raw Denim: This is unwashed, untreated denim. It's stiff and will take longer to break down, but the fades will be incredibly unique and personal.
- Washed Denim: Already pre-softened, it will age faster and respond more readily to treatments.
- Stretch Denim: Be cautious with abrasives and aggressive mechanical methods, as the elastic fibers can break down unevenly, leading to an unnatural look or compromised integrity.
Character Arc and Storytelling:
Always consider the character. Are they:
- A meticulous person who takes care of their clothes? (Subtle aging)
- A laborer working in dirty conditions? (Heavy grime, specific wear patterns)
- Someone who's been through a traumatic event or a journey? (Extreme, varied distress)
The aging should reflect their journey. A character who just escaped a prison riot will have different denim wear than one who has been peacefully working on a farm for years.
Safety Protocols:
| Hazard | Precaution | Solution |
|---|---|---|
| Bleach Fumes | Work in well-ventilated area, wear respirator | Use diluted solutions, neutralize promptly |
| Skin/Eye Contact | Wear gloves, safety glasses | Rinse immediately with water, seek medical attention if severe |
| Fabric Damage | Test on scrap fabric, work gradually | Start with mildest methods, build up intensity |
| Machine Damage | Use protective bags for stones/golf balls | Inspect machine after use, avoid overloading |
As mentioned, safety is paramount. Always protect yourself and your workspace. For detailed information on chemical safety, refer to official guidelines like those from OSHA (Occupational Safety and Health Administration). Your health and the longevity of your tools are not worth compromising for a quick distressed effect.
Beyond the Basics: Advanced Techniques and Common Pitfalls
Once you've mastered the foundational techniques, you can explore more nuanced methods to achieve hyper-realistic results.
Advanced Techniques:
- Grinding Wheels/Rotary Tools: For very specific, controlled holes and thinning, a Dremel tool with a sanding bit can be effective. Use with extreme caution and a light touch.
- Burning (EXTREME CAUTION): For singed edges or small burn holes, a heat gun or very quick application of a flame can work. This is highly risky, requires fire safety precautions (fire extinguisher, water nearby), and should only be attempted by experienced professionals in a controlled environment. I rarely recommend this unless absolutely necessary and with meticulous planning.
- Paint Splatters: Mimic blood, oil, or other liquids by flicking paint from a toothbrush or using a fine spray bottle. Build up layers.
- Mending & Patching: Sometimes, aging means adding repairs. Patches, visible mending stitches, or even subtle darning can add incredible depth to a garment's history.
Common Pitfalls to Avoid:
- The 'Cookie Cutter' Look: Applying the same distressing pattern to every garment. Each piece should be unique.
- Unnatural Symmetry: Real wear is rarely perfectly symmetrical. Avoid making both knees or both thighs look exactly the same.
- Over-Distressing: Less is often more. You can always add more wear, but you can't easily undo it.
- Ignoring Character Context: Aging without a story. Every fade, tear, and stain should make sense for the character.
- Safety Neglect: Skipping PPE or working in poor ventilation is a recipe for disaster.
- Lack of Neutralization: Failing to neutralize bleach will continue to degrade the fabric, leading to unexpected holes later.
Remember, the goal is to create believable wear, not just damage. The most successful costume breakdown tells a silent story, enhancing the actor's performance and immersing the audience further into the narrative. For more detailed insights into the art of costume breakdown, I often refer to academic resources on textile degradation and historical garment wear, such as those found in university textile archives or publications like The Costume Society.
Frequently Asked Questions (FAQ)
Question: How can I prevent bleach from creating harsh lines or splotches? To prevent harsh lines, always dilute your bleach significantly. Apply it with a fine mist spray bottle from a distance, or use a damp sponge to dab and blend the edges. Immediately follow up by rinsing the area or dabbing with a wet cloth to stop the reaction and soften the edges. Working on damp denim can also help the bleach spread more evenly.
Question: What's the best way to make denim look genuinely dirty, not just painted? For genuine dirt, I often use a combination of real, finely sifted dirt or coffee grounds rubbed into damp fabric, followed by very diluted brown/gray acrylic paint washes (with fabric medium). The real dirt provides organic texture, while the paint washes deepen the color and help set the particles. Focus on areas where dirt naturally accumulates, like seams, pockets, and the lower legs.
Question: Can I age stretch denim using these methods without ruining the stretch? You can, but proceed with extreme caution. Abrasives can damage the elastic fibers, leading to an uneven, 'ripped elastic' look. Mechanical methods like aggressive washing are generally safer for overall softening. For fading, highly diluted bleach applied sparingly is best, but avoid areas where stretch is critical. Always test on an inconspicuous area first.
Question: How do I make denim look 'sun-faded' quickly and realistically? True sun-fading involves UV exposure. For a fast alternative, dilute bleach is your best friend. Apply a very fine, even mist of highly diluted bleach (e.g., 1:10 or 1:15 bleach to water) over the entire garment. Let it sit for only a few minutes, then rinse thoroughly and neutralize. For targeted sun-faded areas, focus the mist more heavily on shoulders or thighs. The key is even application and quick rinsing.
Question: What if I only have an hour for an urgent breakdown? Which method is fastest? If you have an hour, prioritize targeted abrasion and grime. Grab 80-grit sandpaper and a wire brush for quick, visible fading on knees and edges. Simultaneously, mix up a quick coffee/tea stain or a diluted brown paint wash and sponge it onto lower hems and high-wear areas for immediate dirt and grime. A quick, aggressive wash (if time allows for drying) can soften, but focus on visible surface effects for instant impact.
Key Takeaways and Final Thoughts
Confronting an 'Urgent costume breakdown: how to age denim realistically fast?' scenario can be daunting, but with the right techniques and a clear understanding of natural wear, you can achieve stunningly authentic results under pressure. Here are the critical takeaways:
- Plan with Purpose: Always consider the character's story and how they would naturally wear their denim.
- Layer Your Techniques: Combine mechanical, abrasive, chemical, and artistic methods for the most realistic depth.
- Work Gradually & Safely: You can always add more, but it's hard to subtract. Prioritize safety with chemicals.
- Patience is a Virtue (Even When Time is Short): Even in an urgent situation, thoughtful application beats rushed destruction.
- Practice Makes Perfect: Experiment on scrap denim to hone your skills before tackling a crucial costume.
Remember, your work as a costume designer is about more than just clothing; it's about helping to build a believable world and a compelling character. By mastering these rapid denim aging techniques, you'll be well-equipped to tackle any urgent breakdown, ensuring your costumes always tell an authentic story, no matter the deadline. Go forth and create cinematic magic!
Recommended Reading
- Clean Suede Shoes Like a Pro: Avoid Ruining Them! Here's How
- Why Dress Styles Fail Online? 5 Proven Ways to Skyrocket E-commerce Sales
- 7 Proven Strategies: Mitigating AI Bias in Fashion & Personalization
- 7 Expert Steps: How to Source Rare Materials for Screen-Accurate Cosplay
- Eco-Friendly Shoes That Last: Find Durable & Sustainable Brands


Your email address will not be published. Required fields are marked *