
Mastering the Art of Repairing Small Tears in Cashmere Gloves Yourself
Imagine this: you reach for your favorite pair of cashmere gloves on a crisp autumn morning, anticipating the familiar embrace of their unparalleled softness. But then, your heart sinks as you discover it – a tiny, almost imperceptible tear. Perhaps it's a snag from a stray branch, or a delicate seam that's come undone. This isn't just a material flaw; it's a disruption to a cherished comfort, a small tragedy for an item that feels almost like a second skin.
The thought of professional repair for such a minor flaw can be daunting, and often, the cost outweighs the perceived value, leading many to wonder if repairing small tears in cashmere gloves yourself? is truly feasible. The answer, thankfully, is a resounding yes. With the right knowledge and a dash of patience, you can breathe new life into your beloved cashmere, saving both money and the sentimental value of your treasured accessories.
This comprehensive guide is designed to empower you with the expertise needed to tackle these delicate repairs with confidence. By the end of this reading, you will possess a clear understanding of cashmere's unique properties, the essential tools required, and the step-by-step techniques to seamlessly mend small tears, ensuring your cashmere gloves remain a source of warmth and elegance for years to come. Let's embark on this journey of textile restoration.
Understanding Cashmere: The Fabric of Luxury
Before you can effectively repair cashmere, it's crucial to understand what makes this fiber so special and, consequently, so susceptible to damage if not handled with care. Cashmere is not just wool; it's a luxury fiber obtained from the soft undercoat of cashmere goats, primarily from regions like Mongolia, China, and Iran. Its unique properties demand a gentle touch, both in wear and repair.
What Makes Cashmere Unique?
The secret to cashmere's legendary softness, warmth, and lightweight feel lies in its incredibly fine fibers. These fibers are much thinner than those of sheep's wool, typically ranging from 14 to 19 microns in diameter. For comparison, a human hair is about 100 microns thick. This fineness allows for a denser, yet remarkably soft, fabric that traps air effectively, providing superior insulation without bulk. The natural crimp of cashmere fibers also contributes to its elasticity and resilience, though its delicate nature means it can be prone to snags and tears if not treated with respect. Understanding this inherent delicacy is the first step towards successful repair.
Common Causes of Tears in Cashmere Gloves
Despite its resilience, cashmere is not indestructible. Small tears in gloves often result from a few common culprits. Firstly, snags are perhaps the most frequent cause, occurring when the delicate fibers catch on sharp objects like jewelry, zippers, rough surfaces, or even fingernails. Secondly, prolonged friction or rubbing, such as against a coat sleeve or bag strap, can weaken the fibers over time, leading to thinning and eventual tears. Thirdly, improper storage can invite pests like moths, which feed on natural fibers, leaving behind unsightly holes. Lastly, general wear and tear, especially in high-stress areas like fingertips or seams, can eventually lead to small separations in the knit. Identifying the cause can sometimes help prevent future damage.
Assessing the Damage: Is Your Tear Repairable?
Not all tears are created equal, and knowing the extent of the damage is key to determining if a DIY repair is feasible or if professional intervention might be necessary. Most small snags, tiny holes, or unraveling seams are excellent candidates for home repair, offering a rewarding project for the patient individual.
Small Tears vs. Larger Damage
A small tear is generally defined as a hole or rip that is no larger than a quarter inch in diameter, or a seam separation that is less than an inch long. These are typically localized and haven't compromised the overall integrity of the surrounding knit. Larger holes, extensive unraveling, or areas where the fabric has become significantly threadbare might be beyond the scope of a simple home repair. In such cases, the stress of mending could further damage the garment, or the repair might be too visible. Always assess the fabric around the tear: if it's strong and intact, proceed with confidence. If it's weak or heavily worn, consider the limitations.
Tools and Materials You'll Need
Gathering the right tools before you begin is paramount for a successful and seamless repair. Using inappropriate materials can cause more harm than good to your delicate cashmere. Here's a list of essentials:
- Fine Darning Needle: Choose a needle with a blunt tip and a large eye, specifically designed for knitwear. A sharp needle can split cashmere fibers, causing further damage.
- Cashmere Yarn or Matching Fine Wool Thread: The ideal choice is a tiny snippet of yarn from the glove itself (if available from an inside seam or label) or a very fine wool or cashmere yarn that perfectly matches the color and weight of your glove's original yarn. Silk thread can also be a good alternative if cashmere yarn is unavailable, as its smoothness reduces friction.
- Small, Sharp Scissors: For trimming loose threads cleanly.
- Thimble: Essential for protecting your finger and pushing the needle through the fabric, especially if the knit is tight.
- Magnifying Glass (Optional but Recommended): For intricate work, especially on very small tears.
- Darning Mushroom or Ball (Optional): Provides a firm, curved surface to stretch the fabric over, making it easier to work on the tear without distorting the knit.
- Fabric Glue (for minor snags, specific type): Only use a clear, flexible fabric glue specifically designed for delicate fabrics, sparingly, and for very small snags where stitching isn't practical.
Having these items ready will streamline your repair process and ensure a professional-looking finish.
Step-by-Step Guide: Mending Small Tears in Cashmere
With your tools at hand and a clear understanding of the damage, it's time to delve into the repair process. The goal is to create an 'invisible' mend that blends seamlessly with the original fabric, restoring both function and aesthetics. With the right approach and a steady hand, the process of repairing small tears in cashmere gloves yourself? transforms from a daunting chore into a satisfying act of preservation.
Preparing Your Workspace and Glove
Preparation is key. Choose a well-lit area, preferably with natural light, to ensure you can see every delicate fiber. A clean, flat surface is also essential. Gently clean the cashmere glove if it's dirty, as dirt can make the fibers brittle and difficult to work with. A gentle hand wash and flat dry is recommended if the entire glove needs cleaning. Once dry, carefully smooth out the area around the tear. If using a darning mushroom or ball, gently stretch the fabric over it, ensuring the tear is taut but not overly stretched, which could distort the knit.
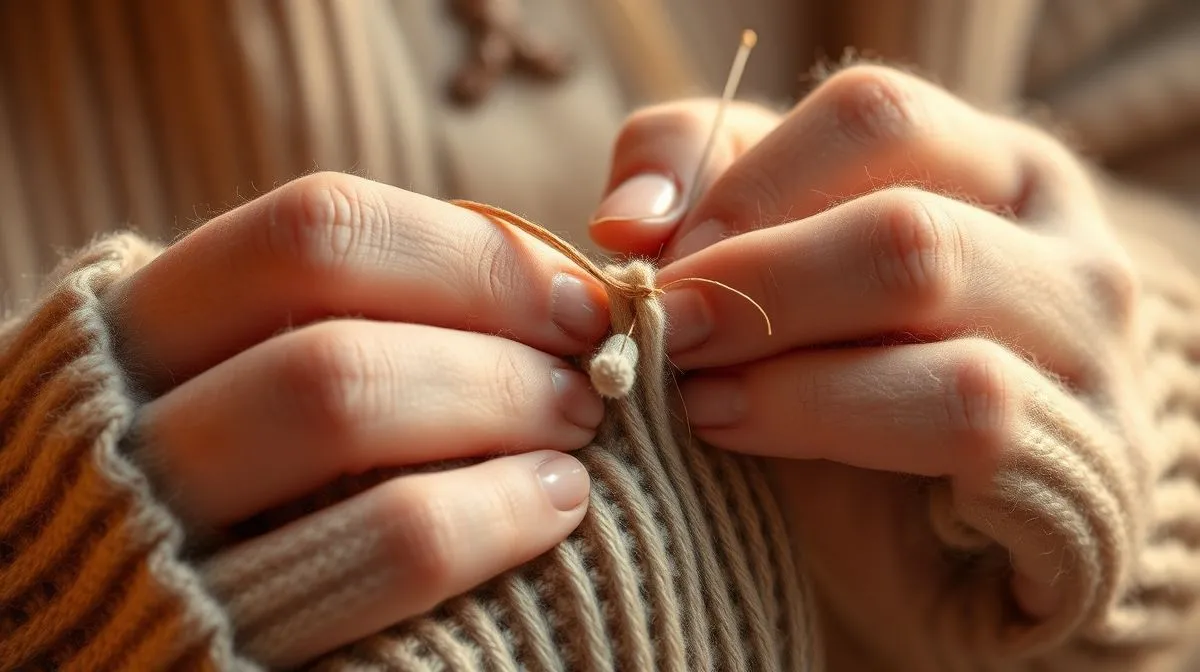
The Invisible Stitch Technique (Darning)
The most effective method for repairing small tears in cashmere is a technique often referred to as darning or invisible mending. This involves weaving new threads into the existing fabric to recreate the missing or damaged knit structure. This technique is particularly effective for small holes or thin areas.
- Trim Loose Threads: Carefully trim any frayed or loose threads around the tear, but do not cut into the intact fabric. The goal is to neaten the edges without enlarging the hole.
- Thread Your Needle: Cut about 18-24 inches of your matching cashmere or wool yarn. Thread it through the eye of your darning needle. Do not knot the end.
- Stabilize the Area: Begin by making a few small, running stitches around the perimeter of the tear, about 1/8 inch away from the edge. This helps to stabilize the fabric and prevent further unraveling. These stitches should be as inconspicuous as possible.
- Create Horizontal Weave (Warp Threads): Starting about 1/4 inch outside one side of the tear, bring your needle up through the fabric. Make a straight stitch across the tear to the other side, entering the fabric about 1/4 inch outside the tear on that side. Continue making parallel stitches, slightly overlapping the tear, working your way up or down until the entire damaged area is covered with these 'warp' threads. Keep tension even – not too tight to pucker, not too loose to sag.
- Weave Vertical Threads (Weft Threads): Now, starting from one edge of your newly created horizontal stitches, begin weaving your needle over and under these horizontal threads, mimicking the original knit pattern. When you reach the end of a row, turn around and weave back, alternating the over-and-under pattern. This creates a 'basket weave' effect that fills the hole. Continue until the entire area of horizontal threads is covered with woven vertical threads.
- Secure the Mend: Once the hole is filled, weave your needle back into the existing cashmere fabric for about 1/2 inch, making small, inconspicuous stitches to secure the thread. Do not knot. Trim the excess thread close to the fabric.
Patience is paramount during this process. Take your time, and don't be afraid to undo stitches if they don't look right. The goal is to make the repair as invisible as possible.
Reinforcing the Repair for Longevity
For areas that experience more stress, or if you want to ensure the repair lasts, you can add a subtle reinforcement. After completing the darning, you can repeat a very fine layer of darning over the first layer, using even finer stitches, to add more density to the repaired area. Another method is to apply a tiny dot of clear, flexible fabric glue (specifically for delicate knits) to the backside of the mend, after it's fully completed and secure. This should be done extremely sparingly and only if the glue is guaranteed not to stiffen or discolor the cashmere. Always test on an inconspicuous area first. This step is optional and should be approached with caution.
Alternative Repair Methods and When to Use Them
While darning is the gold standard for many cashmere repairs, other methods exist for specific types of damage or when a more creative solution is desired.
Using Fabric Glue for Minor Snags
For the tiniest of snags where a single thread is pulled out but not broken, or for a very small, almost microscopic hole that doesn't involve broken fibers, fabric glue can be a quick fix. Use a very specific type of clear, flexible fabric adhesive designed for delicate materials. Apply an almost imperceptible dot to the snagged thread, gently push the thread back into place with a needle or toothpick, and let it dry completely. This method is not suitable for actual tears or holes where fibers are broken, as it will create a stiff, visible patch and likely fail over time. It's a temporary solution for the most minor of cosmetic issues.
Patching: A Creative Solution for Larger Holes
When a tear is too large for invisible darning, or if the surrounding fabric is too weak to hold new stitches, patching becomes an option. This is often a more visible repair but can be done artfully. You'll need a piece of matching cashmere fabric (perhaps from an old, unwearable cashmere item or a swatch from the manufacturer). Cut the patch slightly larger than the hole, ensuring clean, non-fraying edges. You can then hand-sew the patch onto the glove using a small, whip stitch or blanket stitch around the perimeter of the hole, securing the patch to the existing fabric. For a truly creative touch, consider a contrasting color patch or an embroidered patch, transforming a flaw into a unique design element. This method might be more suitable for garments where the aesthetic impact is less critical or where a visible repair is embraced as part of the garment's story. For gloves, it might be more challenging due to their small size and fitted nature, but certainly possible for a skilled hand.
Post-Repair Care: Ensuring Your Cashmere Lasts
Successfully repairing your cashmere glove is only half the battle. Proper care after the mend is crucial to ensure the longevity of your repair and the overall life of the garment. Cashmere is an investment, and treating it with the respect it deserves will pay dividends.
Washing and Drying Repaired Cashmere
After a repair, it's generally best to avoid washing the item immediately, allowing the stitches to fully settle. When it is time to wash, always hand wash cashmere. Fill a basin with cool water and a small amount of a specialized wool or cashmere detergent. Gently submerge the glove and squeeze the suds through the fabric; do not rub, twist, or agitate vigorously, especially around the repaired area. Rinse thoroughly with cool water until all soap is gone. To dry, gently squeeze out excess water (do not wring!). Then, lay the glove flat on a clean, dry towel. Roll the towel and glove together to absorb more water, then unroll and lay the glove flat on a fresh, dry towel or a mesh drying rack, reshaping it to its original form. Allow it to air dry completely away from direct heat or sunlight. This gentle process prevents stretching, shrinking, and stress on the newly mended area.
Proper Storage to Prevent Future Damage
Preventing future tears and damage starts with proper storage. Always store cashmere clean, as moths are attracted to body oils and food particles. Fold your cashmere gloves neatly and store them in breathable garment bags or cedar chests. Cedar blocks or lavender sachets can act as natural moth repellents. Avoid hanging cashmere, as this can cause stretching and distortion, especially in knitwear. Keep cashmere away from direct sunlight, which can fade colors and weaken fibers. Periodically inspect your gloves for any signs of wear or small snags, addressing them promptly before they escalate into larger tears. This proactive approach is key to maintaining your luxury items.
Common Mistakes to Avoid When Repairing Cashmere
Even with the best intentions, certain pitfalls can compromise your cashmere repair. Being aware of these common mistakes can save you frustration and ensure a more successful outcome.
Using the Wrong Thread or Needle
This is perhaps the most common mistake. Using cotton, polyester, or regular sewing thread is a definite no-go. These threads have different elasticity and thickness than cashmere, leading to a stiff, visible, and potentially damaging repair. They can also cut through the delicate cashmere fibers over time. Similarly, a sharp, pointed needle can pierce and break individual cashmere fibers, weakening the surrounding fabric and potentially enlarging the hole. Always opt for fine, blunt-tipped darning needles and matching cashmere or fine wool yarn.
Over-tightening Stitches
It's tempting to pull stitches tight to make the mend feel secure, but this is detrimental to cashmere. Over-tightening will cause the fabric to pucker, creating an unsightly and stiff area that stands out from the soft, fluid drape of the rest of the glove. It can also put excessive stress on the surrounding fibers, leading to new tears. Aim for an even tension that allows the fabric to lay flat and retain its natural elasticity.
Rushing the Process
Cashmere repair requires patience and a steady hand. Rushing can lead to uneven stitches, missed fibers, and a less-than-invisible mend. If you feel frustrated or hurried, take a break and return to the task when you can give it your full, calm attention. Think of it as a meditative process; precision comes with focus.
Ignoring Small Issues
A tiny snag or a single pulled thread might seem insignificant, but in cashmere, these can quickly escalate into larger, more complex tears. Addressing small issues promptly, as soon as they are noticed, prevents them from becoming major repair challenges. A stitch in time truly saves nine, especially with delicate fibers like cashmere.
The Unseen Benefits of DIY Cashmere Repair
Beyond the obvious practicalities of saving your cherished items, the act of repairing your own cashmere carries a deeper significance. It's a quiet rebellion against disposability and a testament to mindful living.
Sustainability and Eco-Friendliness
In an age of fast fashion, learning to mend your clothes is a powerful act of sustainability. By repairing your cashmere gloves, you extend their lifespan, reducing waste and decreasing your reliance on new production. This lessens the environmental footprint associated with manufacturing new garments, from resource extraction to transportation. It's a small but meaningful contribution to a more circular economy, valuing what you already own over constant consumption. Learn more about the environmental impact of fashion and the benefits of repair at reputable sources like the Wikipedia page on Sustainable Fashion or articles from environmental organizations.
Cost Savings
Professional cashmere repair can be surprisingly expensive, often costing a significant percentage of the item's original price, especially for small tears. By taking on the task yourself, you eliminate these costs entirely. The investment in a few basic tools is minimal compared to the recurring expense of professional services or, worse, replacing an entire pair of gloves. This empowers you to manage your wardrobe more economically.
Sentimental Value and Personal Satisfaction
Perhaps the most profound benefit lies in the emotional connection you forge with your repaired items. Successfully mending a beloved cashmere glove transforms it from a mere accessory into a testament to your care and skill. The garment carries a story, a history of being cherished and painstakingly restored. Beyond the immediate financial savings, the profound satisfaction derived from successfully repairing small tears in cashmere gloves yourself? is immeasurable. It's a skill that builds confidence, fosters a deeper appreciation for craftsmanship, and allows you to preserve the memories intertwined with your favorite possessions. Many textile experts and conservators emphasize the importance of maintaining fabric integrity, as highlighted by institutions like the Metropolitan Museum of Art's textile conservation efforts.
Frequently Asked Questions (FAQ)
Can any cashmere tear be repaired at home? No, while many small tears and snags are excellent candidates for DIY repair, very large holes, extensive unraveling, or areas where the fabric is significantly weakened might require professional attention or might be beyond practical repair. Always assess the integrity of the surrounding fabric.
What's the best type of thread for cashmere repair? The best thread is matching cashmere yarn. If unavailable, a very fine wool yarn of the same color and weight, or a smooth silk thread, are good alternatives. Avoid cotton or synthetic threads as they can damage the delicate cashmere fibers and won't blend seamlessly.
How do I prevent my cashmere gloves from tearing in the first place? Prevention is key! Avoid wearing jewelry with sharp edges, be mindful of rough surfaces, store gloves folded in breathable bags with moth repellents (like cedar), and always clean them before long-term storage. Gentle handling during wear and washing also helps significantly.
Is professional repair ever necessary? Yes, for very complex repairs, extensive damage, or if you simply don't feel confident in your mending skills, a professional textile conservator or a specialized cashmere repair service might be necessary. They have specialized tools and expertise for intricate work.
Can I machine wash cashmere after repair? No, even after a successful repair, cashmere should always be hand-washed gently in cool water with a specialized detergent. Machine washing, even on a delicate cycle, can be too harsh for the fibers and the newly mended area, potentially undoing your hard work or causing further damage. Lay flat to dry.
Recommended Reading
- Eyewear for Sensitive Skin: Find Your Perfect, Irritation-Free Fit
- Unleash Your True Self: How to Develop a Unique Personal Street Style
- Eco-Friendly Kids Clothes: Last Longer & Save You Money!
- The Ultimate Guide: How to Properly Fit a Men's Formal Dress Shirt?
- Stunning Nail Art Ideas for Short Nails at Home: Your Ultimate Guide!
Conclusion
The journey of restoring a beloved cashmere glove from a state of disrepair to renewed perfection is not merely a practical task; it is an act of care, sustainability, and personal empowerment. By following the techniques outlined for repairing small tears in cashmere gloves yourself?, you not only extend the life of your beloved accessories but also gain invaluable skills and a deeper appreciation for the craftsmanship of fine textiles. Embrace the challenge, be patient, and take pride in knowing that you've transformed a potential discard into a cherished item, ready to offer warmth and elegance for many more seasons to come. Your cashmere, and the planet, will thank you.


Your email address will not be published. Required fields are marked *