
Mastering Light: Preventing Fabric Texture Loss in Studio Fashion Photography
For over two decades in the demanding world of fashion photography, I've witnessed countless emerging photographers, and even some seasoned ones, grapple with a persistent and frustrating challenge: the elusive loss of fabric texture in their studio shots. It's a subtle but critical detail that can elevate a good photograph to a truly exceptional one, or conversely, render a high-fashion garment flat and uninspired.
The problem isn't always obvious until you're in post-production, staring at a gorgeous silk blouse that looks like plain cotton, or a intricately woven tweed jacket that appears smooth and lifeless. This isn't just a technical glitch; it's a fundamental misunderstanding of how light interacts with textiles, stripping away the very essence of what makes a garment unique and desirable.
In this definitive guide, I'm going to pull back the curtain on the art and science of preventing fabric texture loss in studio fashion photography. You'll learn not just 'what' to do, but 'why' specific lighting choices make all the difference, armed with actionable frameworks, real-world insights, and the expert knowledge I've painstakingly gathered over years of trial, error, and triumph on set.
Understanding the Enemy: How Light Destroys Texture
Before we can master the preservation of texture, we must first understand what causes its disappearance. It's often not a single culprit but a combination of factors related to how light hits and reflects off the fabric's surface.
The Pitfalls of Flat Lighting
One of the most common mistakes I see is the use of overly broad, frontal, and flat lighting. While it might seem intuitive to illuminate a garment evenly, this approach is the archenemy of texture. Flat light minimizes shadows and highlights, which are the very elements that define dimension and surface quality. Without these subtle variations, the fabric's weave, nap, or sheen simply vanishes, leaving behind a two-dimensional representation.
Imagine trying to photograph a mountain range at high noon with the sun directly overhead. The landscape would appear flat, lacking the dramatic shadows that define its peaks and valleys. Fabrics are no different; they need directional light to reveal their contours and surface intricacies. 
Overexposure: The Silent Killer of Detail
Another insidious saboteur of texture is overexposure. When a fabric is overexposed, especially lighter tones, the highlights blow out, losing all detail. This digital clipping effectively erases the nuanced variations that constitute texture. It's like trying to read a newspaper that's been bleached by the sun – the information is gone.
“In my experience, slight underexposure is often preferable to overexposure when capturing texture. You can always recover shadows, but blown-out highlights are gone forever.”
Even if the overall exposure seems correct, localized hot spots on reflective fabrics like silk or satin can obliterate texture. It requires a keen eye and precise control over light intensity and placement.
The Foundation: Studio Setup & Fabric Analysis
Every successful shoot starts with meticulous planning and understanding your subject – in this case, the fabric itself.
Know Your Fabric: From Silk to Tweed
Different fabrics interact with light in unique ways. A rough tweed will benefit from a different lighting approach than a smooth, reflective silk or a plush velvet. Before even touching a light stand, take time to analyze the garment:
- Observe the Weave: Is it a tight, dense weave or a loose, open one?
- Feel the Nap/Pile: Does it have a directional nap (like velvet or corduroy) that changes appearance when brushed?
- Assess Reflectivity: Is it matte, semi-glossy, or highly reflective?
- Examine Translucency: Is it sheer or opaque?
This initial assessment will dictate your lighting strategy. For instance, highly reflective fabrics often require larger, softer light sources to create smooth transitions, while textured fabrics thrive on more directional, harder light to emphasize their irregularities. According to an insightful article by B&H Photo Explora, understanding fabric properties is the first step to successful textile photography.
The Role of Backgrounds and Reflectance
The background choice also subtly influences how fabric texture is perceived. A highly reflective background can bounce unwanted light back onto the garment, potentially flattening the texture. Conversely, a dark, matte background can absorb ambient light, making your carefully crafted lighting on the garment stand out more dramatically. Consider the overall color palette and how it might impact the perceived texture. For example, a light garment on a light background might need more contrast in lighting to make its texture pop.
Sculpting with Light: Key Lighting Techniques for Texture
This is where the magic truly happens. We're not just illuminating; we're sculpting.
The Power of Specular Highlights and Rim Lighting
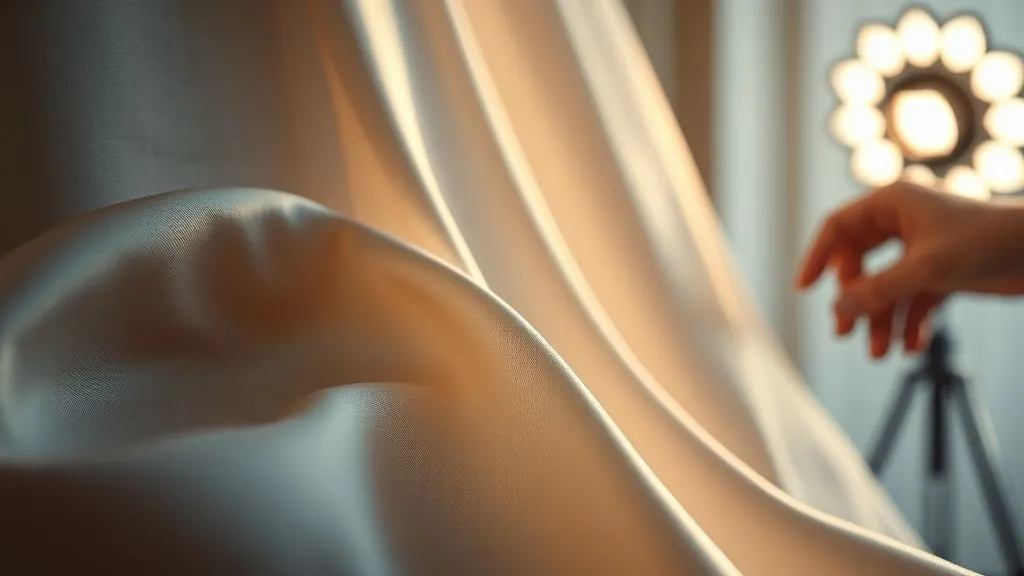
To reveal texture, you need to create contrast at a micro-level. This is achieved by generating subtle specular highlights and shadows that follow the contours of the fabric's weave. Directional light is paramount here. Placing your key light at an angle, rather than straight on, will create these crucial highlights and shadows.
- Angle of Incidence: Position your light source at a 45-degree angle or more to the fabric's surface. This allows light to catch the raised fibers and cast tiny shadows in the depressions.
- Rim Lighting: A powerful technique for adding dimension is to use a light source placed behind the subject, aimed towards the camera, to create a bright outline or 'rim' around the garment. This separates the fabric from the background and can dramatically enhance edge detail and overall texture, especially on fabrics with a slight nap or fuzz.
For fabrics like silk or satin, a slightly larger, softer rim light can create a beautiful, luminous edge that emphasizes their sheen without blowing out highlights. 
Grids and Gels: Controlling Light Spread
Light modifiers like grids (also known as honeycombs) are invaluable tools for texture photography. A grid narrows the beam of light, making it more directional and preventing spill. This allows you to precisely control where the light falls, emphasizing specific areas of texture without affecting others. For example, a grid on a beauty dish or a strip box can create a focused beam that skims across a fabric, enhancing its surface details.
Gels, particularly diffusion gels, can also play a role. While we generally want directional light for texture, sometimes a very subtle diffusion can soften harsh shadows just enough to reveal texture without losing definition. It's a delicate balance.
Using Flags and Gobos for Creative Shadow Play
Flags (opaque panels) and gobos (patterns cut into metal or other materials) are your allies in controlling light and shadow. Flags can be used to block light from areas where it might cause texture loss, or to create negative fill (absorbing light) to deepen shadows and enhance contrast.
Gobos can project patterns onto the background or even subtly onto the garment itself to add visual interest, but their primary use for texture is less direct. More often, flags are used to shape the light and create the necessary contrast for texture. For a deeper dive into controlling light, resources like Profoto Academy offer excellent tutorials on light shaping.
Mastering Modifiers: Softboxes, Octaboxes, and Strip Lights
The choice of light modifier profoundly impacts how light interacts with fabric. It's not just about size; it's about shape, internal baffling, and material.
Choosing the Right Softbox Size and Shape
While large softboxes are excellent for soft, even light, they can sometimes flatten texture if used improperly. For texture, consider:
- Strip Lights: These long, narrow softboxes are fantastic for creating directional, skimming light that accentuates texture. Placed to the side of the garment, they can highlight every ridge and valley.
- Gridded Softboxes: Adding a grid to any softbox, as mentioned, increases directionality.
- Small Softboxes/Beauty Dishes: When used off-axis, smaller modifiers can create more defined shadows and highlights, which are key for texture.
The general rule of thumb is: the larger the light source relative to the subject, the softer the light. For texture, we often want a balance – soft enough to avoid harsh, unflattering shadows, but directional enough to reveal surface detail. 
The Magic of Diffusers and Scrims
Diffusers and scrims are large, translucent panels placed between the light source and the subject. They soften and enlarge the light source without necessarily making it less directional if placed correctly. They are particularly useful for taming harsh sunlight or powerful strobes, creating a more flattering quality of light that still allows texture to shine through.
For highly reflective fabrics, a large diffuser can create a beautiful, even reflection without hot spots, preserving the fabric's natural sheen and texture. It's about controlling the quality of light, not eliminating its ability to define form.
Here's a quick comparison of common modifiers and their impact on fabric texture:
| Modifier Type | Light Quality | Texture Impact | Best Use |
|---|---|---|---|
| Large Octabox (Ungrid) | Very Soft, Broad | Can flatten texture if frontal; good for soft sheen on reflective fabrics if angled. | Overall soft illumination, large garment areas, subtle texture. |
| Gridded Strip Softbox | Directional, Controlled Spill | Excellent for emphasizing weave and nap with skimming light. | Side lighting, rim lighting, creating defined shadows. |
| Beauty Dish (with Grid) | Crisp, Punchy, Focused | Good for highlighting specific areas of texture with defined shadows. | Key light for dramatic texture, emphasizing fine details. |
| Reflector (Silver/Gold) | Bounced, Fill Light | Can add fill without flattening; silver adds crispness, gold adds warmth. | Filling shadows, adding subtle highlights without a separate light source. |
Advanced Strategies: Multi-Light Setups for Depth
While a single well-placed light can do wonders, multi-light setups allow for ultimate control and artistic expression.
The Three-Point Lighting System Reimagined for Texture
The classic three-point lighting system (key, fill, back/hair) can be adapted for texture preservation:
- Key Light: Position this at a 45-60 degree angle to the garment, often slightly above, using a modifier that provides directional light (e.g., gridded strip box, beauty dish). This is your primary texture revealer.
- Fill Light: Instead of a broad, flat fill, use a much softer, lower-powered fill light or a reflector on the opposite side. Its purpose is only to gently lift the deepest shadows, not to eliminate them entirely. The goal is to retain shadow detail, not flatten it.
- Back/Rim Light: Crucial for separation and adding a luminous edge. Place this behind and to the side of the garment, often with a grid, to create a strong rim that emphasizes the fabric's outline and any fine fibers.
This layered approach ensures every aspect of the fabric is considered, from its overall form to its intricate surface details.
Fill Light Finesse: Balancing Ratios
The ratio between your key light and fill light is paramount. For texture, you typically want a higher contrast ratio than you might use for a smooth, even skin tone. A 2:1 or even 3:1 ratio (key light is 2 or 3 times brighter than fill) often works well, allowing shadows to retain depth and reveal texture. Overpowering your fill light will negate the directional effects of your key light, leading right back to texture loss.
Case Study: Reviving Velvet with Strategic Lighting
How a Bespoke Tailor's Velvet Gown Found Its Soul
A few years ago, I was commissioned to photograph a series of exquisite velvet gowns for a high-end bespoke tailor. Velvet, with its luxurious pile, is notoriously difficult to photograph without losing its signature depth and sheen. The initial test shots, using a standard large octabox as the key light, rendered the velvet flat and dull, almost like a cheap felt. It was a classic case of texture loss.
My solution involved a complete overhaul of the lighting setup. I moved the main light, a large gridded strip box, to a very steep 75-degree angle from the side, almost skimming the fabric. This created dramatic, elongated highlights along the nap of the velvet, revealing its plushness. For fill, instead of a direct light, I used a large black flag on the opposite side to create negative fill, deepening the shadows and enhancing the contrast. Finally, a small, gridded reflector dish was placed high and behind, just out of frame, acting as a powerful rim light to pick up the fine fibers on the edges of the gown, giving it a luminous glow and separating it from the dark background.
The result was transformative. The velvet looked rich, deep, and tactile, every fiber seemingly alive. This strategic combination of extreme side lighting, negative fill, and precise rim lighting brought the fabric to life, demonstrating the power of understanding light's interaction with specific materials.
Post-Production Pitfalls: Protecting Texture in Editing
Even with perfect lighting, post-production can undo all your hard work if not handled with care. The goal is to enhance, not destroy.
The Dangers of Over-Smoothing and Clarity Adjustments
Modern editing software offers powerful tools, but they are double-edged swords. Over-smoothing skin, for instance, can inadvertently affect the fabric if not masked carefully. More critically, excessive use of 'Clarity' or 'Dehaze' sliders can introduce artifacts or an unnatural, crunchy look that doesn't truly represent the fabric's texture.
Similarly, aggressive noise reduction can sometimes smooth away fine texture details, especially in areas of shadow. Always zoom in to 100% or 200% when making these adjustments to assess their impact on the fabric.
Subtle Sharpening and Contrast for Definition
Post-production sharpening should be used sparingly and strategically. Apply sharpening primarily to areas of the fabric that genuinely need it, often using masking to protect smoother areas or skin. A good technique is to use a high-radius, low-amount sharpening (e.g., Unsharp Mask) to enhance micro-contrast, which can make texture pop without introducing harshness.
Subtle local contrast adjustments can also work wonders. Instead of globally boosting contrast, target specific tonal ranges or use local adjustments brushes to enhance the contrast within the fabric's texture without affecting the entire image. Remember, the goal is to enhance the texture that's already there, not to create it from scratch. For advanced techniques in post-processing, consider the advice from experts like Adobe's own tutorials on image sharpening.
Frequently Asked Questions (FAQ)
Q: Can I use continuous lights for texture photography, or do I need strobes? A: Both continuous lights and strobes can be effective. Strobes generally offer more power and faster flash durations, which can be beneficial for freezing movement and capturing crisp details. However, modern continuous LED lights are increasingly powerful and color-accurate, making them a viable option, especially for beginners who prefer to see the lighting effect in real-time. The key is directional control and sufficient intensity, not necessarily the type of light.
Q: What's the best modifier for photographing highly reflective fabrics like satin or lamé? A: For highly reflective fabrics, large, soft light sources are generally preferred. A large octabox or a large diffusion panel (scrim) will create a more even, flattering reflection across the fabric's surface, preventing harsh hot spots that obliterate texture. The light should still be angled to create some dimension, but the softness helps to maintain the fabric's sheen without overexposure. Sometimes, a ring light can also create a unique, even reflection if used carefully.
Q: How do I handle dark, textured fabrics like black wool or velvet? A: Dark textured fabrics require careful attention to light ratios and often benefit from stronger, more focused directional light. You'll need enough light to lift the fabric out of shadow and reveal its texture, but without overexposing the highlights. Rim lighting becomes even more crucial here to separate the fabric from a dark background and emphasize its edges. You might also need to slightly increase the overall exposure compared to lighter fabrics, and use very precise fill light or negative fill to control contrast.
Q: Is tethered shooting essential for preventing texture loss? A: While not strictly 'essential,' tethered shooting is a game-changer for texture photography. Being able to see your images on a large monitor in real-time allows you to immediately identify if texture is being lost or if highlights are blowing out. This instant feedback loop enables you to make precise adjustments to light placement, power, and camera settings on the fly, saving significant time and frustration in post-production. It's an investment that pays dividends. You can find more information on tethering benefits on photography education sites like B&H Photo Explora.
Q: Can natural light be used effectively to capture fabric texture? A: Absolutely! Natural light, especially from a window, can be incredibly beautiful for capturing texture. The key is to use it directionally. Position your subject so the window light skims across the fabric at an angle, creating natural highlights and shadows. You can then use reflectors or even white foam core boards to bounce light back into the shadows for fill, or black flags to create negative fill. Overcast days offer a large, soft light source, while direct sunlight can be diffused with a scrim for a more controlled, directional effect.
Key Takeaways and Final Thoughts
- Directional Light is King: Flat, frontal light kills texture. Angle your key light to create highlights and shadows that define the fabric's surface.
- Control Your Highlights: Overexposure is a silent killer of detail. Monitor your highlights closely and err on the side of slight underexposure if in doubt.
- Know Your Fabric: Different textiles require different approaches. Analyze the weave, nap, and reflectivity before you light.
- Utilize Modifiers Strategically: Gridded strip boxes, beauty dishes, and diffusers are your allies in shaping light for texture.
- Master the Fill: Use fill light sparingly and precisely to lift shadows without flattening the crucial contrast needed for texture.
- Post-Production with Care: Avoid aggressive smoothing and sharpening. Enhance, don't create, texture in editing.
Preventing fabric texture loss in studio fashion photography isn't about magic; it's about understanding the physics of light and applying that knowledge with precision and artistic intent. It's a skill that takes practice, but by embracing these principles, you'll transform your fashion photographs from mere representations into tangible, tactile experiences. Keep experimenting, keep observing, and let the beauty of the fabric truly shine through your lens.
Recommended Reading
- 7 Strategies to Slash Biodegradable Fabric Scaling Costs & Boost Innovation
- 9 Steps to Eradicate Razor Burn for a Confident Executive Presence
- Unraveling the Fabric: What Challenges Hinder Sustainable Textile Innovation?
- 5 Strategic Ways to Dress for a Promotion: Empowering Professional Attire
- Unlock the Secret: How to Prevent Platinum Jewelry from Scratching Easily


Your email address will not be published. Required fields are marked *