
How to prevent intricate gel nail art from chipping within a week?
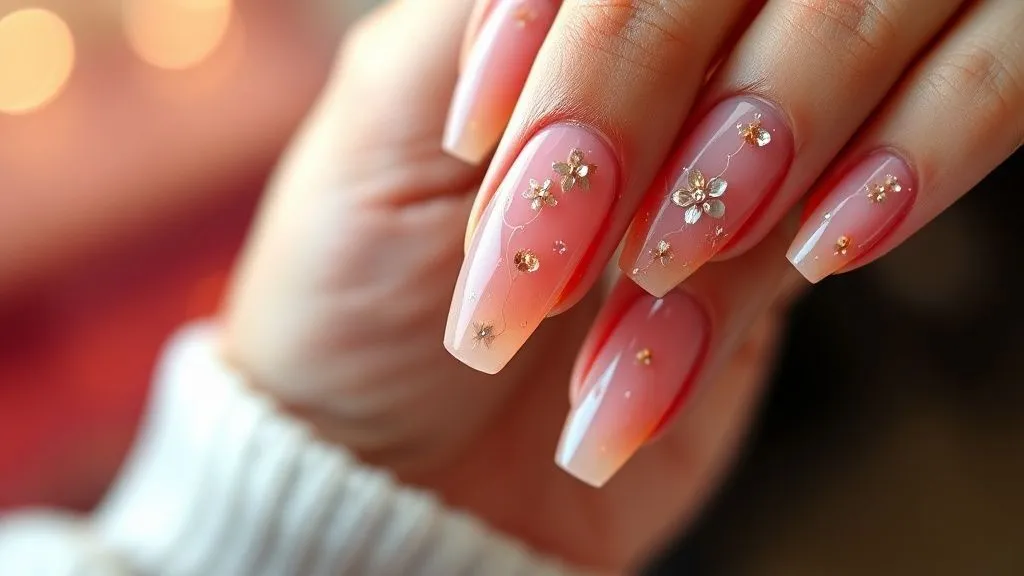
For over 15 years in the dynamic world of beauty fashion, specializing in nail artistry, I've witnessed the sheer joy a perfectly executed, intricate gel nail design brings. There’s a unique satisfaction in watching a client’s eyes light up at a miniature masterpiece on their fingertips. However, I’ve also shared in the frustration when that masterpiece, painstakingly created and admired, starts to chip or lift prematurely, often within days of application.
The problem of intricate gel nail art chipping within a week isn't just an aesthetic inconvenience; it's a significant pain point for both clients and artists. It wastes time, money, and diminishes the perceived value of high-quality nail services. Many believe it's simply the nature of intricate designs – that they’re inherently fragile – but I'm here to tell you that’s a misconception we can definitively overcome.
In this definitive guide, I'll pull back the curtain on the industry's best-kept secrets, sharing my seasoned expertise to help you master the art of long-lasting, intricate gel nail art. We'll delve into actionable frameworks, detailed techniques, and real-world insights, ensuring your elaborate designs remain flawless for weeks, not just days. Get ready to transform your understanding and application of gel nail art, guaranteeing durability without compromising on dazzling detail.
The Foundation First: Meticulous Nail Preparation
Just as a magnificent skyscraper requires an unshakeable foundation, intricate gel nail art demands impeccably prepared nails. This isn't just about cleaning; it's about creating the optimal canvas for adhesion and longevity. In my experience, neglecting this crucial first step is the single biggest reason why even the most beautiful designs fail prematurely.
Understanding the Canvas: Nail Health
Before any product touches the nail plate, assess its health. Hydrated, healthy nails provide a better surface for adhesion. Ensure nails are free from damage, infections, or excessive dryness. If the natural nail is compromised, the gel will struggle to bond effectively, leading to lifting and chipping.
The Art of Impeccable Preparation: Step-by-Step
This is where precision truly pays off. Follow these steps religiously to lay the groundwork for a chip-free manicure:
- Sanitize & Assess: Begin by sanitizing both your hands and the client's. Visually inspect the nails for any issues.
- Gentle Push-Back & Cuticle Care: Using a metal pusher or orange wood stick, gently push back the cuticles. Avoid aggressive pushing, which can damage the nail matrix. Carefully remove any non-living tissue (pterygium) adhering to the nail plate. This is vital, as gel won't adhere to skin.
- Shaping & Filing: File the nails to the desired shape and length. Ensure all edges are smooth and free from snags. Rough edges can become weak points.
- Buffing for Adhesion: Lightly buff the entire nail plate with a fine-grit buffer (220/240 grit). The goal is to remove the natural shine and create microscopic channels for the gel to grip, not to thin the nail. Over-buffing is detrimental.
- Dehydration & Cleansing: This is perhaps the most critical step. Use a lint-free wipe saturated with 99% isopropyl alcohol or a specialized nail dehydrator/cleaner. According to dermatological studies, proper dehydration removes oils and contaminants that inhibit adhesion. Wipe thoroughly, paying close attention to the sidewalls and cuticle area. Do not touch the nail plate after this step.
- Primer/Bonder Application (Optional but Recommended): For clients prone to lifting, a thin layer of acid-free primer or bonder can significantly enhance adhesion. Apply sparingly, only to the natural nail plate, and allow it to air dry completely.
"Think of nail preparation as priming a canvas. You wouldn't paint a masterpiece on a dirty, oily, or uneven surface. Your nails deserve the same respect and meticulous attention."
By investing this time in perfect preparation, you're not just applying gel; you're building a bond that will withstand daily wear and tear. This foundational work is non-negotiable for anyone serious about preventing chips.

Mastering the Art of Application: Thin Layers & Proper Curing
Once your canvas is prepped, the application process itself becomes paramount. Many believes more product equals more strength, but with gel, the opposite is often true, especially for intricate designs. I've seen countless instances where thick layers lead to under-curing, which is a direct pathway to chipping and lifting.
The Thin Layer Philosophy
Gel products are designed to be applied in thin, even layers. Each layer, from base coat to color to top coat, should be as thin as possible while still providing full coverage. Why? Thicker layers are harder for UV/LED light to penetrate completely. This results in 'under-cured' gel, which remains soft, flexible, and prone to breaking or peeling off.
- Base Coat: Apply a very thin, scrub-like layer, ensuring it covers the entire nail plate and is properly sealed at the free edge. This creates the sticky layer for subsequent coats.
- Color Coats: For intricate designs, multiple thin coats of color are always better than one thick coat. This allows for full opacity and ensures each layer cures thoroughly.
- Sealing the Free Edge: With every single layer – base, color, and top coat – remember to 'wrap' or 'cap' the free edge of the nail. This creates a seal that prevents water and debris from seeping under the gel, which is a major cause of lifting and chipping from the tip.
Curing: Not Just About Time, But Technique
Proper curing is non-negotiable. It's the chemical process that hardens the gel, making it durable. Under-curing is a common culprit for chipping, but over-curing can also make gel brittle. It's about finding that sweet spot.
- Know Your Lamp: Not all UV/LED lamps are created equal. Understand your lamp's wattage and recommended curing times for your specific gel system. Older lamps can lose potency over time.
- Hand Placement: Ensure the client's hand is positioned correctly in the lamp, with all fingers (especially thumbs) receiving full light exposure. Many chips start on the sides of nails because they weren't fully exposed during curing.
- Flash Curing (for intricate designs): When working with intricate elements like rhinestones or detailed lines, flash curing (a quick 5-10 second cure) after each small element can prevent shifting and ensure everything is set before a full cure.
- Full Curing: Always follow the manufacturer's recommended full curing times for each layer. Don't rush this process.
As guidelines from health authorities suggest, understanding the UV/LED exposure is key for both safety and product efficacy. Proper curing is not just about hardening; it’s about activating the polymers to create a strong, resilient bond.
The Intricacy Challenge: Design Layering and Encapsulation
Intricate gel nail art often involves multiple layers of color, glitter, foils, hand-painted details, and even 3D elements. The challenge here is to integrate these elements seamlessly without creating weak points or excessive bulk that can lead to premature chipping. This is where artistic vision meets structural engineering.
Strategic Design Placement
When planning an intricate design, consider the nail's natural stress points. Designs that extend too far over the free edge, or have elements that stick out significantly, are more susceptible to snagging and chipping. Integrate elements within the nail's natural curvature as much as possible.
- Thin Layers of Detail: If you're hand-painting fine lines or delicate patterns, use highly pigmented gel paint that allows for thin application. Multiple thin strokes are better than one thick, heavy line.
- Glitter & Foils: When applying loose glitter or foils, press them firmly into the tacky layer of a cured gel coat. Ensure they lie as flat as possible. Uneven or protruding glitter creates bumps that can catch and lift.
- Rhinestones & Charms: Use a strong builder gel or a specialized rhinestone adhesive gel to secure embellishments. Apply a small bead of gel, place the charm, and then 'encapsulate' the base and sides of the charm with more gel, ensuring there are no sharp edges for catching. Flash cure immediately.
The Power of Encapsulation
Encapsulation is your best friend for intricate designs. It involves sealing your design elements within a clear layer of gel, protecting them from external damage. This is particularly important for anything raised or textured.
After your intricate design is complete and fully cured, apply a thin, even layer of clear builder gel or a robust top coat over the entire nail, encapsulating all design elements. This creates a smooth, protective barrier. Cure this layer thoroughly. If necessary, apply a second thin encapsulating layer, especially for highly textured designs, ensuring the nail's surface is smooth to the touch. This technique significantly boosts the design's durability.
| Design Element | Application Tip | Encapsulation Strategy | Durability Impact |
|---|---|---|---|
| Hand-painted lines | Use thin, highly pigmented gel paint. Apply multiple thin coats if needed. | Seal with a thin layer of top coat. | Prevents flaking of paint, maintains sharp lines. |
| Loose Glitter/Flakes | Press firmly into tacky layer, ensure flatness. | Apply 1-2 layers of clear builder gel for smooth finish. | Prevents shedding, keeps glitter intact, smooth surface. |
| Rhinestones/Charms | Use strong adhesive gel, ensure firm placement. | Encapsulate base and sides with builder gel, leave top exposed. | Prevents snagging and loss of embellishments. |
The Unsung Hero: Top Coat Selection and Application
The top coat is often underestimated, yet it is the ultimate shield for your intricate gel nail art. It provides the final layer of protection, gloss, and durability. A poor-quality top coat or incorrect application can undermine all the meticulous work you've put in, leading to chips, dullness, and premature wear.
Choosing the Right Top Coat
Not all top coats are created equal. For intricate designs, I always recommend a high-quality, professional-grade top coat known for its strength and scratch resistance. Consider these factors:
- Flexibility vs. Hardness: Some top coats are more flexible, suitable for natural nails that bend slightly. Others are harder, offering superior scratch resistance but can be more prone to chipping on very flexible nails. Choose one that complements the underlying gel system and nail type.
- No-Wipe vs. Tacky-Layer: No-wipe top coats are convenient as they don't leave a sticky inhibition layer. However, some artists find tacky-layer top coats offer slightly better durability if the inhibition layer is removed correctly. Experiment to find your preference.
- Specialized Top Coats: For designs with significant texture (like embedded glitter or 3D elements), a thicker, self-leveling top coat or a builder gel might be necessary as the final encapsulating layer before a standard top coat for shine.
Flawless Top Coat Application
The application of the top coat is the grand finale. It needs to be flawless:
- Even & Sufficient Coverage: Apply a medium-thin, even layer of top coat over the entire nail, ensuring it covers all design elements and reaches the sidewalls without flooding the cuticles.
- Wrap the Free Edge (Again!): This cannot be stressed enough. As emphasized by leading industry publications like Nailpro, wrapping the free edge with the top coat is crucial. It seals the entire manicure, preventing water and debris from seeping under the gel, which is a major cause of lifting and chipping from the tip.
- Proper Curing: Cure the top coat fully according to the manufacturer's instructions. An under-cured top coat will be dull, soft, and prone to scratching and chipping.
- Allow to Cool: After curing, allow the nails to cool for a minute or two before wiping off the inhibition layer (if using a tacky-layer top coat). This allows the gel to fully harden and prevents dulling.
"The top coat isn't just for shine; it's the armor for your art. Treat its application with the utmost respect and precision."
Beyond the Salon Chair: Crucial Aftercare and Maintenance
Your responsibility for your intricate gel nail art doesn't end when you leave the salon or finish your DIY session. The way you treat your nails in the days and weeks following application significantly impacts their longevity. This is where many clients unknowingly sabotage their beautiful manicures.
The First 24-48 Hours are Critical
Even though gel is cured and hardened, it continues to polymerize and reach its maximum strength in the hours following application. During this crucial period, I advise extreme caution:
- Avoid Prolonged Water Exposure: Try to minimize long baths, swimming, or excessive dishwashing. While gel is waterproof, prolonged saturation can weaken the bond to the natural nail.
- No Picking or Prying: Resist the urge to pick at any tiny imperfections or use your nails as tools. This is a surefire way to introduce lifting.
- Moisturize (But Not Immediately): While cuticle oil is a friend to lasting manicures, wait a few hours after a no-wipe top coat, or after wiping the inhibition layer, before applying heavy oils.
Daily Habits for Longevity
Integrating these simple habits into your routine will drastically extend the life of your intricate gel nail art:
- Wear Gloves for Chores: Whenever you're doing dishes, cleaning with harsh chemicals, or gardening, wear gloves. Chemicals can degrade the gel, and physical impact can cause chips.
- Use Cuticle Oil Daily: Hydrated cuticles and nail plates are more flexible and less prone to brittleness. Apply cuticle oil at least once a day, massaging it into the cuticles and around the entire nail. This keeps the surrounding skin healthy and flexible, preventing dry skin from pulling at the gel.
- Avoid Using Nails as Tools: Whether it's opening a soda can, prying open a package, or scraping something, find a tool. Your nails are jewels, not tools.
- Be Mindful of Impact: Everyday activities can chip nails. Be conscious when reaching into bags, typing vigorously, or bumping your hands against hard surfaces.
Case Study: Sarah's Salon Success Story
I had a client, Sarah, who loved elaborate, hand-painted floral designs. She'd spend hours with me, only to report chipping within 4-5 days. We tried different gel systems, but the issue persisted. After a frank discussion, we realized her aftercare was lacking. She was a keen gardener and often did housework without gloves. By implementing the daily use of cuticle oil and consistently wearing gloves for all household and garden tasks, her intricate manicures now regularly last 3+ weeks. This simple shift in habits made all the difference, proving that even the most perfect application needs diligent aftercare to thrive.

Addressing the Root Cause: Identifying Common Chipping Culprits
To truly prevent intricate gel nail art from chipping, we must understand the underlying causes. It's not always about a single factor; often, it's a combination of environmental, lifestyle, and application-related issues. Diagnosing the specific culprit is key to finding a lasting solution.
Environmental Factors
- Water Exposure: Prolonged immersion in water (dishes, swimming, long showers) can cause the natural nail plate to absorb water and swell. Since gel doesn't absorb water, this expansion and contraction can lead to lifting and chipping at the edges.
- Chemical Exposure: Harsh cleaning agents, solvents, and even some hand sanitizers (especially those with high alcohol content) can degrade the gel polish, making it brittle or causing it to peel.
- Extreme Temperatures: Rapid changes from hot to cold, or prolonged exposure to very hot water, can stress the gel, leading to tiny cracks or lifting.
Lifestyle Considerations
- Trauma & Impact: Bumping nails, using them as tools, or engaging in activities that put direct pressure on the nail tips (e.g., extensive typing, playing certain sports) are major causes of chips and breaks.
- Nail Biting/Picking: This habit is detrimental to both natural nails and gel manicures. The constant stress and pulling will inevitably cause chipping and lifting.
- Product Quality & Compatibility: Using low-quality gel products or mixing different brands that aren't compatible can lead to adhesion issues and premature wear. Forbes often highlights the importance of investing in reputable beauty products for optimal results.
| Chipping Culprit | Impact | Prevention Strategy | Severity |
|---|---|---|---|
| Excessive Water Exposure | Natural nail swells, causing gel to lift. | Wear gloves for water-intensive tasks, limit prolonged immersion. | High |
| Chemical Cleaners | Degrades gel, causes brittleness. | Always wear gloves when cleaning or handling chemicals. | Medium-High |
| Physical Trauma/Using Nails as Tools | Direct impact causes chips/breaks. | Use tools for tasks, be mindful of hand movements. | High |
| Under-curing Gel | Gel remains soft, peels easily. | Ensure proper lamp wattage, follow cure times, correct hand placement. | High |
Professional Insights: Tools, Products, and Continuous Learning
As an industry specialist, I can tell you that the longevity of intricate gel nail art is not solely about technique; it's also profoundly influenced by the quality of the tools and products you employ. Skimping here is a false economy, leading to frustration and repeat visits. Investing wisely is a hallmark of true professionalism.
Investing in Quality: The Product Spectrum
Think of your gel system as an ecosystem. Each component plays a vital role, and they should ideally be designed to work together:
- Base Coat: A high-quality base coat creates the essential bond between the natural nail and the gel system. Look for reputable brands known for their adhesion properties.
- Gel Colors & Paints: For intricate art, highly pigmented gel paints that allow for thin application are crucial. Cheap gels might require thicker coats for opacity, leading to curing issues.
- Builder Gels: If you're encapsulating 3D elements or adding strength, a good quality builder gel offers superior structural integrity.
- Top Coat: As discussed, this is your final defense. Invest in a top coat known for its durability, scratch resistance, and long-lasting shine.
- Prep Solutions: Don't overlook your dehydrators, cleansers, and primers. These ensure the perfect, oil-free surface for adhesion.
The Role of Professional Tools
Your tools are an extension of your skill. Quality tools facilitate precision and consistency:
- UV/LED Lamp: This is arguably your most important piece of equipment. Invest in a professional-grade lamp with adequate wattage (e.g., 48W or higher) and consistent light distribution. Replace bulbs or the unit itself according to manufacturer recommendations, as lamp efficacy diminishes over time. Industry bodies like Professional Beauty emphasize the importance of maintaining and understanding your curing lamp for both safety and service quality.
- Brushes: For intricate designs, fine-tipped art brushes are indispensable. Invest in brushes that hold their shape, have good snap, and are easy to clean.
- Files & Buffers: High-quality, professional-grade files and buffers ensure precise shaping and gentle preparation without damaging the natural nail.

When to Seek Professional Help (and How to Choose)
While this guide empowers you with extensive knowledge, there are times when the expertise of a seasoned professional is irreplaceable, especially for complex designs or persistent chipping issues. Knowing your limits and when to consult an expert is a mark of wisdom.
Understanding Your Limits
If you're consistently facing chipping despite meticulously following all the steps outlined here, it might be time to seek a professional nail technician. They have access to a wider range of professional products, advanced training, and often, more powerful equipment. They can also diagnose specific nail health issues that might be contributing to the problem.
- Complex Nail Health Issues: If your natural nails are unusually brittle, oily, or prone to splitting, a professional can offer targeted treatments or recommend specific products.
- Advanced Design Techniques: Some intricate designs require techniques that are best learned and executed by experienced professionals.
- Consistent Lifting/Chipping: If you've tried everything and still experience issues, a professional can provide an objective assessment of your nails and application process.
Qualities of a Great Nail Technician
Choosing the right professional is key. Look for a technician who:
- Is Licensed and Certified: Ensures they have met professional standards and received proper training.
- Uses High-Quality Products: Inquire about the brands they use. Reputable salons and technicians will be transparent about their products.
- Prioritizes Nail Health: A good technician will assess your nail health, provide proper preparation, and never compromise your natural nails for a design.
- Demonstrates Excellent Technique: Observe their work. Do they apply thin layers? Do they wrap the free edge? Is their curing process meticulous?
- Has a Strong Portfolio: Look at their previous work, especially intricate designs. Online reviews and social media can be excellent resources.
- Offers Clear Aftercare Advice: They should educate you on how to maintain your manicure at home.

Frequently Asked Questions (FAQ)
Q: Can a strong base coat alone prevent chipping on intricate designs? A: While a strong base coat is absolutely fundamental for adhesion, it's not a standalone solution for intricate designs. Intricate art often involves multiple layers and elements which can create weak points if not applied thinly, cured properly, and encapsulated. A robust base coat is the starting line, but proper application, encapsulation with builder gel, and a durable top coat are critical for the entire journey of a chip-free intricate design. Think of it as a team effort, not a solo player.
Q: Is it true that some intricate designs are just 'meant' to chip faster? A: This is a common misconception! While designs with very raised elements or sharp edges might be more prone to snagging if not perfectly encapsulated, no design is 'meant' to chip faster. The durability is a direct result of meticulous preparation, precise application, strategic layering, thorough encapsulation, quality products, and diligent aftercare. A truly skilled artist can make even the most elaborate designs incredibly durable. It's about technique, not inherent fragility of the art.
Q: How often should I reapply cuticle oil to maximize gel nail longevity? A: I recommend applying cuticle oil at least once daily, preferably before bed, to allow it to soak in overnight. However, for maximum longevity, especially if your hands are frequently exposed to water or dry environments, applying it two to three times a day can be significantly beneficial. Consistent hydration keeps the natural nail and surrounding skin flexible, preventing brittleness and reducing the chances of the gel lifting from the edges. It's a small habit with a huge impact.
Q: My gel art always chips at the free edge. What's the most common reason for this? A: Chipping at the free edge is almost always due to one of two reasons, or a combination: insufficient 'wrapping' or 'capping' of the free edge during application, and/or using your nails as tools. Every single layer – base, color, and especially top coat – must be sealed over the free edge to create a protective barrier against impact and moisture infiltration. Additionally, if you're frequently bumping your nail tips or using them to pry things open, even the best sealed free edge will eventually give way. Focus on both meticulous application and conscious aftercare.
Q: Can under-curing be a problem even if the gel feels hard? A: Absolutely, and it's a sneaky culprit! Gel can feel hard to the touch on the surface but still be under-cured deeper down, especially with thicker layers or inadequate lamp power. An under-cured gel will be weaker, more flexible than it should be, and prone to chipping, lifting, or dulling. It also poses a significant risk for developing gel allergies over time due to uncured monomers contacting the skin. Always adhere to manufacturer's recommended full cure times and ensure proper hand placement in a good quality lamp.
Key Takeaways and Final Thoughts
Preventing intricate gel nail art from chipping within a week is not a myth; it's an achievable standard when you approach it with knowledge, precision, and consistency. From my years in the industry, I've distilled the core principles that elevate a beautiful design to a truly enduring piece of art. It's about respecting the science of the products and the artistry of the application.
- Preparation is Paramount: Meticulous nail prep is the non-negotiable foundation for strong adhesion.
- Thin Layers & Thorough Curing: Avoid bulk and ensure every layer is fully polymerized for maximum strength.
- Encapsulation is Key: Seal intricate elements with builder gel or a robust top coat for protection.
- Top Coat is the Shield: Choose a high-quality top coat and apply it perfectly, always wrapping the free edge.
- Aftercare is Essential: Protect your nails from water, chemicals, and trauma; hydrate daily with cuticle oil.
- Invest in Quality: Professional-grade products and tools make a tangible difference in durability.
Embrace these practices, and you'll not only create stunning, intricate gel nail art but also ensure its longevity, bringing lasting joy and satisfaction to every manicure. Your commitment to these details will transform your results from fleeting beauty to enduring masterpieces. Keep learning, keep refining, and watch your artistry shine for weeks on end.
Recommended Reading
- Eco-Friendly Kids Clothes: Last Longer & Save You Money!
- Mastering Platinum: 7 Steps to Eliminate Porosity in Intricate Jewelry Casting
- 7 Key Challenges in 3D Body Scanning for Custom Fit & How to Overcome Them
- Most Flattering Denim Wash for Men: Look Your Best!
- Scaling Textile Recycling: 7 Strategies for Circular Fashion Profit

Your email address will not be published. Required fields are marked *