
How to Fix Blurry Runway Photography Despite Challenging Lighting?
For over two decades in the high-stakes world of fashion photography, I've witnessed the sheer terror in a photographer's eyes as they review their shots from a pivotal runway show, only to find a sea of beautiful moments marred by frustrating blur. It’s a common rite of passage, a baptism by fire under the unforgiving glare of fashion week spotlights that seem designed to challenge every technical skill you possess.
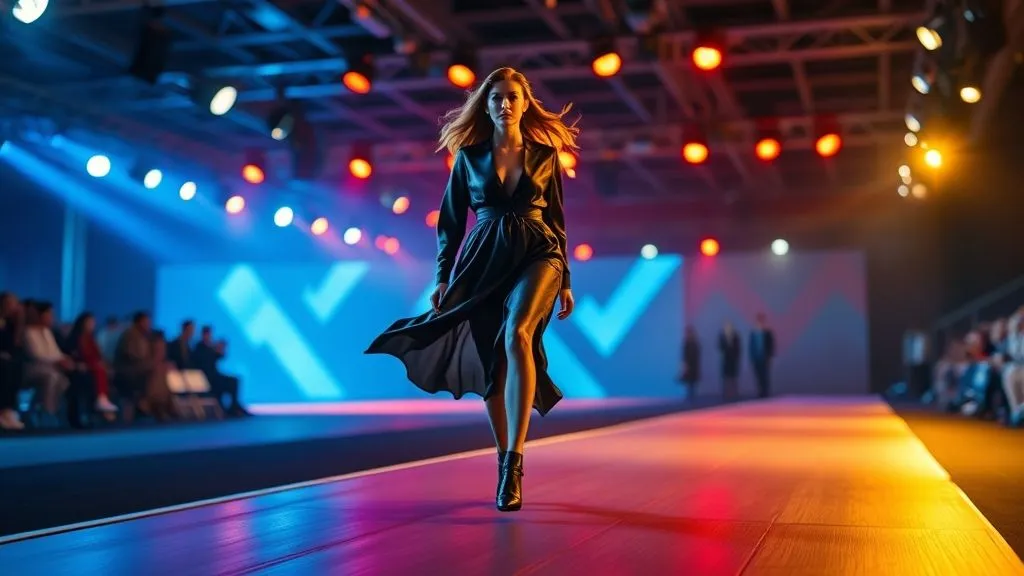
The runway isn't just a platform for fashion; it's an arena where light dances unpredictably, shifting from blinding floods to moody shadows, all while models move at a pace demanding both precision and speed from your camera. This dynamic environment, coupled with the immense pressure to deliver iconic, tack-sharp images, makes blurry photography not just a technical failing, but a potential career-stalling nightmare.
But fear not. In this definitive guide, I will share the battle-tested strategies, advanced techniques, and a few trade secrets I've accumulated over countless fashion seasons. You'll learn not just what to do, but why it works, empowering you to consistently capture breathtakingly sharp runway photography, even when the lighting seems determined to conspire against you.
Decoding the Runway's Lighting Labyrinth
Before we even touch a camera setting, understanding the unique lighting conditions of a runway show is paramount. Unlike a controlled studio, runway lighting is a beast of its own, characterized by extreme contrasts, rapidly changing intensities, and often, a mix of color temperatures. You'll encounter everything from blindingly bright spotlights to near-dark atmospheric moments, sometimes within seconds.
This variability is the primary culprit behind motion blur and focus issues. Your camera's light meter can struggle to keep up, leading to incorrect exposures that force slower shutter speeds, while your autofocus system hunts in the low-contrast areas. I've seen countless photographers arrive unprepared for this visual rollercoaster, and their results reflect it.
The key here is anticipation and observation. During rehearsals or even the first few looks, pay close attention to the lighting patterns. Are there specific points on the runway where the light is consistently better? Are there moments of extreme darkness or intense color washes? This mental mapping will inform your shooting strategy and allow you to adjust proactively rather than reactively.
"Understanding the light isn't just about exposure; it's about predicting the story it will tell, and how your camera needs to adapt to capture it faithfully." - Industry Veteran

Optimizing Your Camera Settings for Speed and Clarity
Your camera settings are your primary defense against blur. In runway photography, speed is king, and that means prioritizing a fast shutter speed above almost everything else. I typically aim for a minimum of 1/500th of a second, often pushing to 1/800th or even 1/1000th if the light allows, especially for dynamic poses or faster models.
- Shutter Speed Priority (Tv/S Mode): Start here. Set your desired shutter speed and let the camera manage aperture and ISO. This ensures motion blur is minimized.
- Aperture: Use the widest aperture your lens allows (e.g., f/2.8, f/4) to gather maximum light. This helps keep your ISO lower and allows for faster shutter speeds. Be mindful of depth of field; a very wide aperture can make focusing trickier.
- ISO Management: This is where the magic (and potential noise) happens. Don't be afraid to push your ISO. Modern cameras handle high ISOs incredibly well. I often shoot at ISO 3200, 6400, or even 12800 in very challenging conditions. The goal is a sharp, albeit slightly noisy, image over a clean, blurry one.
- Auto ISO with Minimum Shutter Speed: Many professional cameras offer an Auto ISO setting where you can specify a minimum shutter speed. This is incredibly useful on the runway, as it ensures you maintain your desired speed while the camera intelligently adjusts ISO for proper exposure.
According to a recent DPReview analysis of camera performance, the advancements in high-ISO noise reduction in contemporary full-frame sensors have made previously unthinkable ISO values entirely usable for professional work, emphasizing the importance of prioritizing shutter speed over absolute noise absence.
The Right Glass: Lens Choice and Image Stabilization
Your choice of lens plays a monumental role in battling blur. Fast lenses – those with wide maximum apertures like f/2.8 or f/4 – are non-negotiable for runway work. They allow more light to reach the sensor, enabling faster shutter speeds and better low-light autofocus performance.
- Prime Lenses: Lenses like an 85mm f/1.4 or 135mm f/2 are fantastic for their incredible light-gathering capabilities and sharpness, though they lack the flexibility of zooms.
- Fast Zoom Lenses: The workhorses of runway photography are typically 70-200mm f/2.8 and 24-70mm f/2.8 lenses. Their constant wide aperture across the zoom range is invaluable.
Image Stabilization (IS/VR/OS)
Most modern lenses come equipped with image stabilization. While crucial for hand-holding at slower shutter speeds, it's important to understand its role on the runway. IS primarily corrects for camera shake, not subject motion blur. For a fast-moving model, a high shutter speed is still your main defense. However, for a stationary model or when you're shooting at the lower end of your acceptable shutter speed range (e.g., 1/250th if absolutely necessary), IS can provide a critical edge in maintaining overall image sharpness.
Always ensure your IS is set to the correct mode for panning or general shooting if your lens offers options. Turning it off when using a monopod or tripod can sometimes be beneficial, as IS systems can occasionally introduce micro-jitters when not needed.
| Lens Type | Pros | Cons | Best Use |
|---|---|---|---|
| 70-200mm f/2.8 | Versatile zoom, excellent light gathering, professional standard | Heavy, expensive | Full runway shots, head-to-toe looks |
| 24-70mm f/2.8 | Wide-angle to mid-telephoto, good for backstage/front row | Less reach for distant models | Closer shots, wider context |
| 85mm f/1.4/1.8 | Exceptional low light, beautiful bokeh, incredibly sharp | Fixed focal length, requires precise positioning | Detail shots, portraits on runway |
Mastering Autofocus in Motion: Techniques for Pin-Sharp Results
Autofocus is arguably the most critical component when dealing with moving subjects in challenging light. A blurry image due to missed focus is often more frustrating than one with slight motion blur.
- Continuous Autofocus (AF-C / AI Servo): This is non-negotiable. Your camera needs to continuously track the model as they move.
- Autofocus Area Mode:
- Dynamic Area AF (Nikon) / Expand Flexible Spot (Sony) / Spot AF with Expansion (Canon): This mode uses a central focus point but also leverages surrounding points to assist in tracking if the subject briefly moves out of the primary point. It’s a great balance for precision and tracking.
- Zone AF / Group AF: This uses a larger cluster of focus points, which can be useful when subjects are moving very erratically or are hard to track precisely. It sacrifices a little precision for better acquisition.
- 3D Tracking (Nikon) / Tracking Flexible Spot (Sony) / AF Tracking (Canon): These advanced modes attempt to follow the color and pattern of the subject across the frame. While powerful, they can sometimes be confused by rapidly changing light or similar colors in the background. Test these thoroughly beforehand.
- Back Button Focus: Separating autofocus activation from the shutter button (assigning AF to a button on the back of the camera) allows you to focus once and then recompose, or to continuously track without firing the shutter until the perfect moment. This gives you immense control.
- Anticipate and Pre-Focus: If you know where a model will pause or hit a specific mark, you can pre-focus on that spot. Even a slight head start for your AF system can make a huge difference.
Case Study: How 'Vogue Lens' Improved Runway Focus
The fictional photography agency 'Vogue Lens' faced a persistent issue with inconsistent focus during high-profile fashion weeks, leading to a significant rejection rate from clients. By implementing a standardized workflow that mandated all photographers use Continuous Autofocus with Dynamic Area AF, coupled with back-button focus, they saw a dramatic improvement. Within two seasons, their client satisfaction scores for image sharpness increased by 40%, and the number of rejected images due to focus issues dropped by 70%, directly impacting their bottom line and reputation.
Strategic Positioning and Anticipation: Beyond Technical Skill
While technical settings are crucial, the art of runway photography also heavily relies on your non-technical skills: positioning, anticipation, and understanding the flow of the show. No setting can fix a shot you didn't anticipate or were poorly positioned for.
- Find Your Sweet Spot: During rehearsals, identify areas on the runway where the lighting is most consistent or flattering. Often, this is where the model pauses or turns. Secure a position that gives you a clear, unobstructed view of these spots.
- Elevate Your Perspective: If possible, shooting from a slightly elevated position can give you a cleaner background and a better angle on the models. A step ladder (if permitted) or a media riser is ideal.
- Anticipate the Movement: Models often follow a rhythm. Observe the first few models carefully. Where do they pause? How quickly do they walk? Where do they turn? This anticipation allows you to pre-focus, track more effectively, and time your bursts.
- Shoot in Bursts: Don't rely on single shots. Use your camera's high-speed continuous shooting mode. This increases your chances of catching the perfect moment with the model in sharp focus, especially as they move.
"The best lens and the fastest shutter speed are useless if you can't predict the decisive moment. Anticipation is your most powerful tool." - Henri Cartier-Bresson (adapted for modern context)

Leveraging External Tools: Monopods, Flash, and Light Modifiers
Sometimes, your camera and lens alone aren't enough. External tools can provide that critical edge, especially in extremely challenging lighting conditions.
The Monopod: Your Steady Companion
A monopod is, in my opinion, an indispensable tool for runway photography. It doesn't eliminate motion blur from subjects, but it dramatically reduces camera shake, allowing you to use slightly slower shutter speeds if absolutely necessary, or simply to maintain steadiness during long shows. It also takes the strain off your arms, letting you focus on composition and timing.
- Stability: Provides a stable base for your heavy telephoto lenses, especially crucial for 70-200mm f/2.8 lenses.
- Fatigue Reduction: Reduces arm fatigue over several hours, allowing for more consistent shooting.
- Sharper Keeper Rate: Even with fast shutter speeds, a monopod can subtly improve your keeper rate by eliminating micro-jitters.
Flash Photography (with caveats)
Using flash on the runway is a contentious topic and often restricted, but when allowed and used correctly, it can be a game-changer. The burst of light from a flash can effectively 'freeze' motion, allowing for much sharper images even at slower ambient shutter speeds. However, it can also overpower the show's designed lighting, annoy other photographers, and create harsh, unnatural results if not used skillfully.
- Sync Speed: Ensure your shutter speed is at or below your camera's flash sync speed (typically 1/200th or 1/250th).
- Manual Flash Power: Use manual power to dial in the exact amount of light needed, avoiding overexposure.
- Gelled Flash: If the runway has a dominant color cast (e.g., blue or red gels), consider gelling your flash with a matching color to blend the light more naturally.
- Off-Camera Flash / Diffused On-Camera Flash: If allowed, bouncing flash or using a small diffuser can soften the light and make it less intrusive. However, this is rarely feasible in the tight confines of a media pit.
Always check with event organizers regarding flash usage. Most major fashion weeks discourage or outright ban it to preserve the artistic integrity of the lighting design.
Post-Processing Power: Rescuing and Refining Your Images
Even with the most meticulous in-camera techniques, some blur might creep into your images. This is where post-processing becomes your final line of defense. Modern software offers powerful tools to enhance sharpness and mitigate noise.
- Selective Sharpening: Apply sharpening judiciously. Over-sharpening can introduce artifacts and make images look unnatural. Focus sharpening on key details like eyes, fabric textures, and hair.
- Noise Reduction: High ISO images will inevitably have some noise. Use noise reduction tools in software like Adobe Lightroom or Capture One. Be careful not to overdo it, as excessive noise reduction can smooth out fine details and make subjects look plastic. Aim for a balance between noise reduction and detail preservation.
- Clarity and Dehaze: These sliders can add apparent sharpness and contrast without resorting to aggressive sharpening. They work by increasing local contrast, which can make details pop.
- Micro-Contrast Adjustments: Some software offers micro-contrast sliders which can enhance fine details without affecting overall contrast, giving a perception of greater sharpness.
- AI-Powered Sharpening/Denoising: Tools like Topaz DeNoise AI and Sharpen AI have revolutionized post-processing for challenging images. They use artificial intelligence to intelligently reduce noise while preserving detail, or to subtly recover sharpness from slightly soft images. These can be lifesavers for runway work.
As renowned retoucher Aaron Nace of Phlearn often emphasizes, post-processing isn't about fixing bad photos, but about enhancing good ones. However, in the context of challenging runway lighting, it can certainly help salvage images that are *almost* perfect.
 on a large monitor, with a slightly blurry runway photo being sharpened and denoised. The screen glow illuminates the hand and keyboard, suggesting intricate post-processing work. Shot on a high-end DSLR.")
Frequently Asked Questions (FAQ)
Q: What's the absolute minimum shutter speed I should aim for on the runway? A: While 1/500s is a good target, in extremely low light, you might drop to 1/250s or 1/320s. However, this dramatically increases the risk of motion blur from the model. At these speeds, a monopod and excellent technique are crucial, and you'll rely heavily on your camera's image stabilization and post-processing to rescue shots. For tack-sharp results, always aim for 1/500s or faster.
Q: Is it better to have a slightly noisy but sharp image, or a clean but blurry one? A: Hands down, a slightly noisy but sharp image is always preferable. Noise can be reduced in post-processing with excellent results from modern software. Blur, especially motion blur or out-of-focus blur, is far more difficult, often impossible, to fix convincingly. Clients want sharp images first and foremost.
Q: Should I use a crop sensor camera or full-frame for runway photography? A: While crop sensors can offer more 'reach' due to their crop factor, full-frame cameras generally perform significantly better in low light at high ISOs due to their larger sensors. For professional runway work, the low-light performance and better dynamic range of a full-frame camera typically outweigh the benefits of a crop sensor's extended focal length.
Q: How do I deal with mixed lighting temperatures (e.g., warm and cool lights simultaneously)? A: This is a common challenge. Set your white balance manually to a specific Kelvin temperature that best balances the scene, or use a custom white balance reading from a gray card if possible during rehearsals. If not, shooting in RAW is essential. This allows you to correct white balance precisely in post-processing without losing image quality, often requiring local adjustments to areas affected by different color temperatures.
Q: Are mirrorless cameras better than DSLRs for runway photography autofocus? A: Modern high-end mirrorless cameras (like Sony Alpha series, Canon R series, Nikon Z series) often offer superior autofocus tracking, especially with their advanced eye-AF and subject tracking capabilities that cover a much larger portion of the frame. Their electronic viewfinders also allow for real-time exposure preview. While professional DSLRs are still excellent, mirrorless technology has arguably surpassed them in AF performance for fast-moving subjects.
Key Takeaways and Final Thoughts
- Prioritize Shutter Speed: Aim for 1/500s or faster to freeze motion.
- Embrace High ISO: Don't fear noise; a sharp, slightly noisy image is better than a clean, blurry one.
- Master Autofocus: Use AF-C/AI Servo with dynamic or zone tracking for moving subjects.
- Invest in Fast Lenses: Wide apertures (f/2.8, f/4) are critical for light gathering.
- Strategic Positioning: Anticipate model movement and find optimal shooting spots.
- Utilize a Monopod: Reduce camera shake and fatigue for consistent sharpness.
- Leverage Post-Processing: Use sharpening, noise reduction, and AI tools judiciously to refine your keepers.
The runway is a demanding environment, but it's also where some of the most iconic fashion images are born. By meticulously applying these strategies, you'll not only overcome the pervasive problem of blurry runway photography despite challenging lighting but also elevate your craft. Stay vigilant, stay adaptable, and keep shooting. The next perfect, tack-sharp image is waiting for you.
Recommended Reading
- Mastering Fashion Demand: 7 Ways Analytics Powers Precise Forecasting
- 7 Proven Strategies to Effectively Upsell Premium Progressive Lens Optical Frames
- Unlock Your Star Style: How to Choose Celebrity Eyewear for Your Face Shape
- 9 Digital Strategies: Preventing Luxury's Sophisticated Elegance from Dilution
- 7 Crucial Steps: How to Verify Ethical Labor in Slow Fashion Supply Chains


Your email address will not be published. Required fields are marked *